Did you know you can render a mesh... without any mesh?
I will explain:
What is a procedural draw?
How is it used?
How to use it in Unity.
How to write shaders for procedural draws - generating meshes on the fly.
Step-by-step explanation of how I created a tornado using a procedural draw.
A few optimization steps that make rendering more than 10x faster.
___
What is a procedural draw call
A procedural draw call is a draw call that doesn't use any mesh as input...
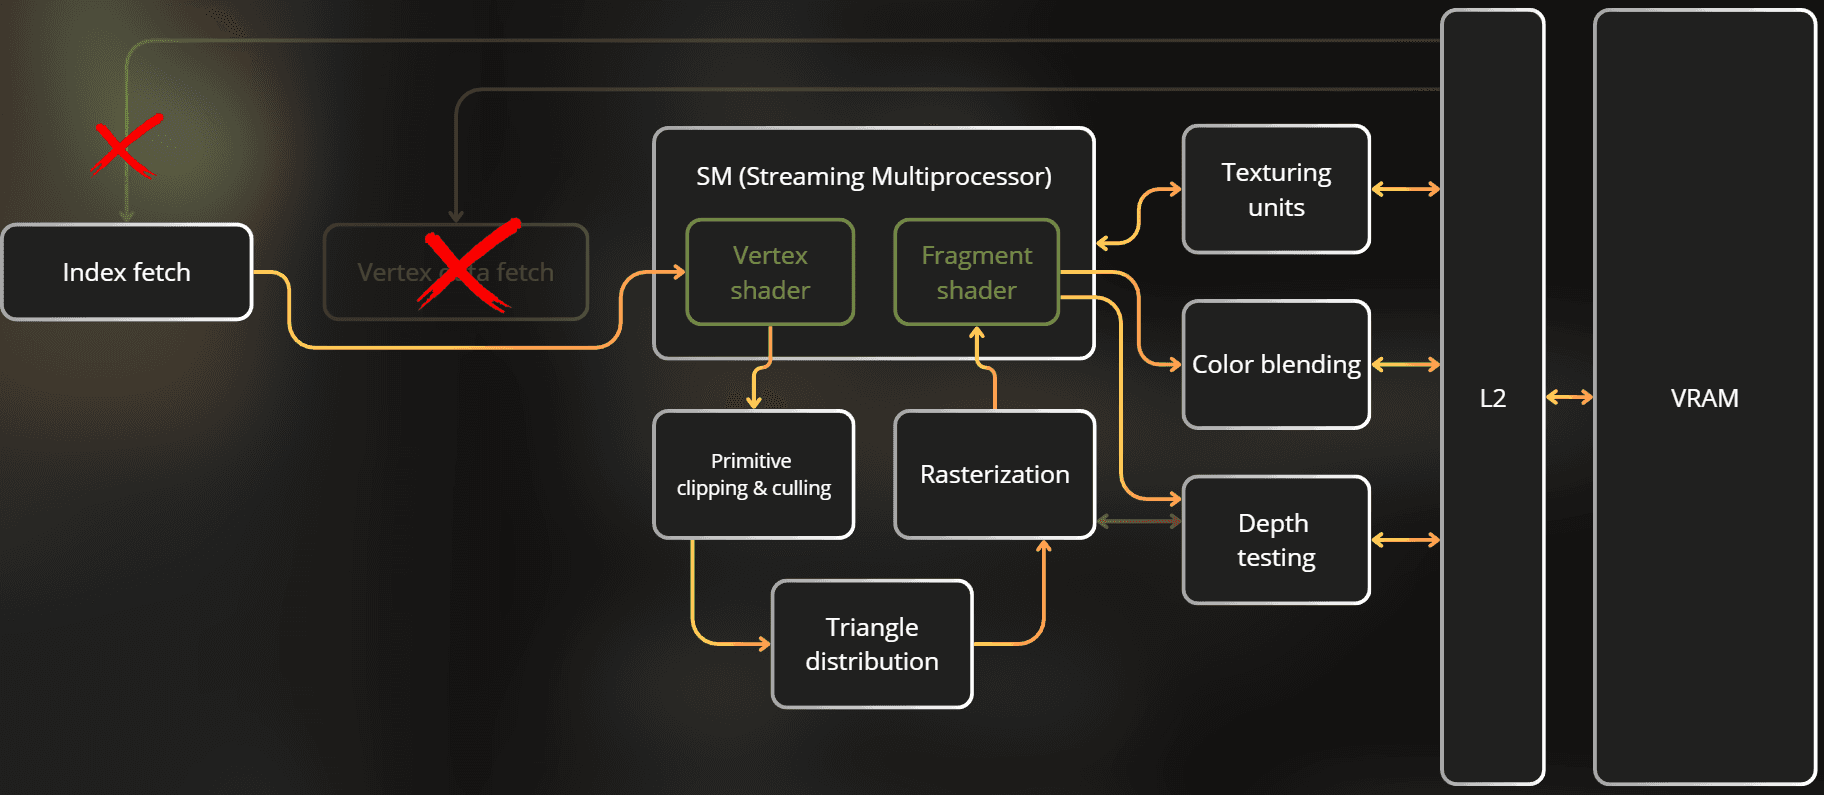
How does that work? The GPU pipeline is designed so it can execute a draw without reading any mesh data. In this case, the GPU pipeline completely skips the Vertex Attribute Fetch stage and only vertex ID and instance ID are provided to the vertex shader.
Below is a visualization of how the GPU works if you don't provide any mesh for a draw call. Vertex Attribute Fetch is completely skipped, and Index Fetch provides only the vertex IDs instead of reading indices from memory:
___
If there is no mesh, how can I render anything?
Instead of using vertex attributes as the shader input, I only use SV_VertexID and SV_InstanceID, like this:
struct VertexData
{
	uint vertexID : SV_VertexID;
	uint instanceID : SV_InstanceID
struct VertexData
{
	uint vertexID : SV_VertexID;
	uint instanceID : SV_InstanceID
struct VertexData
{
	uint vertexID : SV_VertexID;
	uint instanceID : SV_InstanceID
I can use these attributes to procedurally generate vertex properties like normal, tangent, UV, and of course - position. This way, the vertex shader generates the mesh on the fly.
___
How is it used?
With procedural draws, I don't need to create a mesh on the CPU, which saves mesh handling code.
The most common use case for me is stateless particles. The concept works like this:
Based on SV_VertexID, I generate a simple mesh.
Based on SV_InstanceID, I randomize each instance, e.g., by hashing the instance ID to modify position.
I use a time variable to animate each particle.
Example quad generated from 6 vertices (2 triangles × 3 vertices each):
Using instance ID and time to modify the position of each quad:
Other scenarios where I often use procedural draws:
Fullscreen draws.
Any shape that can be easily generated procedurally using only vertex ID, where I need to tweak the vertex count. This avoids mesh rebuilding logic.
Here I will focus only on stateless particles.
___
How to execute a procedural draw in Unity
So, how do you execute a procedural draw in Unity?
There are no built-in components for this. Fortunately, there's a simple API to implement it.
___
Procedural draws - rendering API in Unity
I can use the Graphics API, which works like immediate mode rendering.
This API internally places a virtual renderer in the scene for a single frame. This virtual renderer is then included in culling, layer filtering, shadowcasting, and all other Unity internals. This is the safest approach.
When you use the Graphics API, the depth-only, shadowcaster, forward, and deferred passes of your shaders integrate correctly with the render pipeline. The rendered content is also included in culling/filtering and other engine tasks - highly recommended.

You can also use a Command Buffer for lower-level rendering work. It works the same way but completely skips engine-related renderer management. It's on you to handle render targets, invoke the correct shader pass, etc.
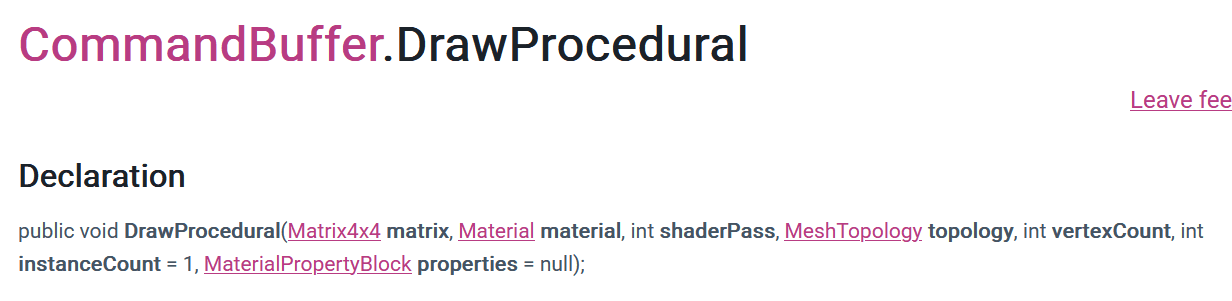
Notice that both APIs don't use any mesh. Instead, they require you to provide MeshTopology, vertex count, and instance count.
For mesh topology, I use triangles most often, which means every 3 consecutive vertices create a single triangle. For example, if you want to render a quad, you need 6 vertices.
___
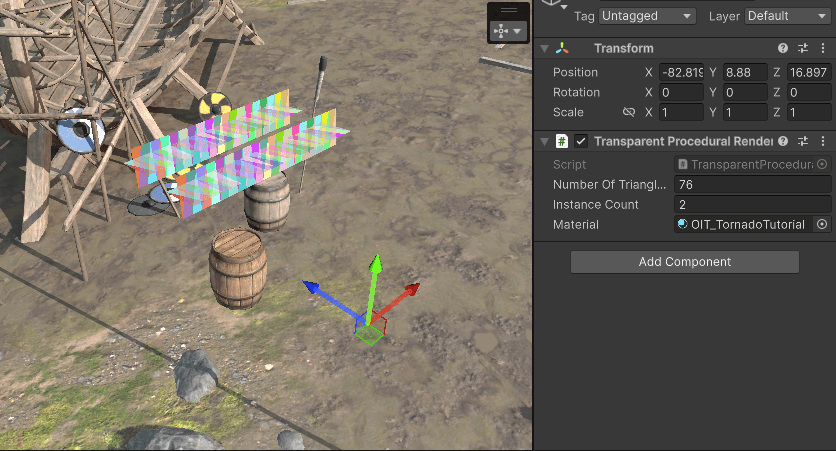
How I implemented my custom procedural renderer
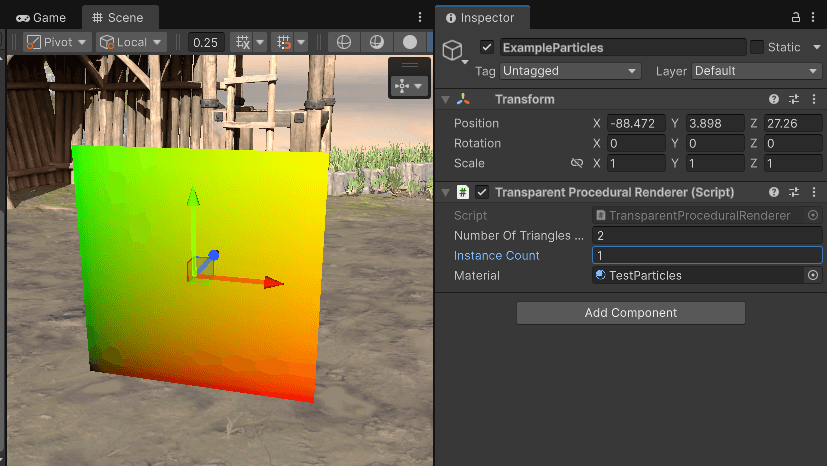
Now I'll show you how I implemented this component in Unity. It allows me to use a specific material to render a procedural mesh. I just select the number of instances and triangles, and the shader does the rest.
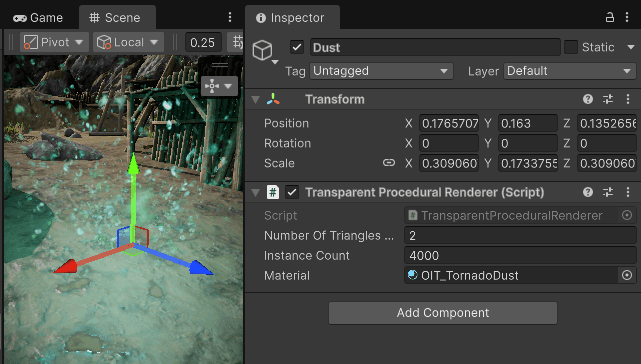
It only uses 3 properties, which are self-explanatory.
Number of triangles per instance.
Instance count.
Material.
This is the source code. It only registers the renderer to a global collection.
using System.Collections.Generic;
using UnityEngine;
[ExecuteAlways]
public class TransparentProceduralRenderer : MonoBehaviour
{
private readonly static List<TransparentProceduralRenderer> allInstances = new();
public static IReadOnlyList<TransparentProceduralRenderer> AllInstances => allInstances;
public int numberOfTrianglesPerInstance;
public int instanceCount;
public Material material;
protected void OnEnable()
{
allInstances.Add(this);
}
protected void OnDisable()
{
allInstances.Remove(this
I use a custom render feature to render procedural meshes into custom render targets, so I use the lower-level CommandBuffer API.
Rendering is simple. I set the render target, iterate through all renderers, and execute one draw call for each:
for (int i = 0; i < TransparentProceduralRenderer.AllInstances.Count; i++)
{
TransparentProceduralRenderer proceduralRenderer = TransparentProceduralRenderer.AllInstances[i];
if (proceduralRenderer.numberOfTrianglesPerInstance < 1 ||
proceduralRenderer.instanceCount < 1 ||
proceduralRenderer.material == null)
continue;
propertyBlock.SetInteger(Uniforms._TriangleCount, proceduralRenderer.numberOfTrianglesPerInstance);
propertyBlock.SetInteger(Uniforms._InstanceCount, proceduralRenderer.instanceCount);
Matrix4x4 localToWorldMatrix = proceduralRenderer.transform.localToWorldMatrix;
cmd.DrawProcedural(
localToWorldMatrix,
proceduralRenderer.material,
0,
MeshTopology.Triangles,
proceduralRenderer.numberOfTrianglesPerInstance * 3,
proceduralRenderer.instanceCount,
propertyBlock
___
Implementation context
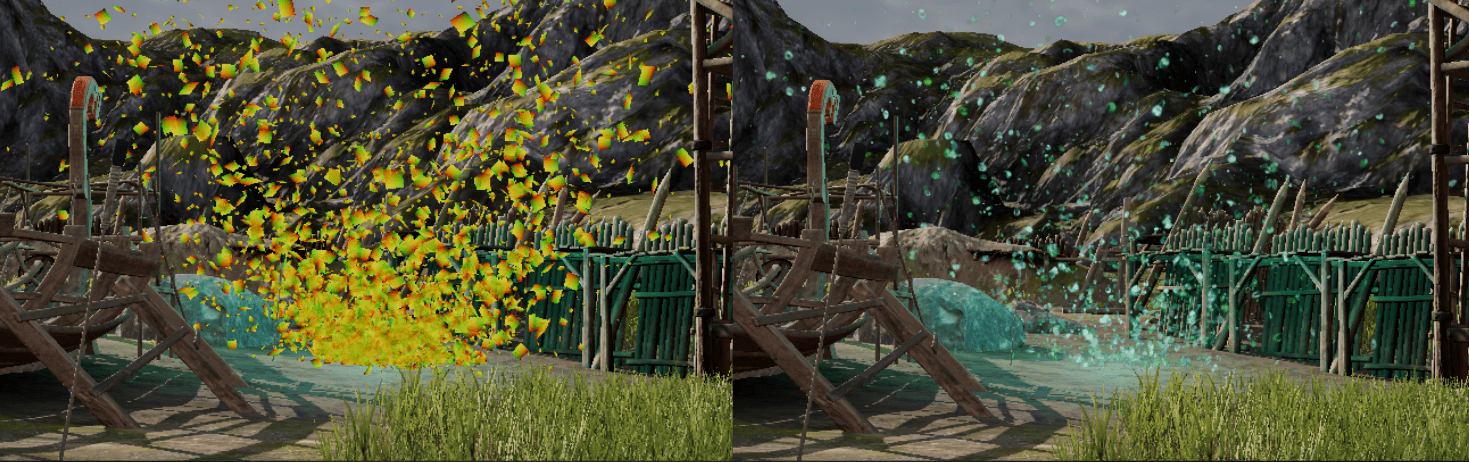
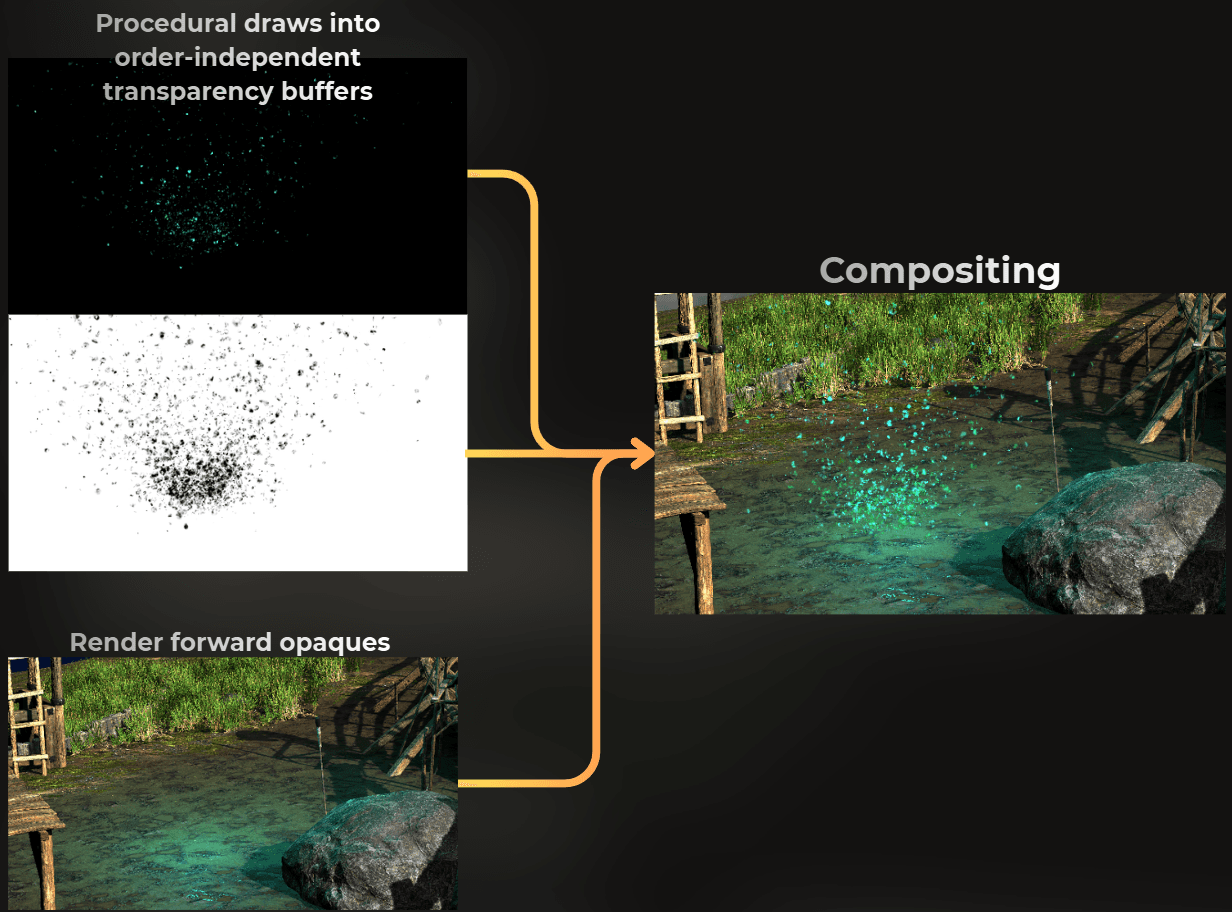
I use order-independent transparency to render the particles. This technique doesn't require sorting particles back-to-front, which is super useful for procedural particles.
I render the procedural draws into two color buffers. Then, these buffers are composited to create the final frame.
This rendering technique is described here: https://casual-effects.blogspot.com/2014/03/weighted-blended-order-independent.html
___
How to write the shader for procedural draw?
Here I will show you how to write shaders for procedural draws, starting with a simple quad and building up to more complex effects.
___
Rendering a single quad
First, I ensure that the vertex shader uses only VertexID and InstanceID as input:
struct VertexData
{
	uint vertexID : SV_VertexID;
	uint instanceID : SV_InstanceID
struct VertexData
{
	uint vertexID : SV_VertexID;
	uint instanceID : SV_InstanceID
struct VertexData
{
	uint vertexID : SV_VertexID;
	uint instanceID : SV_InstanceID
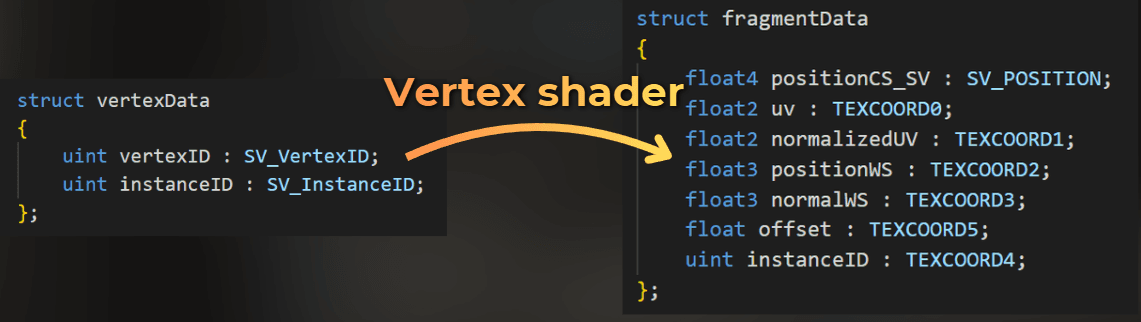
The vertex shader needs to output position on the screen. I'll also output UV and world-space position.
struct FragmentData
{
	float4 positionCS_SV : SV_POSITION;
	float2 uv : TEXCOORD0;
	float3 positionWS : TEXCOORD1
struct FragmentData
{
	float4 positionCS_SV : SV_POSITION;
	float2 uv : TEXCOORD0;
	float3 positionWS : TEXCOORD1
struct FragmentData
{
	float4 positionCS_SV : SV_POSITION;
	float2 uv : TEXCOORD0;
	float3 positionWS : TEXCOORD1
In the vertex shader, I use the vertex ID to create a quad. I defined a static constant array of quad UVs in the shader code. I use the vertex ID to pick the UV, then use this UV to generate object-space position for each vertex.
static const float2 quadUVs[] =
{
float2(0.0, 0.0),
float2(0.0, 1.0),
float2(1.0, 1.0),
float2(0.0, 0.0),
float2(1.0, 1.0),
float2(1.0, 0.0)
};
FragmentData vert(VertexData input)
{
FragmentData output;
float2 uv = quadUVs[input.vertexID % 6];
float4 positionOS = float4(uv.xy - 0.5, 0.0, 1.0);
output.positionCS_SV = TransformObjectToHClip(positionOS.xyz);
output.positionWS = TransformObjectToWorld(positionOS.xyz);
output.uv = uv;
return output
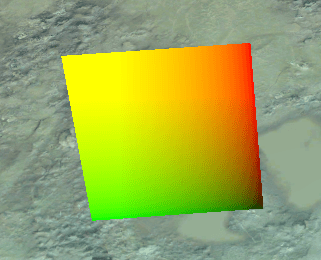
In the fragment shader, I just render the UV to verify the quad is correctly created.
void frag(FragmentData input, out float4 OUT_Accumulated : SV_Target0, out float4 OUT_Reveal : SV_Target1)
{
float4 color = float4(input.uv, 0.0, 1.0);
RenderOrderIndependentTransparency(color, input.positionWS, OUT_Accumulated, OUT_Reveal
void frag(FragmentData input, out float4 OUT_Accumulated : SV_Target0, out float4 OUT_Reveal : SV_Target1)
{
float4 color = float4(input.uv, 0.0, 1.0);
RenderOrderIndependentTransparency(color, input.positionWS, OUT_Accumulated, OUT_Reveal
void frag(FragmentData input, out float4 OUT_Accumulated : SV_Target0, out float4 OUT_Reveal : SV_Target1)
{
float4 color = float4(input.uv, 0.0, 1.0);
RenderOrderIndependentTransparency(color, input.positionWS, OUT_Accumulated, OUT_Reveal
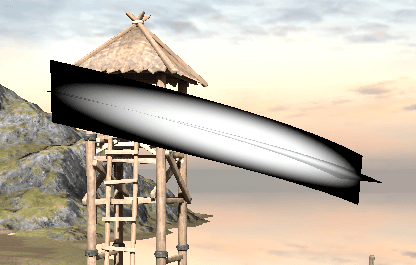
And this is what a single instance of this quad looks like:
___
Randomizing the instances
Now the problem is that no matter how many instances I render, they're all in the same place. Let's see how to randomize each instance.
I'll add the instanceID to the position:
positionOS.z += input.instanceID
positionOS.z += input.instanceID
positionOS.z += input.instanceID
The result:
Now I can randomize the position of each quad by hashing the instance ID. Here's an example:
float4 randomPerInstance = FastHash41(input.instanceID);
positionOS.xyz *= randomPerInstance.a;
positionOS.xyz += (randomPerInstance.xyz - 0.5) * 5.0
float4 randomPerInstance = FastHash41(input.instanceID);
positionOS.xyz *= randomPerInstance.a;
positionOS.xyz += (randomPerInstance.xyz - 0.5) * 5.0
float4 randomPerInstance = FastHash41(input.instanceID);
positionOS.xyz *= randomPerInstance.a;
positionOS.xyz += (randomPerInstance.xyz - 0.5) * 5.0
___
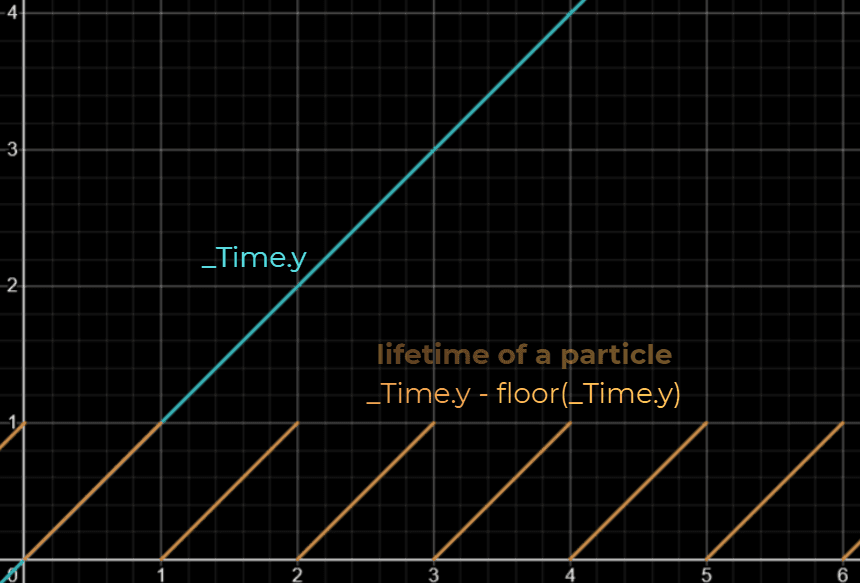
Lifetime of each instance
To make each instance animate as a particle, I use a time property in the shader to get the lifetime of each particle and its modified ID.
This is how I generate the lifetime of each quad:
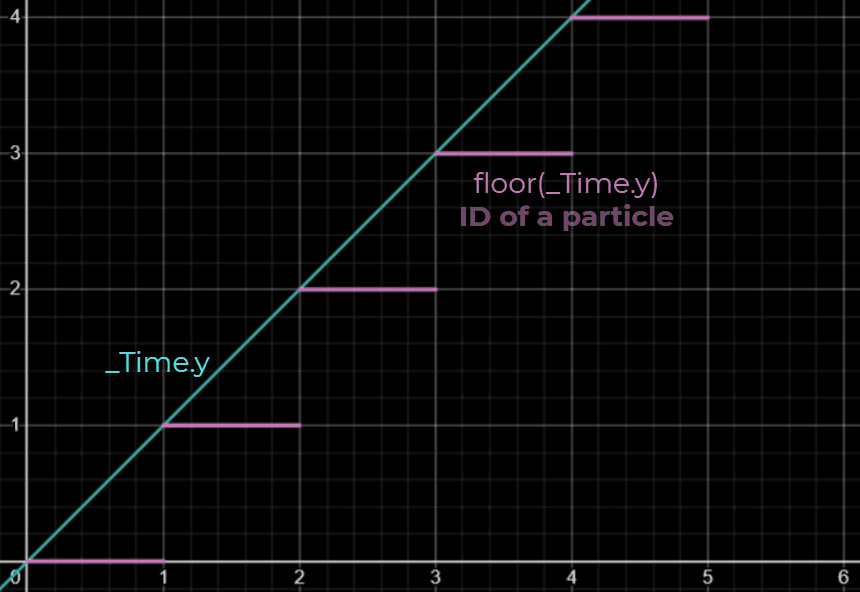
And this is a value that will be unique for each lifetime cycle:
The shader implementation looks like this:
float timePerInstance = _Time.y + FastHash41(input.instanceID * 7 + 8932).r;
float particleLifetime = timePerInstance - floor(timePerInstance);
float particleLifetimeID = floor(timePerInstance);
float particleInstanceID = input.instanceID * 13 + particleLifetimeID * 197;
float4 randomPerInstance = FastHash41(particleInstanceID
And this is how it looks when I render the lifetime as color.

___
Movement, fade-in and fade-out
Now I can use this lifetime to add movement and fade-out to alpha transparency:
positionOS.y += -pow(particleLifetime, 2.0) * 4.0
positionOS.y += -pow(particleLifetime, 2.0) * 4.0
positionOS.y += -pow(particleLifetime, 2.0) * 4.0
color.a = smoothstep(0.5, 0.3, abs(input.particleLifetime - 0.5
color.a = smoothstep(0.5, 0.3, abs(input.particleLifetime - 0.5
color.a = smoothstep(0.5, 0.3, abs(input.particleLifetime - 0.5

I made each quad thinner and faster, and used the default particle texture. Here's the result:
___
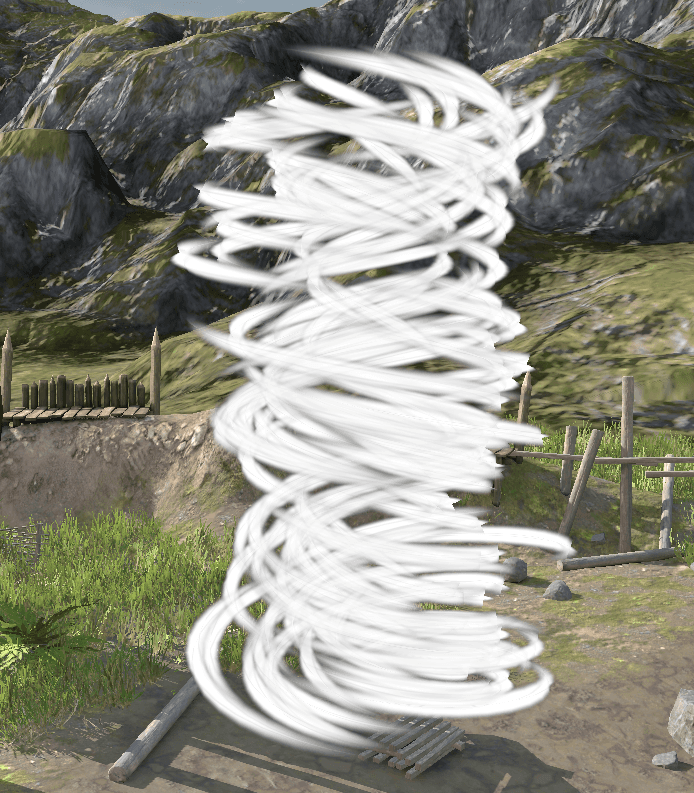
Implementing a tornado!
Now, let's jump into a more advanced example - implementing a tornado.
Here are the implementation steps, and I will go through one by one, explaining the whole process in detail.
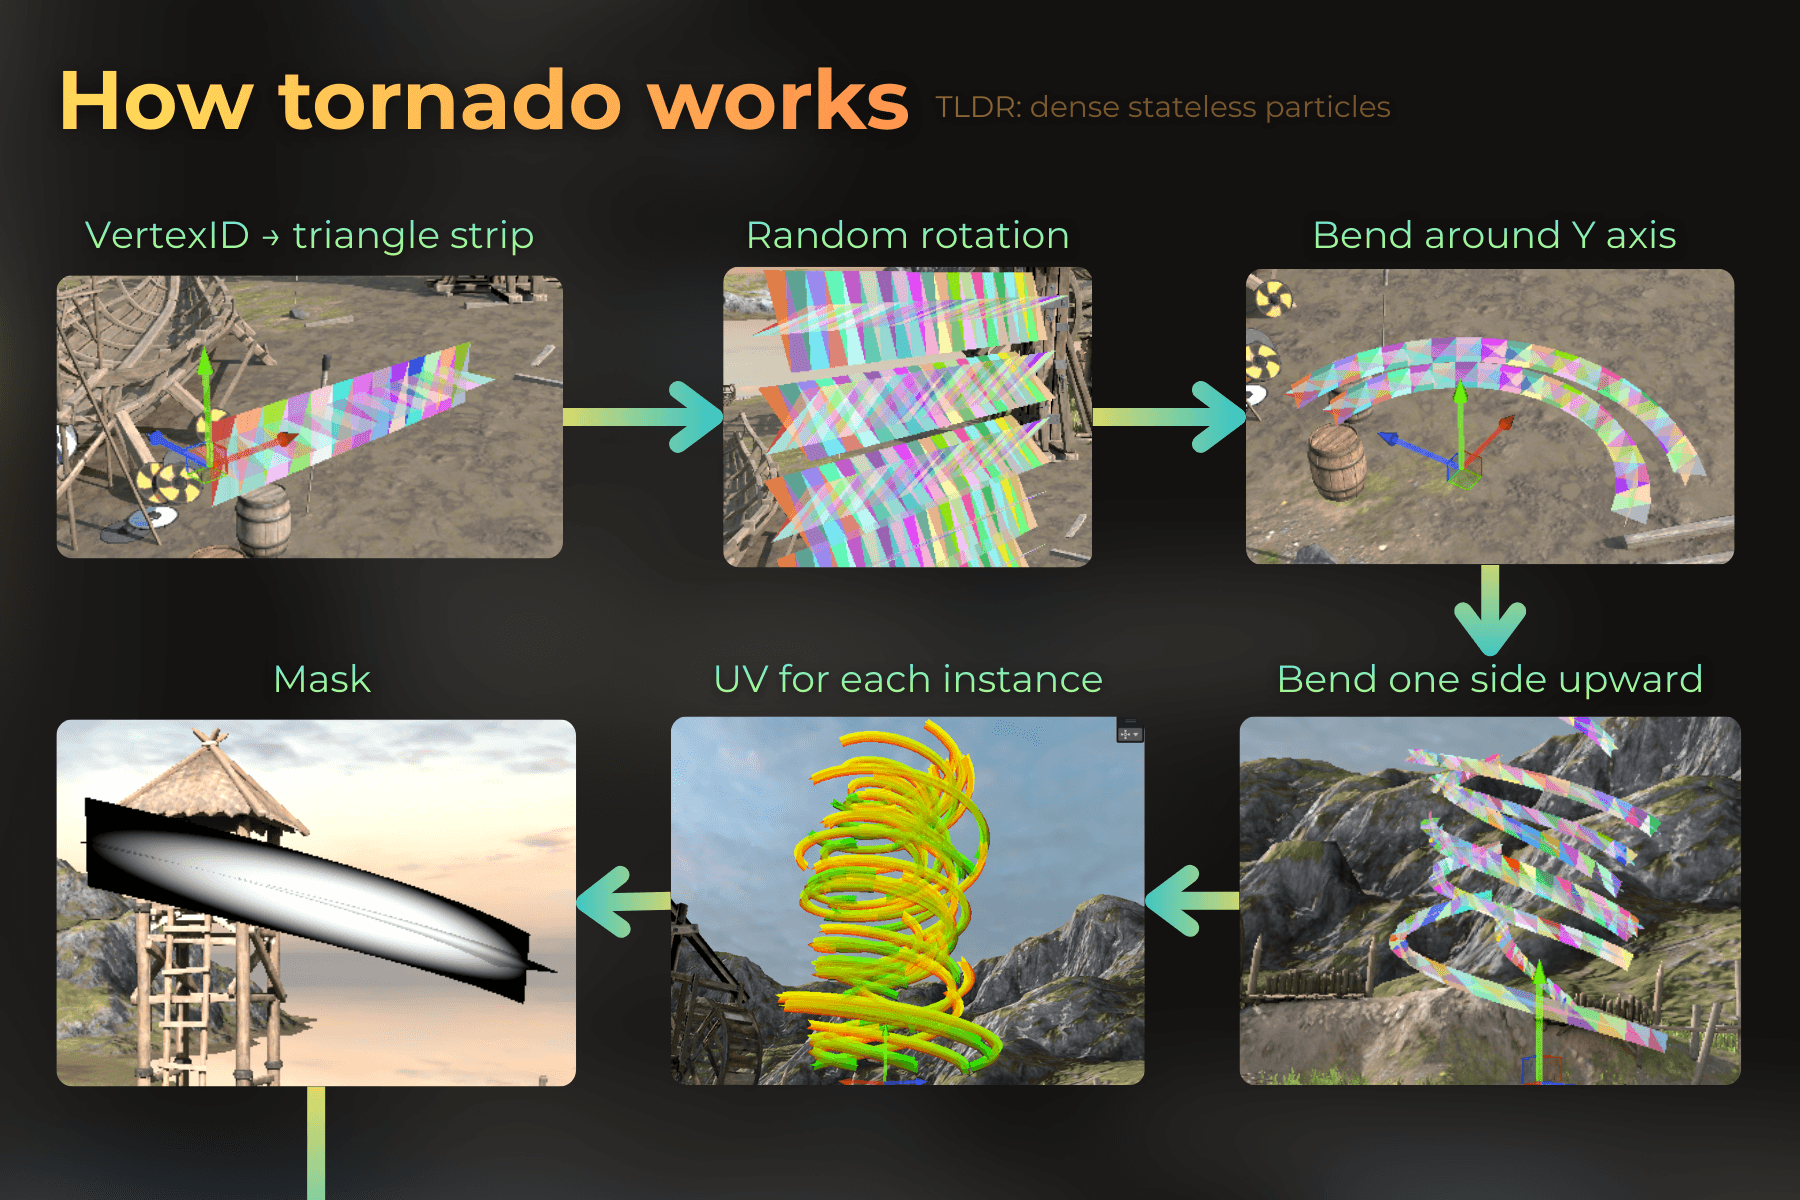
Let's start the implementation!
___
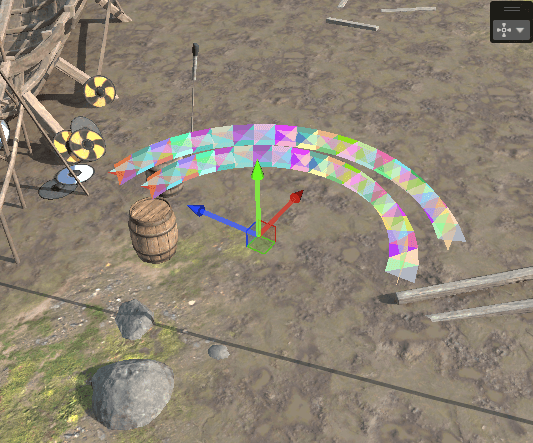
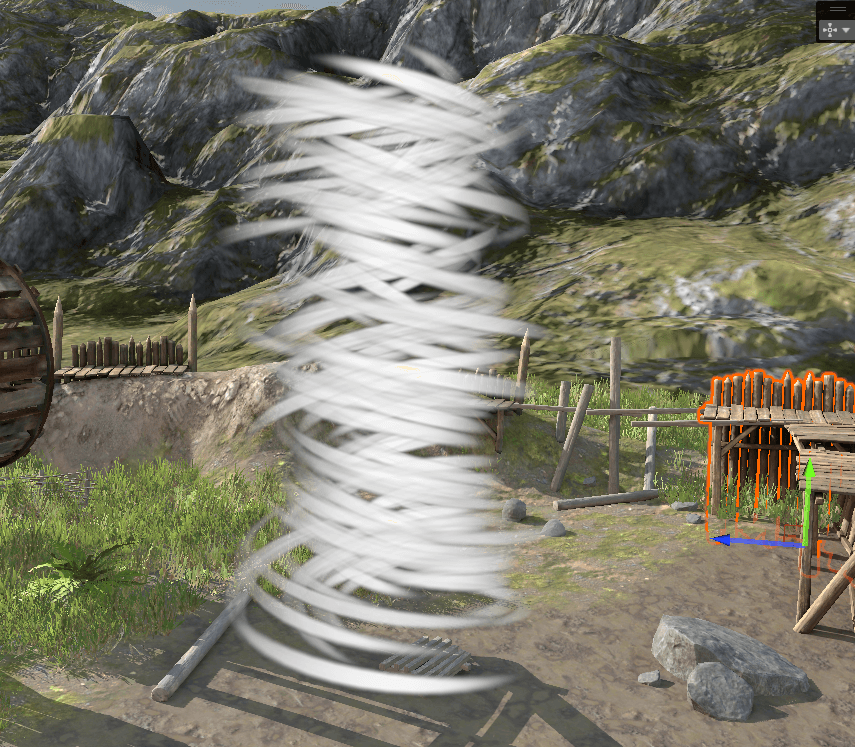
Rendering a triangle strip
First, I needed to figure out how to convert the vertex ID into a triangle strip. The triangle strip is made using multiple quads (segments). Two quads cross each other to create a segment. The density of segments depends on the number of triangles in a single instance.
I generated object-space position and normal.
float stripLength = _TriangleCount / 4.0f;
uint segmentID = input.vertexID / 12;
uint quadID = input.vertexID / 6;
float2 uv = quadUVs[input.vertexID % 6] + float2((float)segmentID, 0.0);
float2 normalizedUV = uv.xy * float2(1.0 / stripLength, 1.0);
float3 positionOS = float3((normalizedUV.xy - float2(0.0, 0.5)) * float2(_StripLength, _StripWidth), 0.0);
float3 normalOS = float3(0.0, 0.0, -1.0);
if (quadID % 2 == 0)
{
positionOS.yz = positionOS.zy * float2(-1.0, 1.0);
normalOS.yz = normalOS.zy * float2(-1.0, 1.0
Visualized generated primitives (hashed SV_PrimitiveID) in the fragment shader:
void frag(FragmentData input, uint primitiveID : SV_PrimitiveID, out float4 OUT_Accumulated : SV_Target0, out float4 OUT_Reveal : SV_Target1)
{
	float4 randomPerPrimitive = FastHash41(primitiveID);
	float4 color = float4(randomPerPrimitive.rgb, 1.0
void frag(FragmentData input, uint primitiveID : SV_PrimitiveID, out float4 OUT_Accumulated : SV_Target0, out float4 OUT_Reveal : SV_Target1)
{
	float4 randomPerPrimitive = FastHash41(primitiveID);
	float4 color = float4(randomPerPrimitive.rgb, 1.0
void frag(FragmentData input, uint primitiveID : SV_PrimitiveID, out float4 OUT_Accumulated : SV_Target0, out float4 OUT_Reveal : SV_Target1)
{
	float4 randomPerPrimitive = FastHash41(primitiveID);
	float4 color = float4(randomPerPrimitive.rgb, 1.0

___
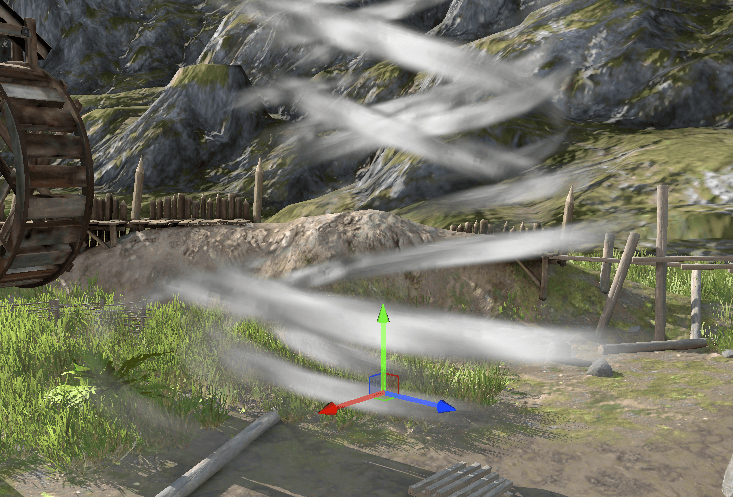
Randomizing rotation around X axis
Then I ensured that each triangle strip instance is rotated randomly around the X axis.
float xAngle = randomPerInstance.x * 6.28 / 4.0;
float2x2 meshRotationMatrix = float2x2(cos(xAngle), sin(xAngle), -sin(xAngle), cos(xAngle));
positionOS.yz = mul(meshRotationMatrix, positionOS.yz);
normalOS.yz = mul(meshRotationMatrix, normalOS.yz);
positionOS.y += input.instanceID * 0.2
float xAngle = randomPerInstance.x * 6.28 / 4.0;
float2x2 meshRotationMatrix = float2x2(cos(xAngle), sin(xAngle), -sin(xAngle), cos(xAngle));
positionOS.yz = mul(meshRotationMatrix, positionOS.yz);
normalOS.yz = mul(meshRotationMatrix, normalOS.yz);
positionOS.y += input.instanceID * 0.2
float xAngle = randomPerInstance.x * 6.28 / 4.0;
float2x2 meshRotationMatrix = float2x2(cos(xAngle), sin(xAngle), -sin(xAngle), cos(xAngle));
positionOS.yz = mul(meshRotationMatrix, positionOS.yz);
normalOS.yz = mul(meshRotationMatrix, normalOS.yz);
positionOS.y += input.instanceID * 0.2
___
Warping each instance around Y axis
Now I want to warp each strip around the Y axis. For this, I offset each instance a bit from the Y axis:
float offset = 0.0;
offset += lerp(0.2, 1.3, sqrt(randomPerInstance.y));
offset += lerp(0.0, 1.0, pow(randomPerInstance.z, 8.0));
offset += lerp(0.0, 0.7, pow(randomPerInstance.w, 4.0));
positionOS.z = max(0.0, positionOS.z + offset
float offset = 0.0;
offset += lerp(0.2, 1.3, sqrt(randomPerInstance.y));
offset += lerp(0.0, 1.0, pow(randomPerInstance.z, 8.0));
offset += lerp(0.0, 0.7, pow(randomPerInstance.w, 4.0));
positionOS.z = max(0.0, positionOS.z + offset
float offset = 0.0;
offset += lerp(0.2, 1.3, sqrt(randomPerInstance.y));
offset += lerp(0.0, 1.0, pow(randomPerInstance.z, 8.0));
offset += lerp(0.0, 0.7, pow(randomPerInstance.w, 4.0));
positionOS.z = max(0.0, positionOS.z + offset
Now I use the X component of each vertex to bend it around the Y axis.
float bendAngle = positionOS.x * lerp(0.8, 1.2, instanceHash);
float2x2 bendMatrix = float2x2(cos(bendAngle), sin(bendAngle), -sin(bendAngle), cos(bendAngle));
positionOS.x = 0.0;
positionOS.xz = mul(bendMatrix, positionOS.xz);
normalOS.xz = mul(bendMatrix, normalOS.xz
float bendAngle = positionOS.x * lerp(0.8, 1.2, instanceHash);
float2x2 bendMatrix = float2x2(cos(bendAngle), sin(bendAngle), -sin(bendAngle), cos(bendAngle));
positionOS.x = 0.0;
positionOS.xz = mul(bendMatrix, positionOS.xz);
normalOS.xz = mul(bendMatrix, normalOS.xz
float bendAngle = positionOS.x * lerp(0.8, 1.2, instanceHash);
float2x2 bendMatrix = float2x2(cos(bendAngle), sin(bendAngle), -sin(bendAngle), cos(bendAngle));
positionOS.x = 0.0;
positionOS.xz = mul(bendMatrix, positionOS.xz);
normalOS.xz = mul(bendMatrix, normalOS.xz
Now let's move one end up so it looks more like a spiral:
float moveUpOffset = bendAngle * 0.48 * lerp(0.8, 1.2, randomPerInstance3.x) + randomPerInstance3.y * 6.0;
positionOS.y += moveUpOffset
float moveUpOffset = bendAngle * 0.48 * lerp(0.8, 1.2, randomPerInstance3.x) + randomPerInstance3.y * 6.0;
positionOS.y += moveUpOffset
float moveUpOffset = bendAngle * 0.48 * lerp(0.8, 1.2, randomPerInstance3.x) + randomPerInstance3.y * 6.0;
positionOS.y += moveUpOffset
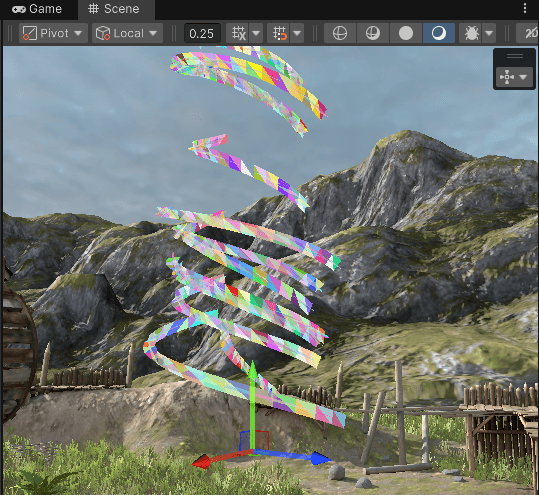
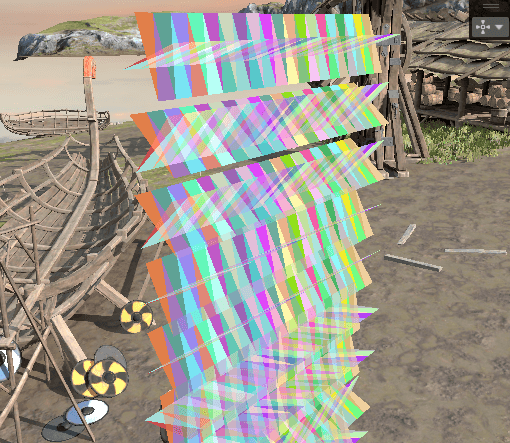
Currently, every triangle strip starts from the same angle. I want to randomize that by rotating all instances randomly around the Y axis. This rotation will be animated.
float rotateAngle = -_Time.y * _TimeScale * 0.2 * lerp(0.8, 1.2, randomPerInstance2.y) * randomPerInstance2.z + randomPerInstance2.w * 6.18;
float2x2 rotateMatrix = float2x2(cos(rotateAngle), sin(rotateAngle), -sin(rotateAngle), cos(rotateAngle));
positionOS.xz = mul(rotateMatrix, positionOS.xz);
normalOS.xz = mul(rotateMatrix, normalOS.xz

___
Texturing each instance
Before moving forward, I want to edit the fragment shader to texture the strips more nicely. Each instance has a normalized UV:
I'll use this UV to texture the strips. First, I procedurally generate a mask for the strip edges:
float disk = smoothstep(0.5, 0.2, distance(input.normalizedUV, float2(0.5, 0.5)));
color.rgb = disk
float disk = smoothstep(0.5, 0.2, distance(input.normalizedUV, float2(0.5, 0.5)));
color.rgb = disk
float disk = smoothstep(0.5, 0.2, distance(input.normalizedUV, float2(0.5, 0.5)));
color.rgb = disk
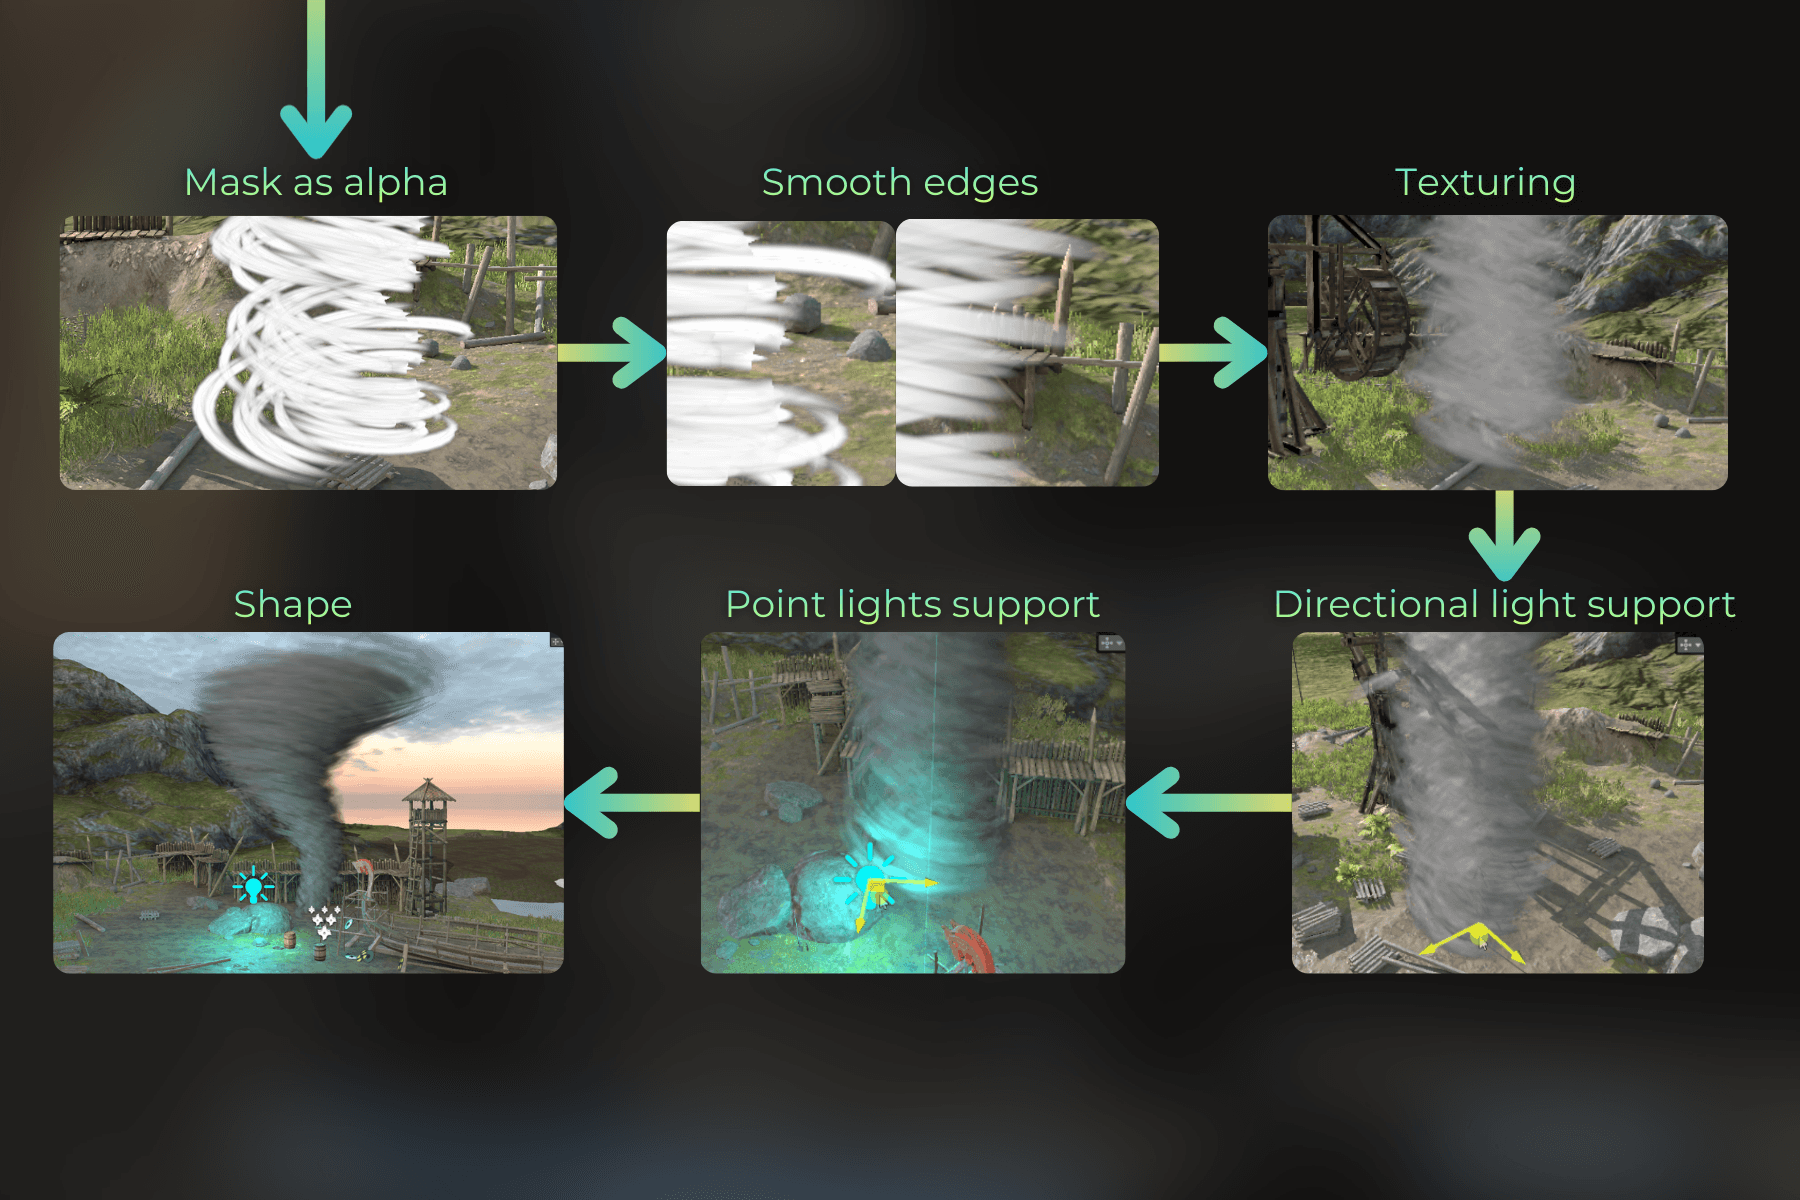
And when I use it as an alpha:
Now, I don't like how the edges look - too sharp. You can see the cross-like shape of each instance. I'll use a fresnel mask to fade out the tornado at the edges.
float3 viewDirectionWS = normalize(_WorldSpaceCameraPos - input.positionWS);
float fresnelMask = pow(abs(dot(normalize(input.normalWS.xyz), viewDirectionWS.xyz)), 1.5);
color.a *= fresnelMask
float3 viewDirectionWS = normalize(_WorldSpaceCameraPos - input.positionWS);
float fresnelMask = pow(abs(dot(normalize(input.normalWS.xyz), viewDirectionWS.xyz)), 1.5);
color.a *= fresnelMask
float3 viewDirectionWS = normalize(_WorldSpaceCameraPos - input.positionWS);
float fresnelMask = pow(abs(dot(normalize(input.normalWS.xyz), viewDirectionWS.xyz)), 1.5);
color.a *= fresnelMask
Then I used a texture sample to add more details:
float2 scaledUV = input.normalizedUV * float2(1.0, 0.2);
float noiseValue = smoothstep(0.0, 0.4, _NoiseTexture.Sample(linearRepeatSampler, scaledUV).r);
color.rgb = noiseValue
float2 scaledUV = input.normalizedUV * float2(1.0, 0.2);
float noiseValue = smoothstep(0.0, 0.4, _NoiseTexture.Sample(linearRepeatSampler, scaledUV).r);
color.rgb = noiseValue
float2 scaledUV = input.normalizedUV * float2(1.0, 0.2);
float noiseValue = smoothstep(0.0, 0.4, _NoiseTexture.Sample(linearRepeatSampler, scaledUV).r);
color.rgb = noiseValue
And making the texture scroll in each strip nicely imitates the fast tornado flow:
float noiseMovementSpeed = lerp(2.0, 1.0, smoothstep(0.0, 2.0, randomPerInstance.x * 0.5 + input.offset)) * 0.5;
float2 animatedUVOffset = float2(-_Time.y * noiseMovementSpeed, 0.0);
float noiseValue = smoothstep(0.0, 0.4, _NoiseTexture.Sample(linearRepeatSampler, input.normalizedUV * scaledUV + animatedUVOffset).r
Then I played with compositing the color from all the values I have at this point:
color = float4(_Color.rgb, fresnelMask * disk * (noiseValue) * _Color.a
color = float4(_Color.rgb, fresnelMask * disk * (noiseValue) * _Color.a
color = float4(_Color.rgb, fresnelMask * disk * (noiseValue) * _Color.a
And I added more details by sampling the noise texture a few times:
float noiseValue = smoothstep(0.0, 0.4, _NoiseTexture.Sample(linearRepeatSampler, input.normalizedUV * scaledUV + animatedUVOffset).r) * 0.6;
noiseValue += smoothstep(0.0, 0.4, _NoiseTexture.Sample(linearRepeatSampler, input.normalizedUV * scaledUV * 2.0 + animatedUVOffset).r) * 0.4;
noiseValue += smoothstep(0.0, 0.4, _NoiseTexture.Sample(linearRepeatSampler, input.normalizedUV * scaledUV * 4.0 + animatedUVOffset).r) * 0.2
___
Light integration
Now I want to integrate it with Unity's lighting. First, I integrated the main directional light.
float4 noiseValue2 = _NoiseTexture.Sample(linearRepeatSampler, scaledUV + animatedUVOffset) * 0.6;
noiseValue2 += _NoiseTexture.Sample(linearRepeatSampler, scaledUV * 2.0 + animatedUVOffset) * 0.4;
float3 normalOffset = noiseValue2.rgb - 0.5;
float3 lightingNormalWS = normalize(input.normalWS.xyz + normalOffset.xyz);
float4 shadowCoord = TransformWorldToShadowCoord(input.positionWS);
Light mainLight = GetMainLight(shadowCoord);
float lightValue = smoothstep(-0.5, 1.0, dot(lightingNormalWS, -mainLight.direction)) * mainLight.distanceAttenuation * mainLight.shadowAttenuation;
color.rgb *= lerp(0.2, 1.0, lightValue) * pow(mainLight.color, 1.0 / 2.2
In this case I use Forward+ render path in Unity. I integrated additional lights using this loop:
float4 lightAccumulation = 0.0;
InputData inputData = (InputData)0;
inputData.normalizedScreenSpaceUV = GetNormalizedScreenSpaceUV(input.positionCS_SV);
inputData.positionWS = input.positionWS;
LIGHT_LOOP_BEGIN(0)
{
Light light = GetAdditionalLight(lightIndex, input.positionWS);
{
lightAccumulation.rgb += smoothstep(-0.5, 1.0, dot(-light.direction, lightingNormalWS)) * sqrt(light.color) * light.distanceAttenuation;
}
}
LIGHT_LOOP_END
color.rgb += lightAccumulation.rgb
___
Final tweaks
Now the shape of the tornado is cylindrical.
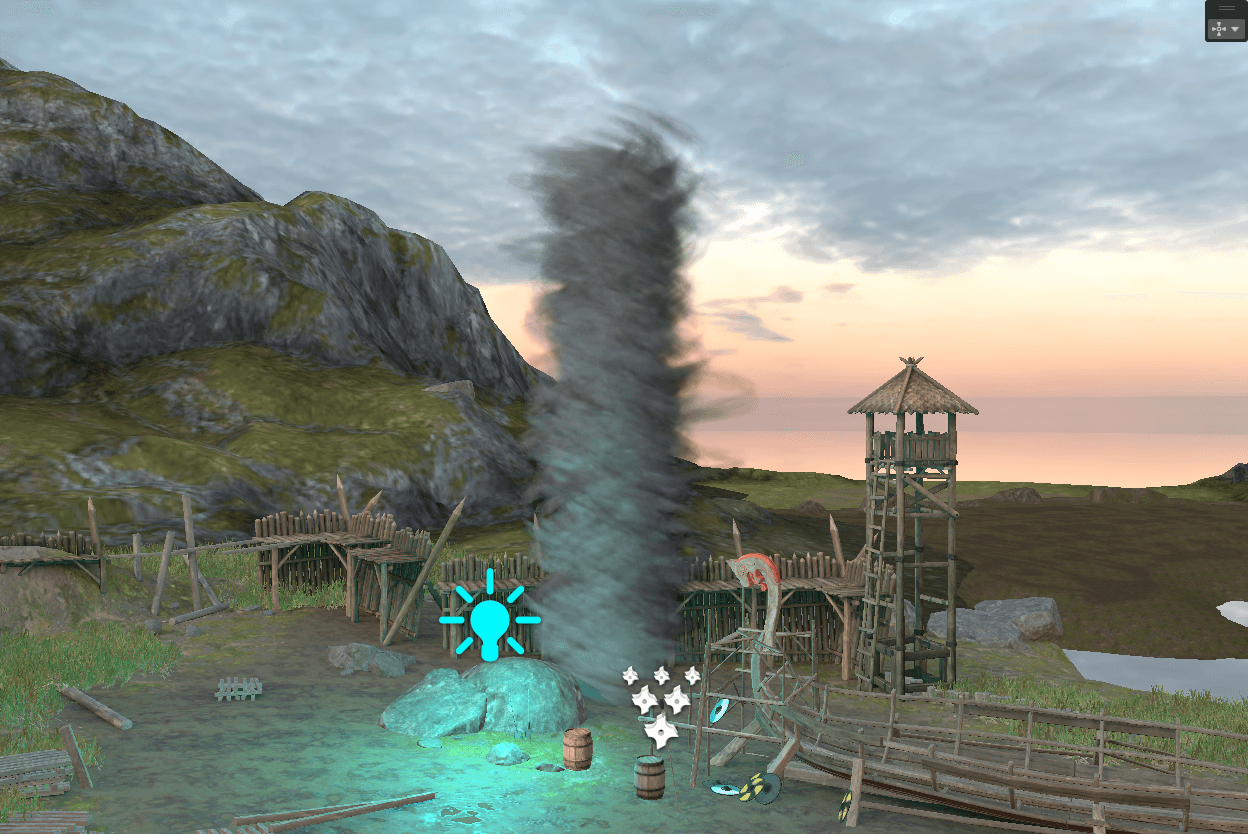
I want to make it wider at the top and thinner at the bottom.
So I added this to the vertex shader:
float upWide = pow(max(0.0, positionOS.y / (4.0)), 3.0);
positionOS.xz += normalize(positionOS.xz) * upWide
float upWide = pow(max(0.0, positionOS.y / (4.0)), 3.0);
positionOS.xz += normalize(positionOS.xz) * upWide
float upWide = pow(max(0.0, positionOS.y / (4.0)), 3.0);
positionOS.xz += normalize(positionOS.xz) * upWide
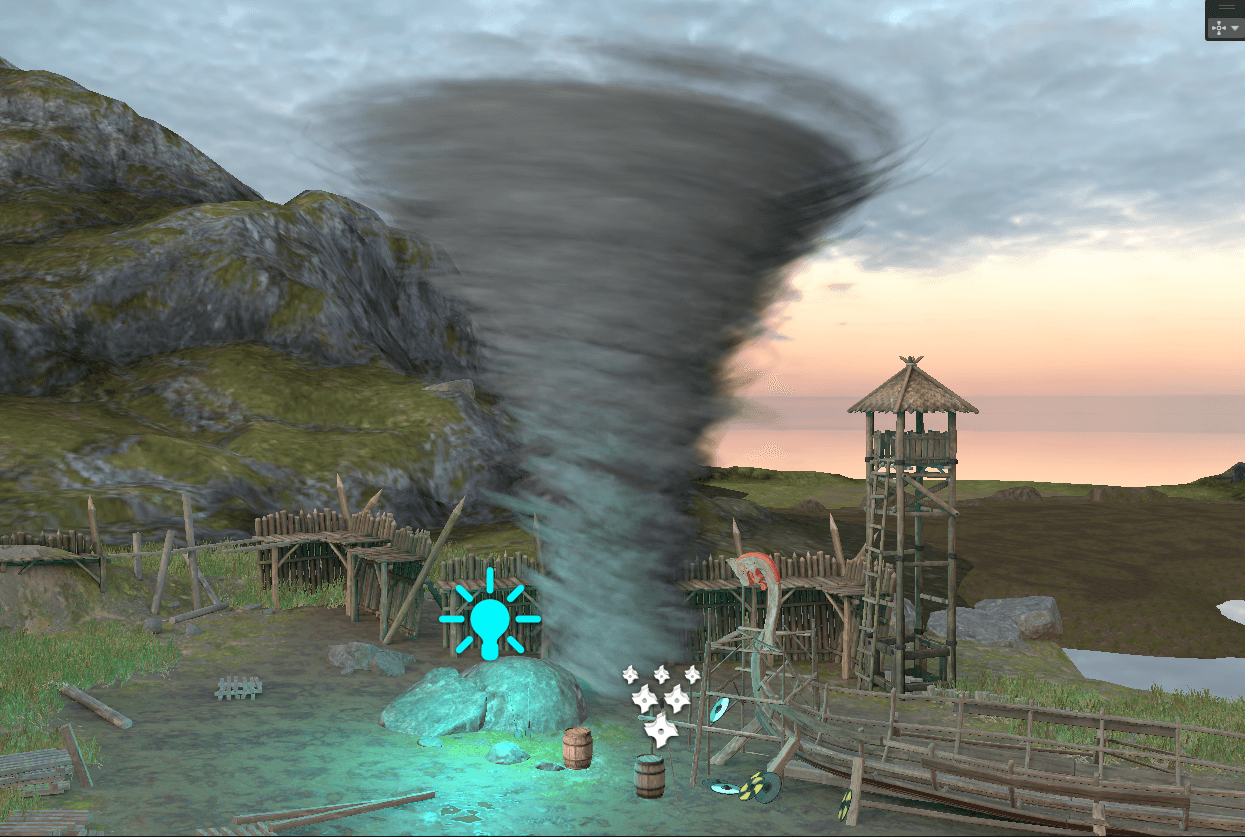
And I added a wiggle and made it thinner at the bottom:
positionOS.xz += (sin(positionOS.y));
positionOS.xz *= lerp(0.5, 1.0, smoothstep(0.0, 5.0, positionOS.y
positionOS.xz += (sin(positionOS.y));
positionOS.xz *= lerp(0.5, 1.0, smoothstep(0.0, 5.0, positionOS.y
positionOS.xz += (sin(positionOS.y));
positionOS.xz *= lerp(0.5, 1.0, smoothstep(0.0, 5.0, positionOS.y
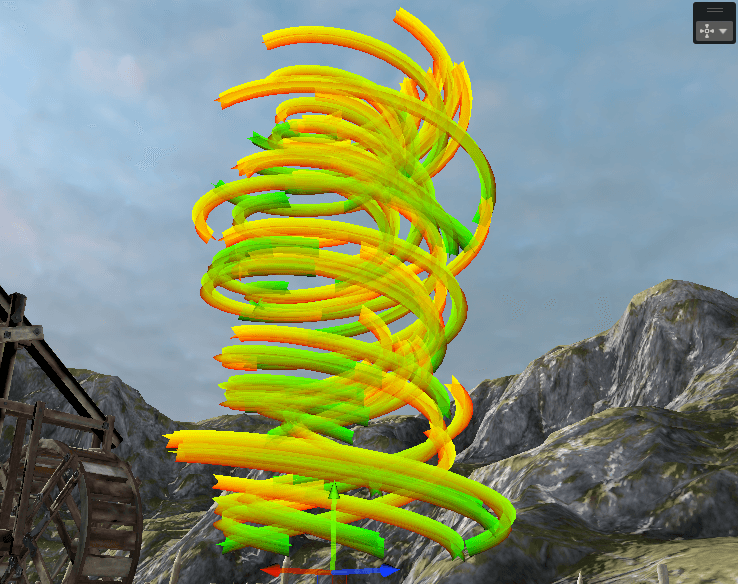
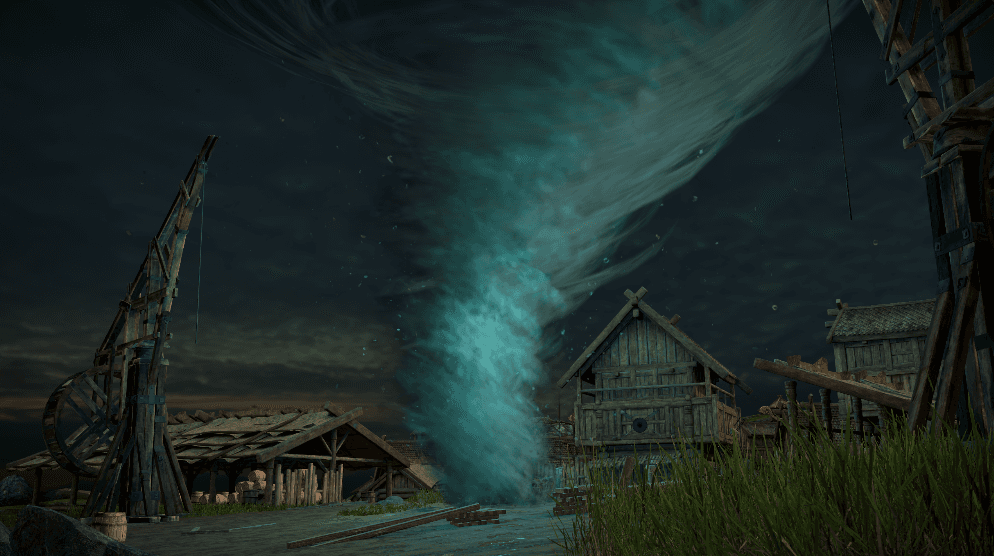
And I sprinkled some particles (separate shader)
___
Profiling and optimization
Now it's time to build this view and profile it using Nvidia Nsight Graphics. Let's see how I can optimize it. I will follow my GPU optimization reasoning model described here: GPU pipeline mental model
For more details on shader optimization techniques, see: I made this shader run 5x faster
I will profile this shot on RTX 3060 in 1440p:
Tornado settings: 60 triangles per instance, 700 instances.
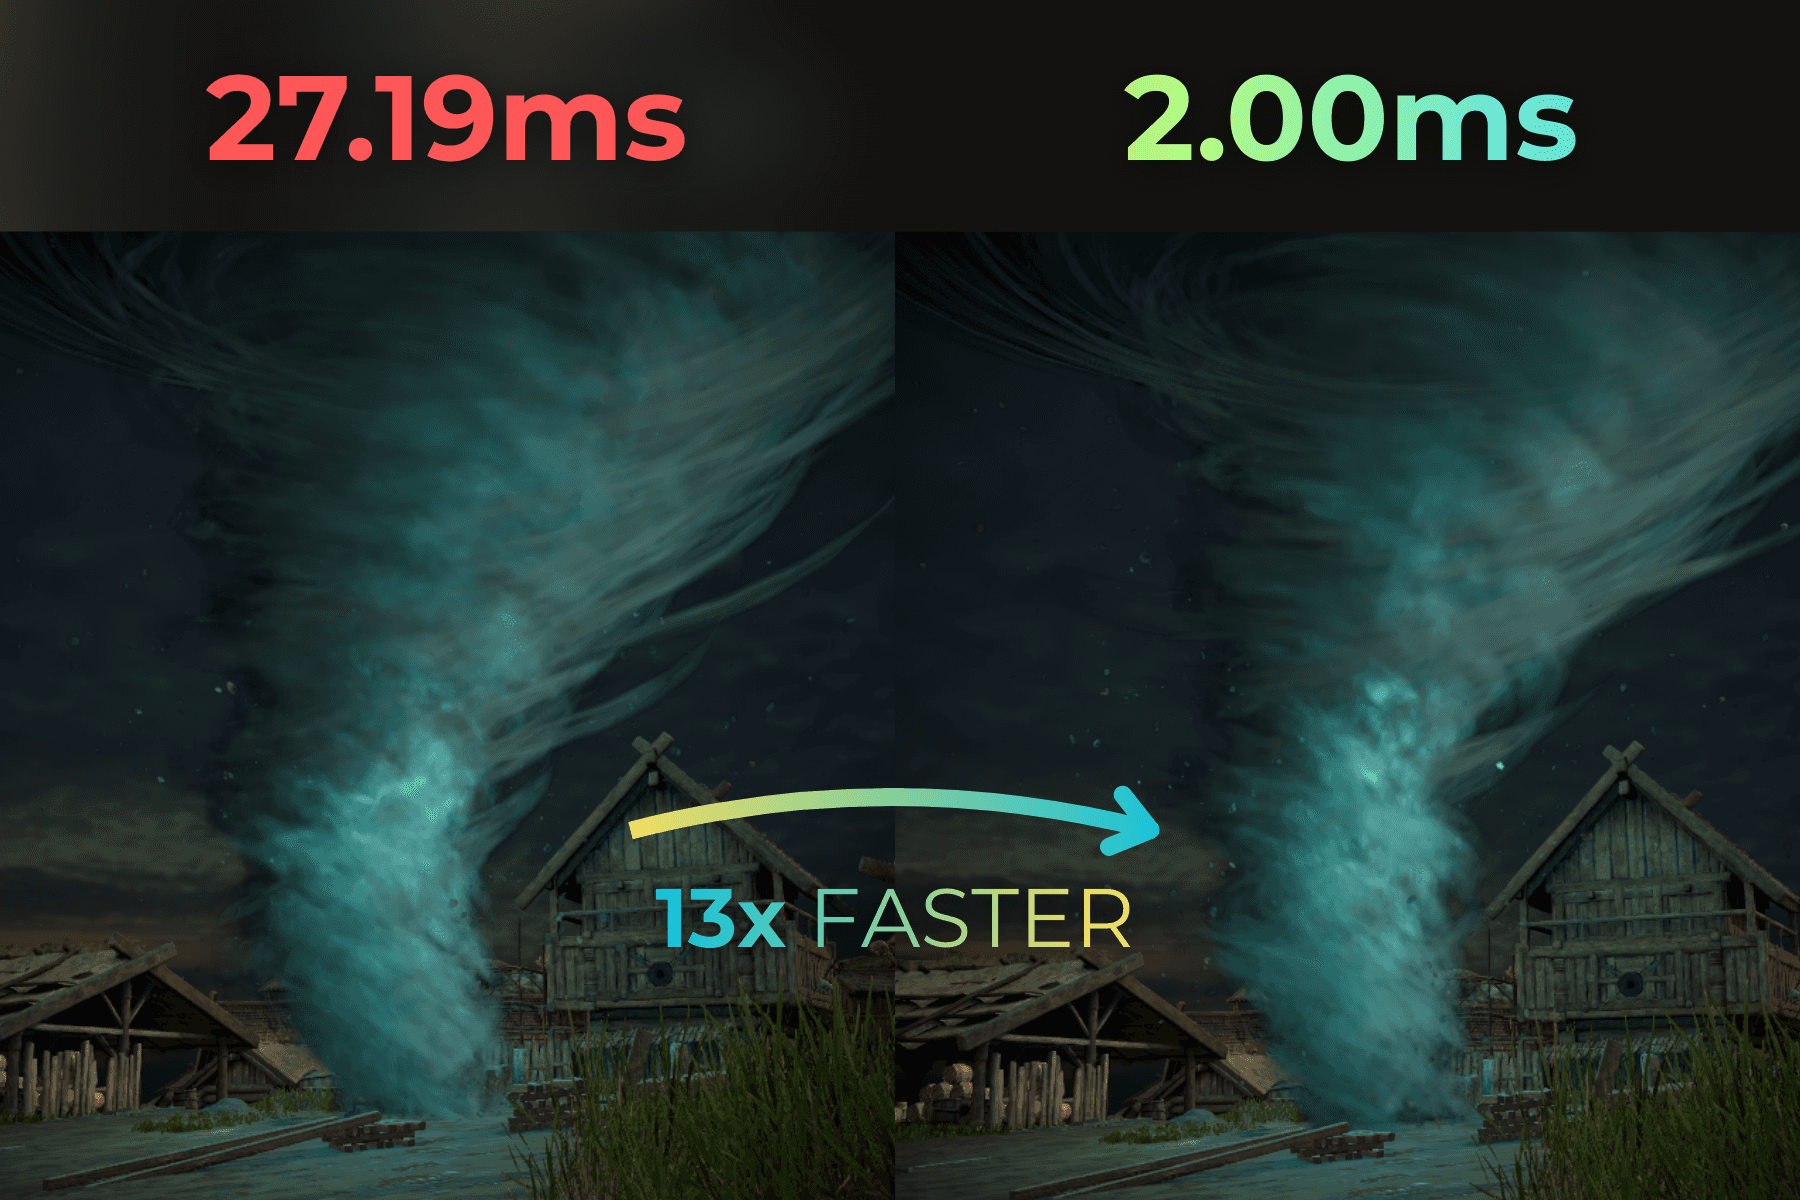
Oh wow, it is MUCH slower than I expected... 27.19ms to render this tornado... For 60 FPS I need the whole frame under 16.6ms, so 27ms just for the tornado is way too much.

___
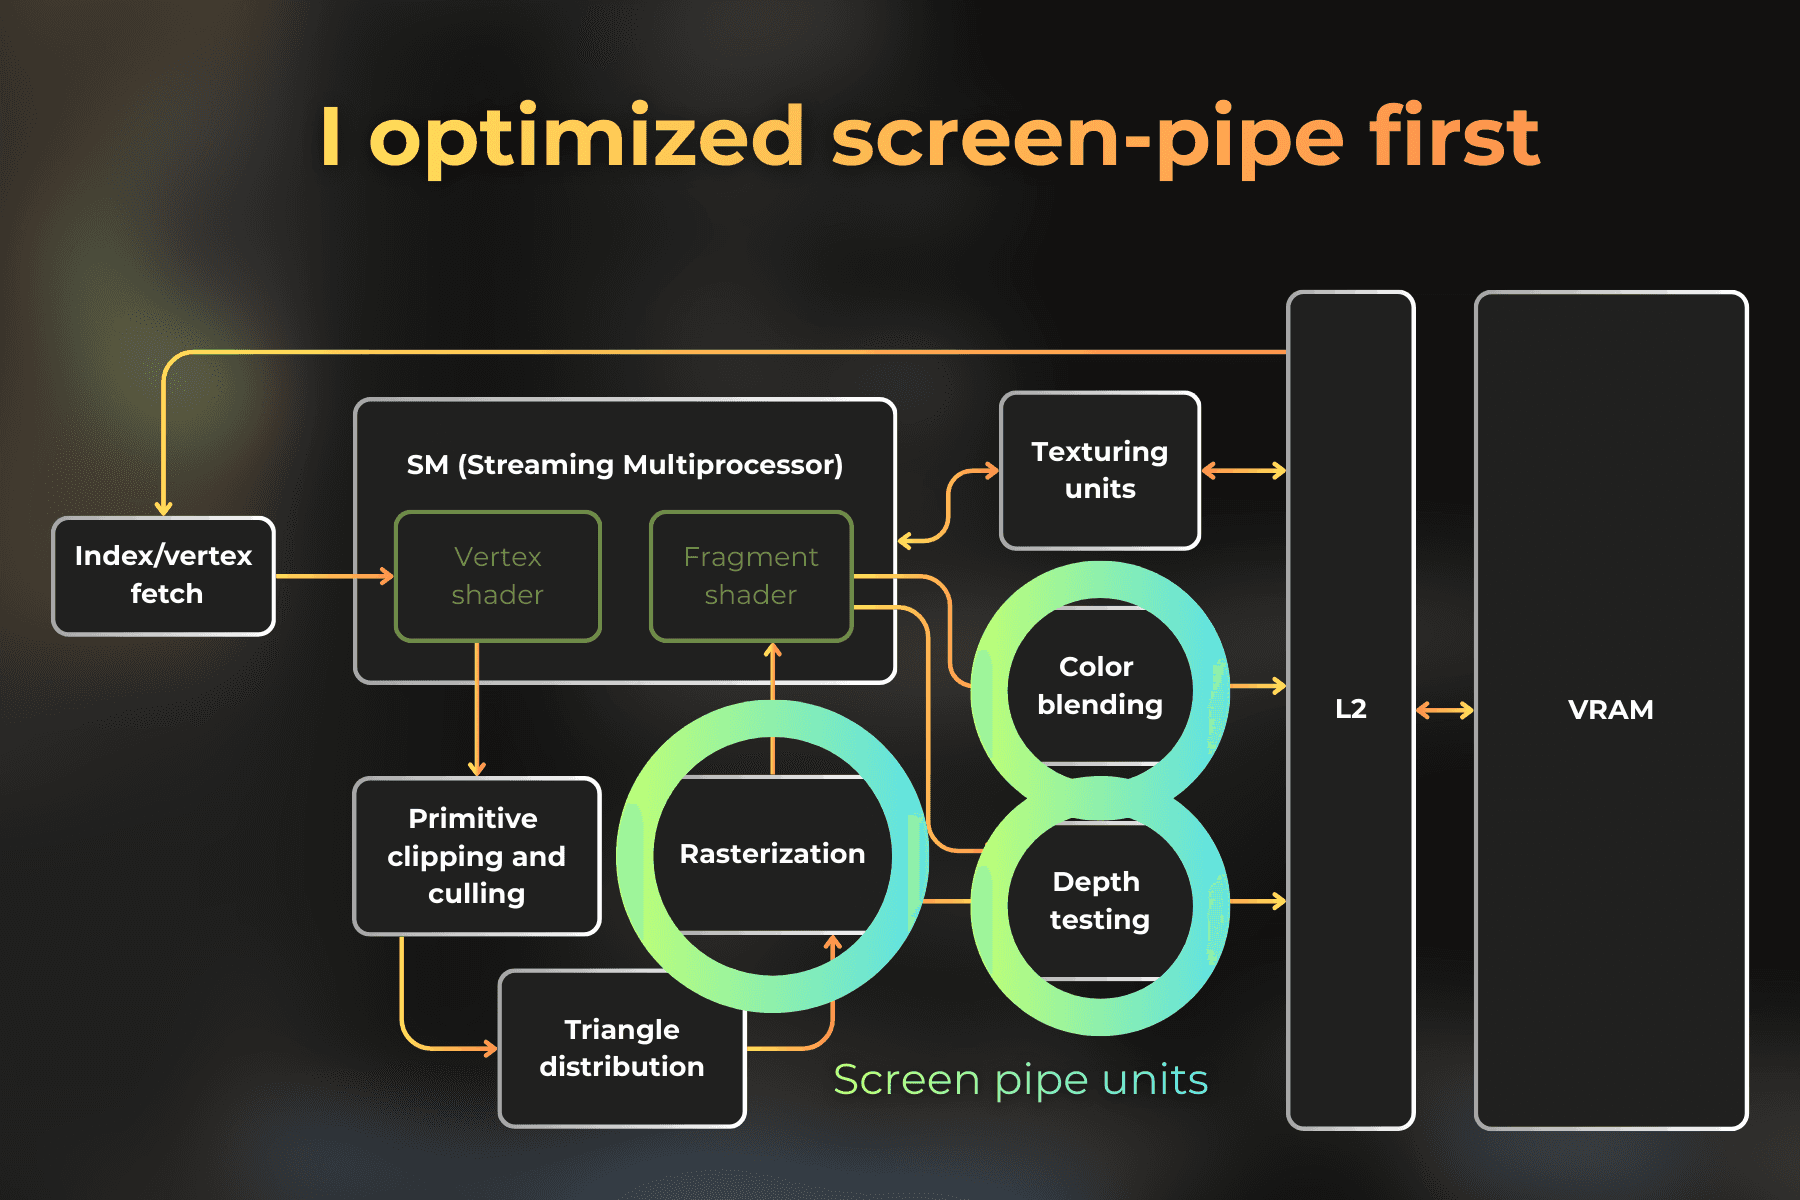
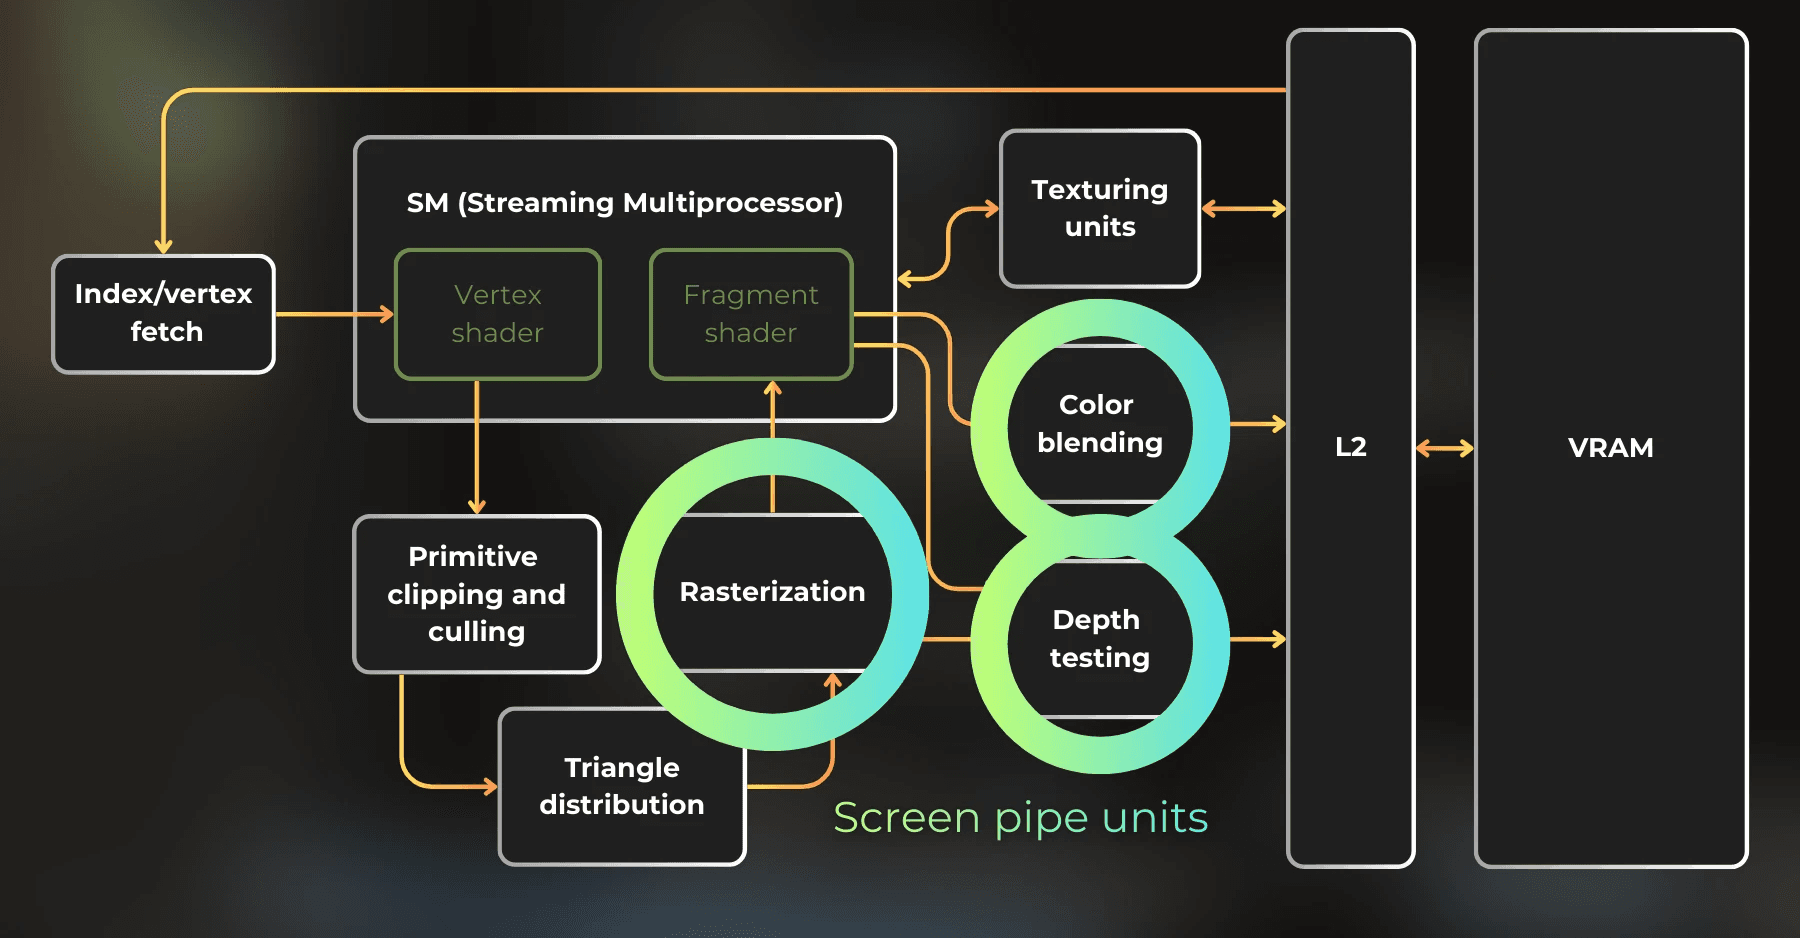
Optimizing for screen-pipe throughput
Now, the highest throughput is on a screen pipe, and it is depth testing, color blending and rasterization. This is what I need to optimize first:
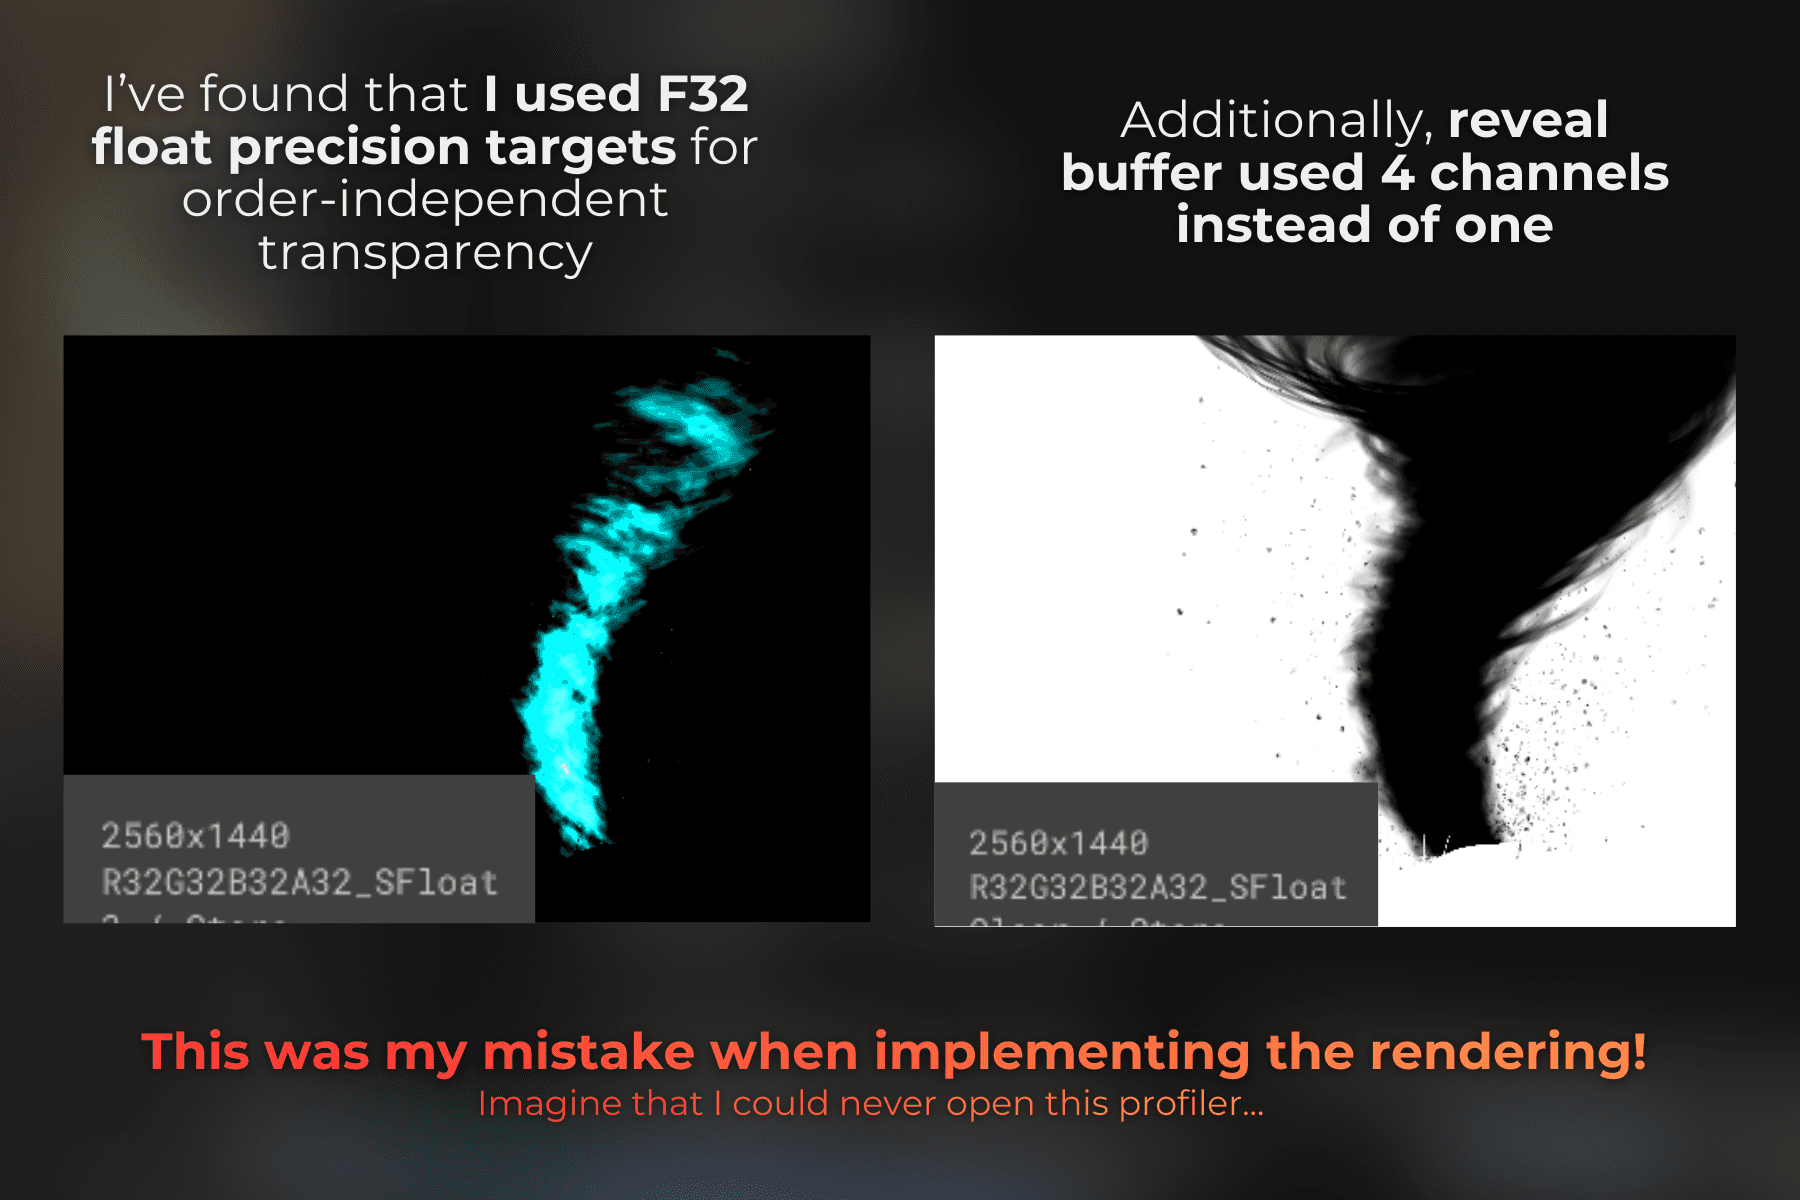
So I looked at my rendering setup and realized that I render the order-independent transparency buffers to 32-bit precision targets. Also, by mistake, for one buffer I used a 4-channel format instead of a single channel. I changed the code to use 16-bit precision, because it uses less VRAM bandwidth and blending 16-bit precision is usually much faster.
accumulationTargetDesc.format = UnityEngine.Experimental.Rendering.GraphicsFormat.R32G32B32A32_SFloat;
revealTargetDesc.format = UnityEngine.Experimental.Rendering.GraphicsFormat.R32G32B32A32_SFloat;
accumulationTargetDesc.format = UnityEngine.Experimental.Rendering.GraphicsFormat.R16G16B16A16_SFloat;
revealTargetDesc.format = UnityEngine.Experimental.Rendering.GraphicsFormat.R16_SFloat
I profiled again. Much better, but still super slow. Time dropped from 27.19ms to 7.89ms per frame.
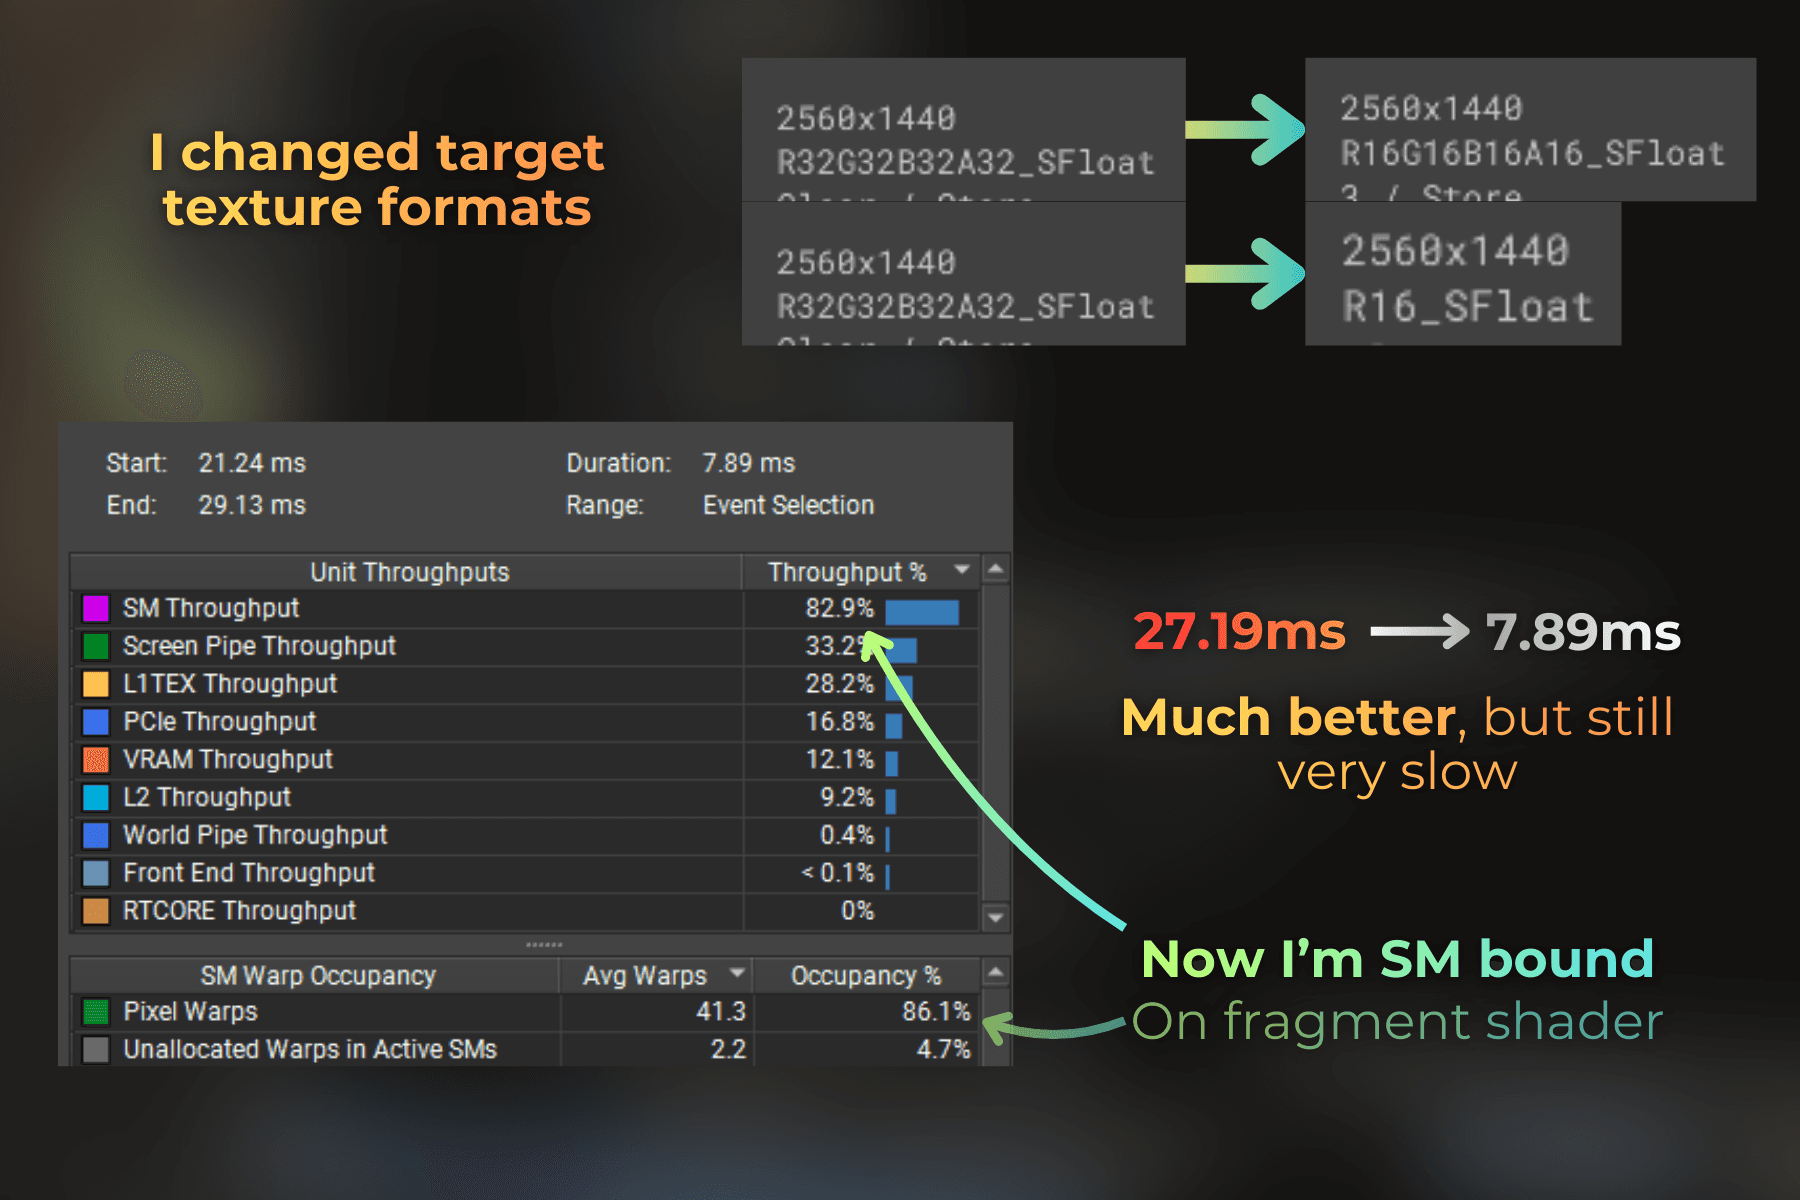
But now, the SM throughput is an issue. Specifically - fragment shader, because the tornado spends most of the time executing pixel warps. So I will focus on optimizing that:
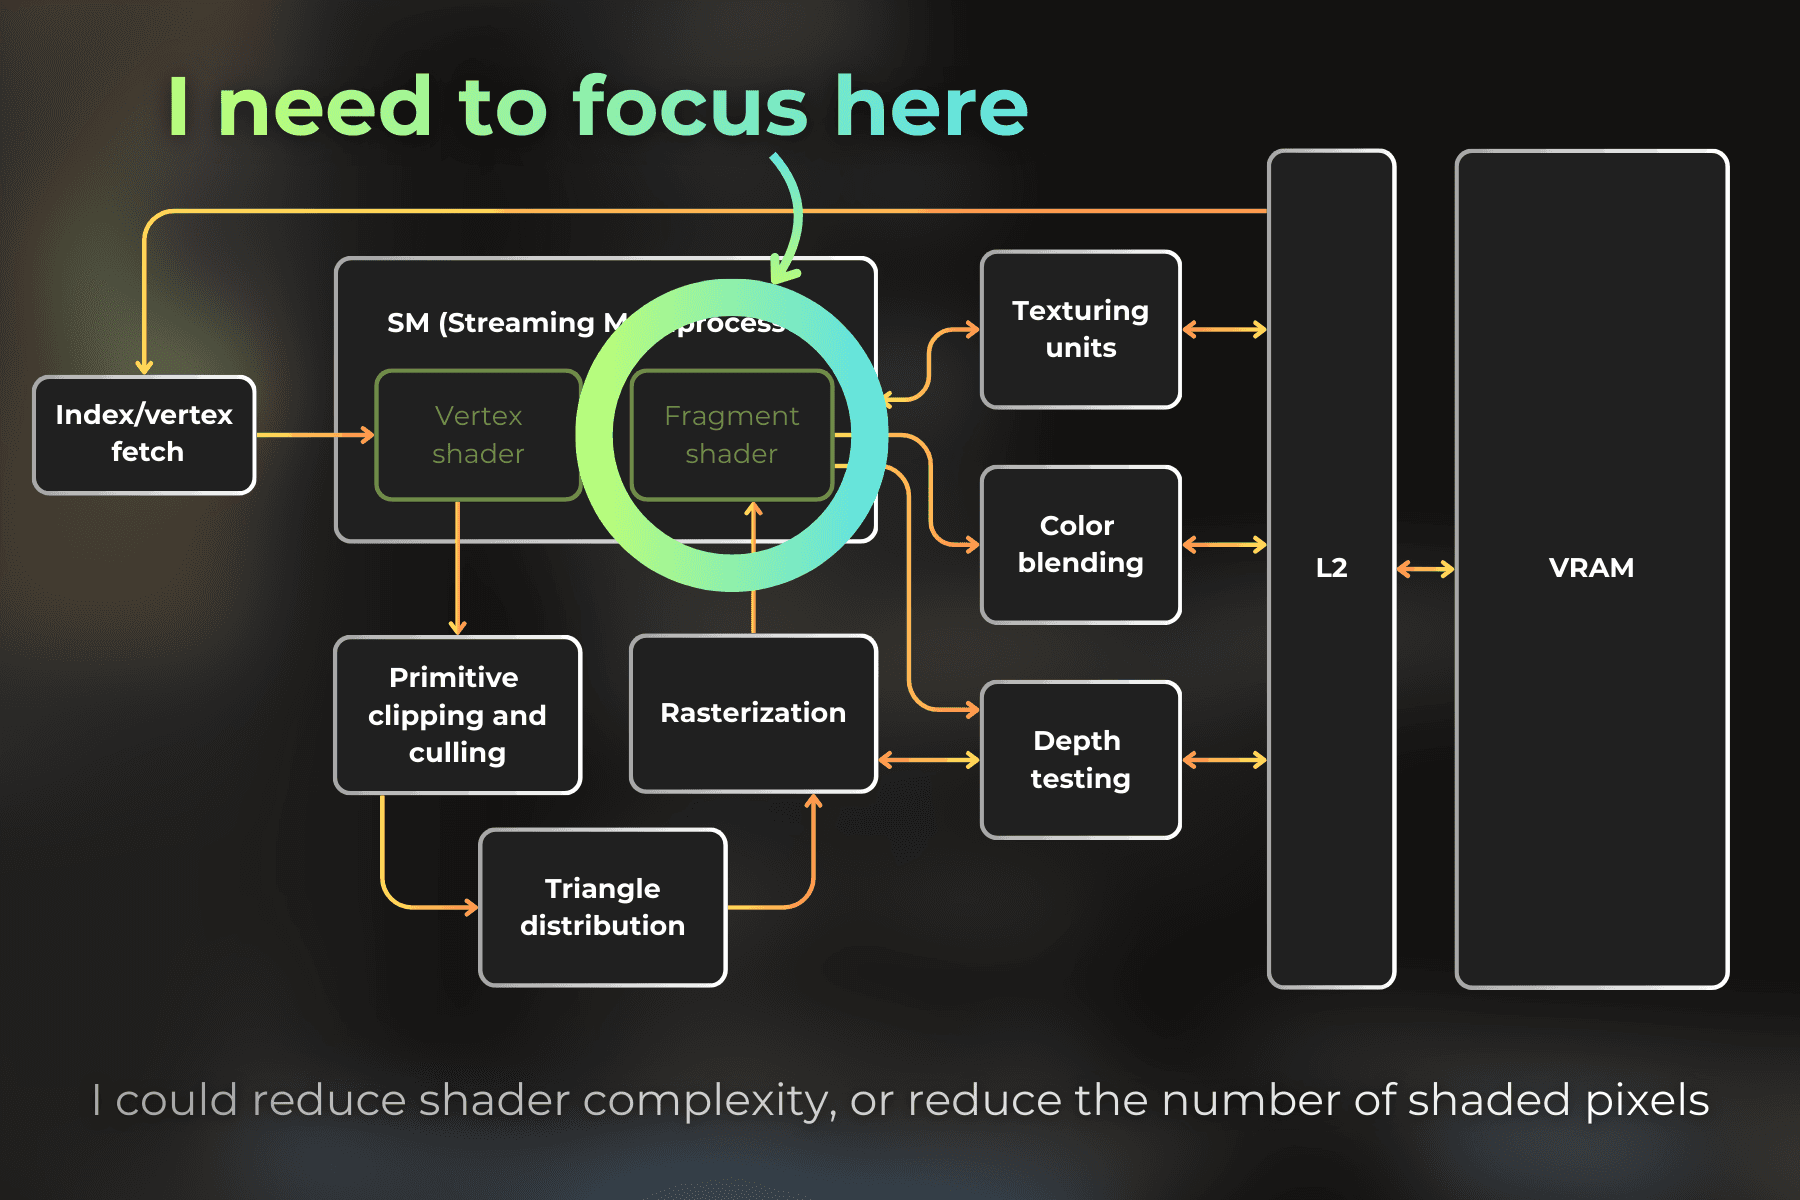
SM workload depends on two things
Fragment shader complexity
Number of shaded pixels
I'll try to adjust the tornado parameters and balance the shader better to cover fewer pixels on the screen.
I lowered the instance count from 700 to 400. Then I made each strip instance a little thinner, reducing its width from 0.4 to 0.35. I also modified the disk mask in the shader to make it sharper and cover a larger area of each strip:
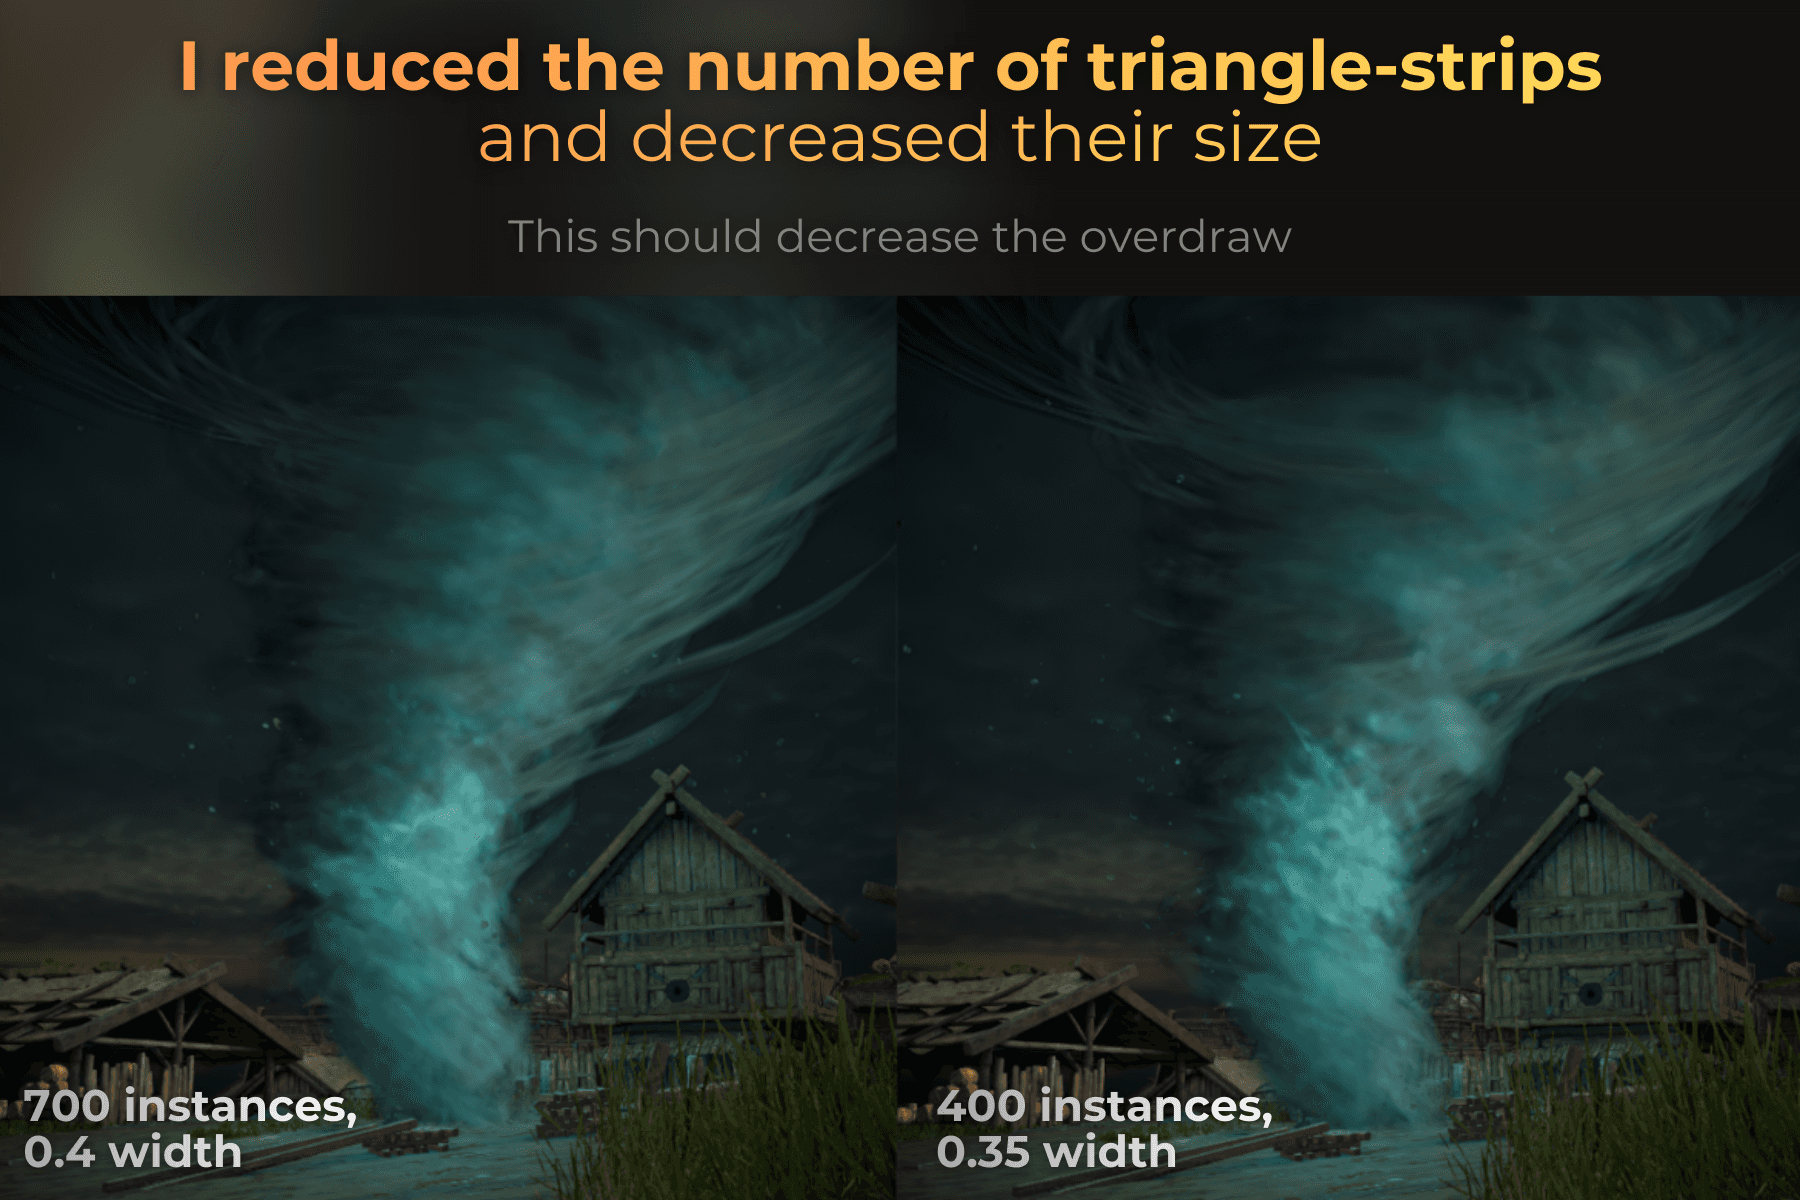
And time dropped from 7.89ms to 4.27ms.
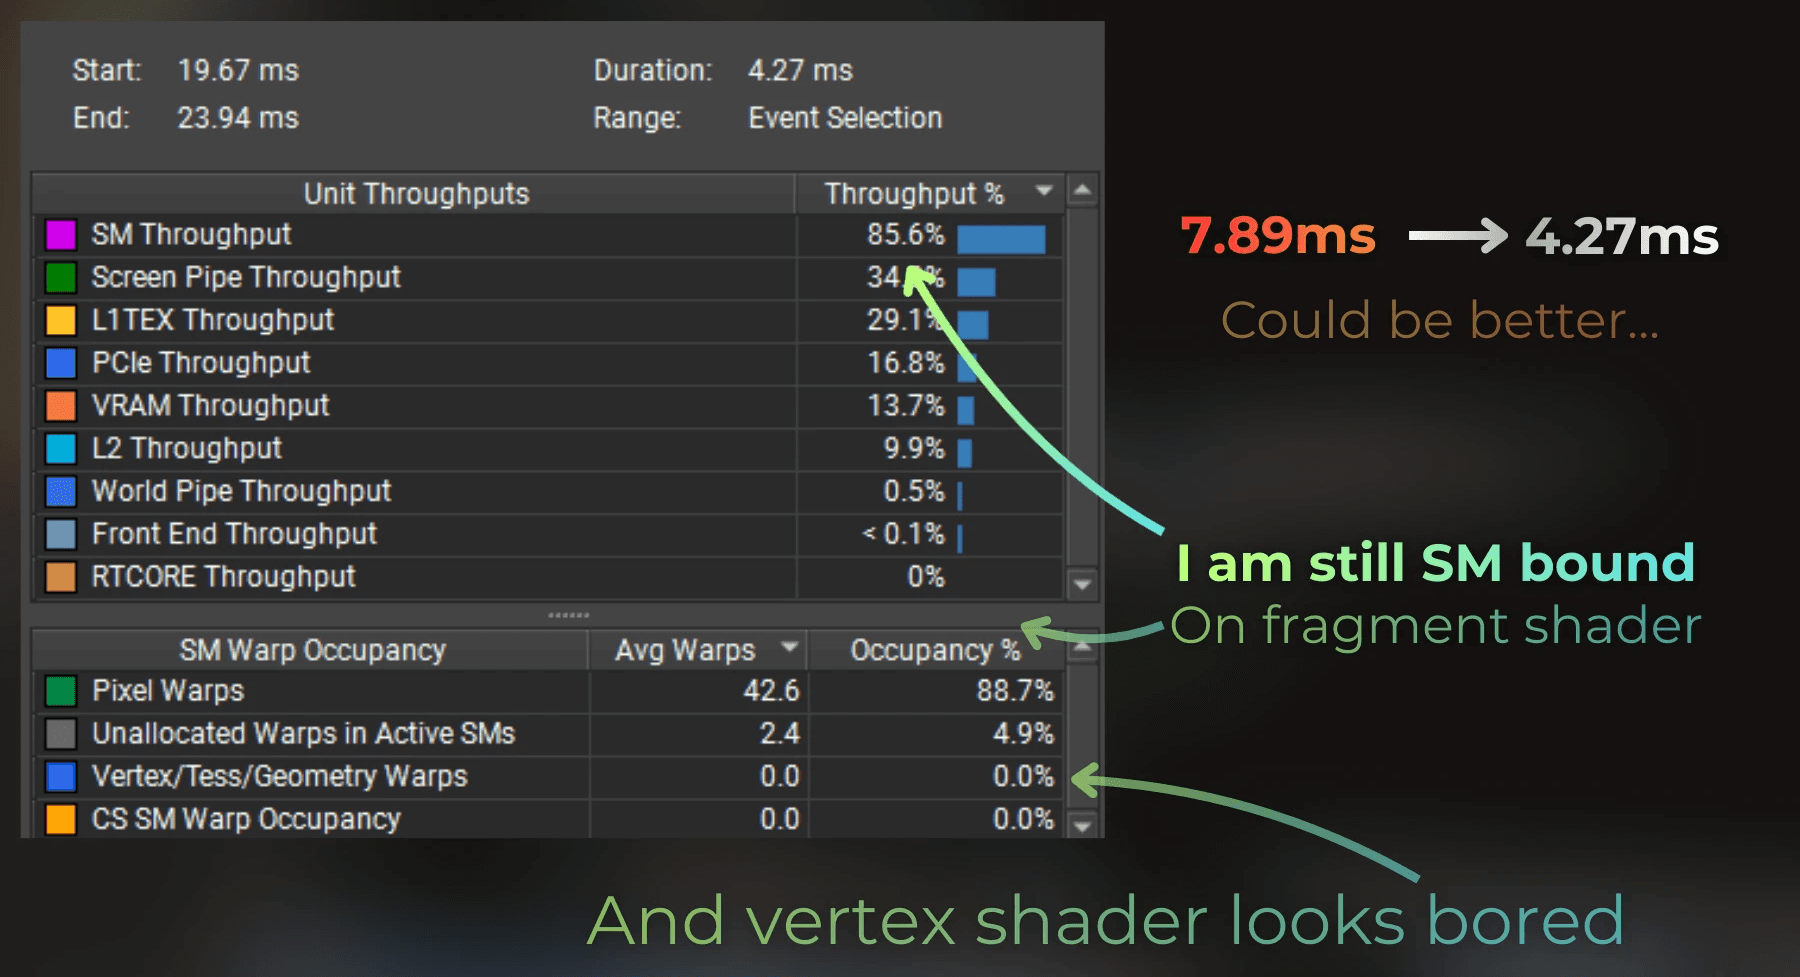
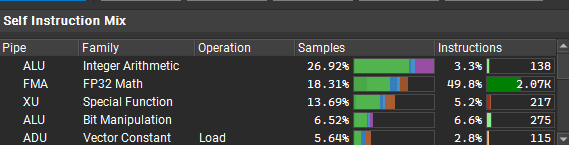
Things are getting harder to optimize. The fragment shader still takes the most time, and there are a lot of FP32 and integer instructions.
There's nothing special about the shader code, so I decided to temporarily remove the lighting from the fragment shader, and this is the result. I'm no longer SM-bound when lighting is not calculated in the shader.

So I moved the light calculation from the fragment shader to the vertex shader, which seems almost unused here. I don't remember the last time I used this optimization... here we go!
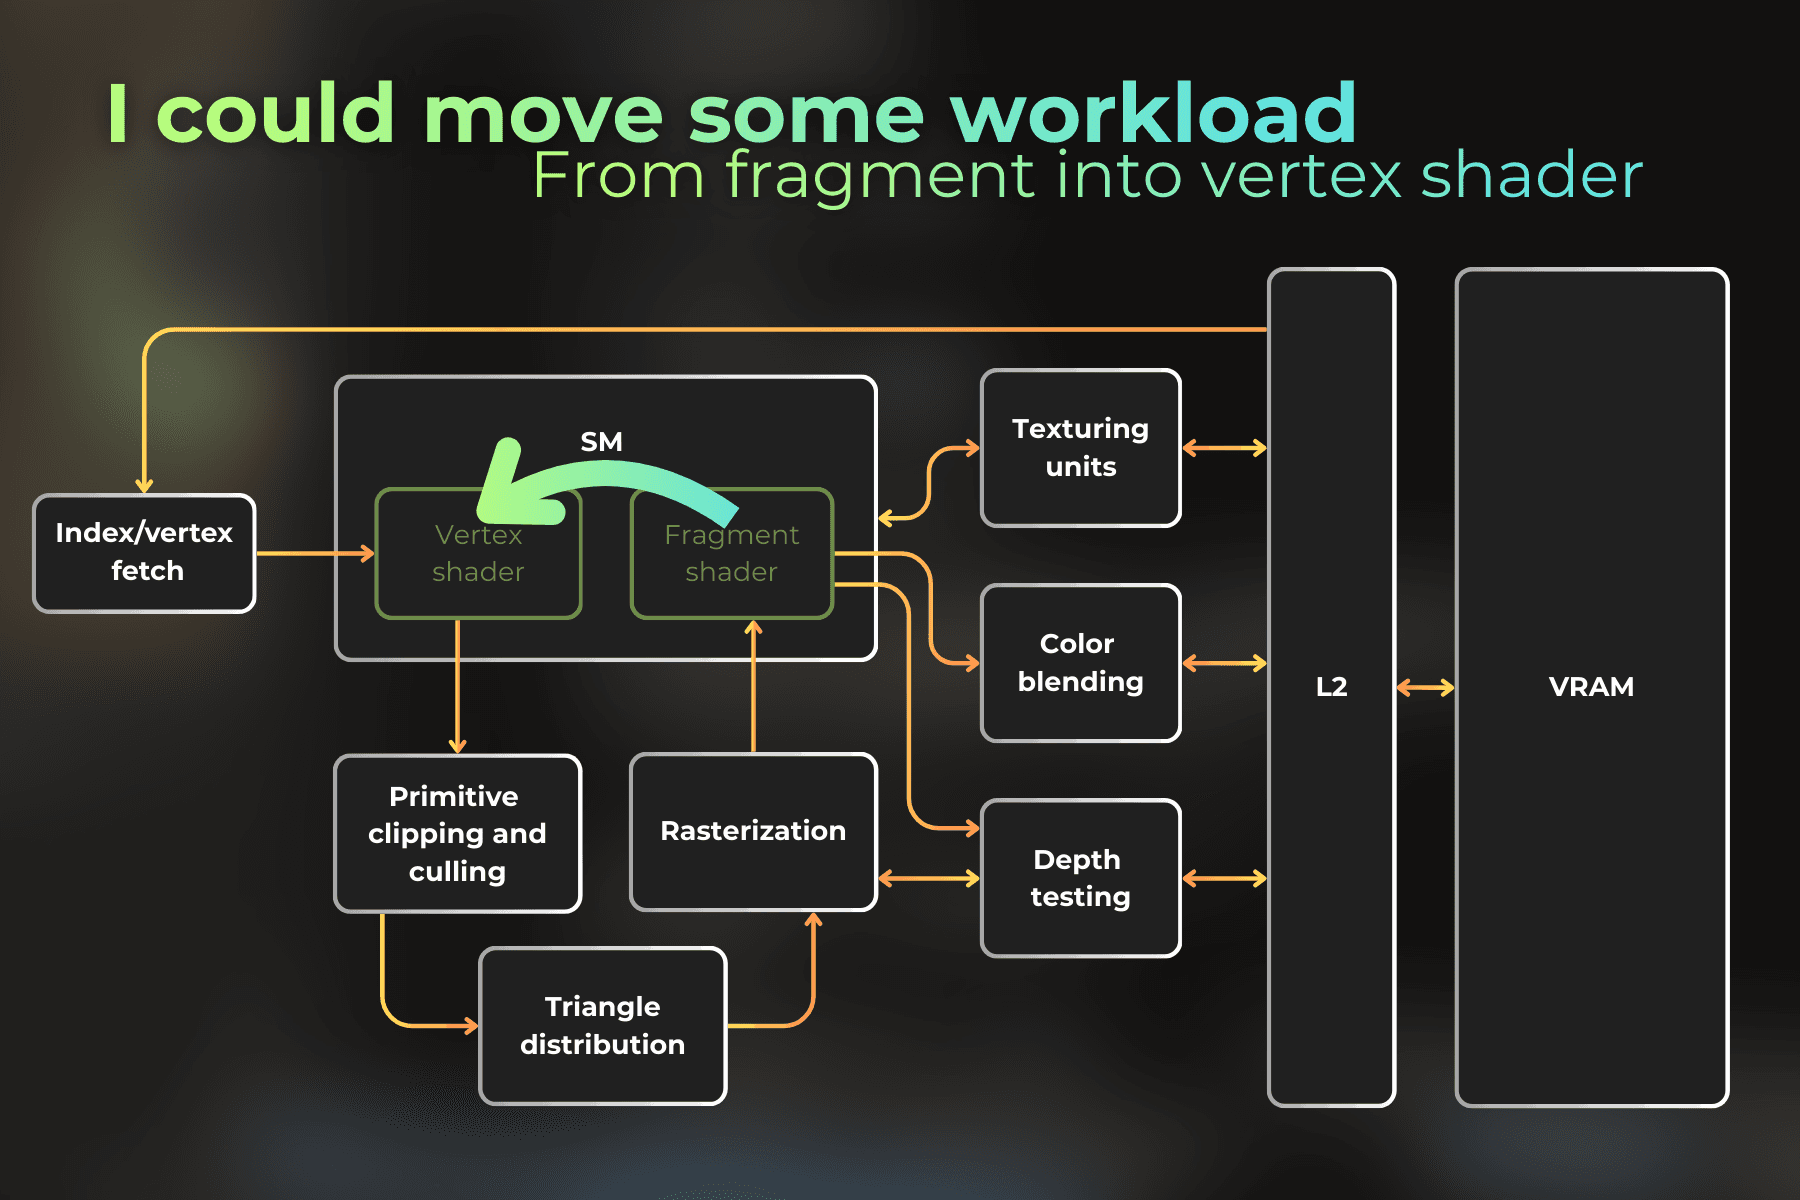
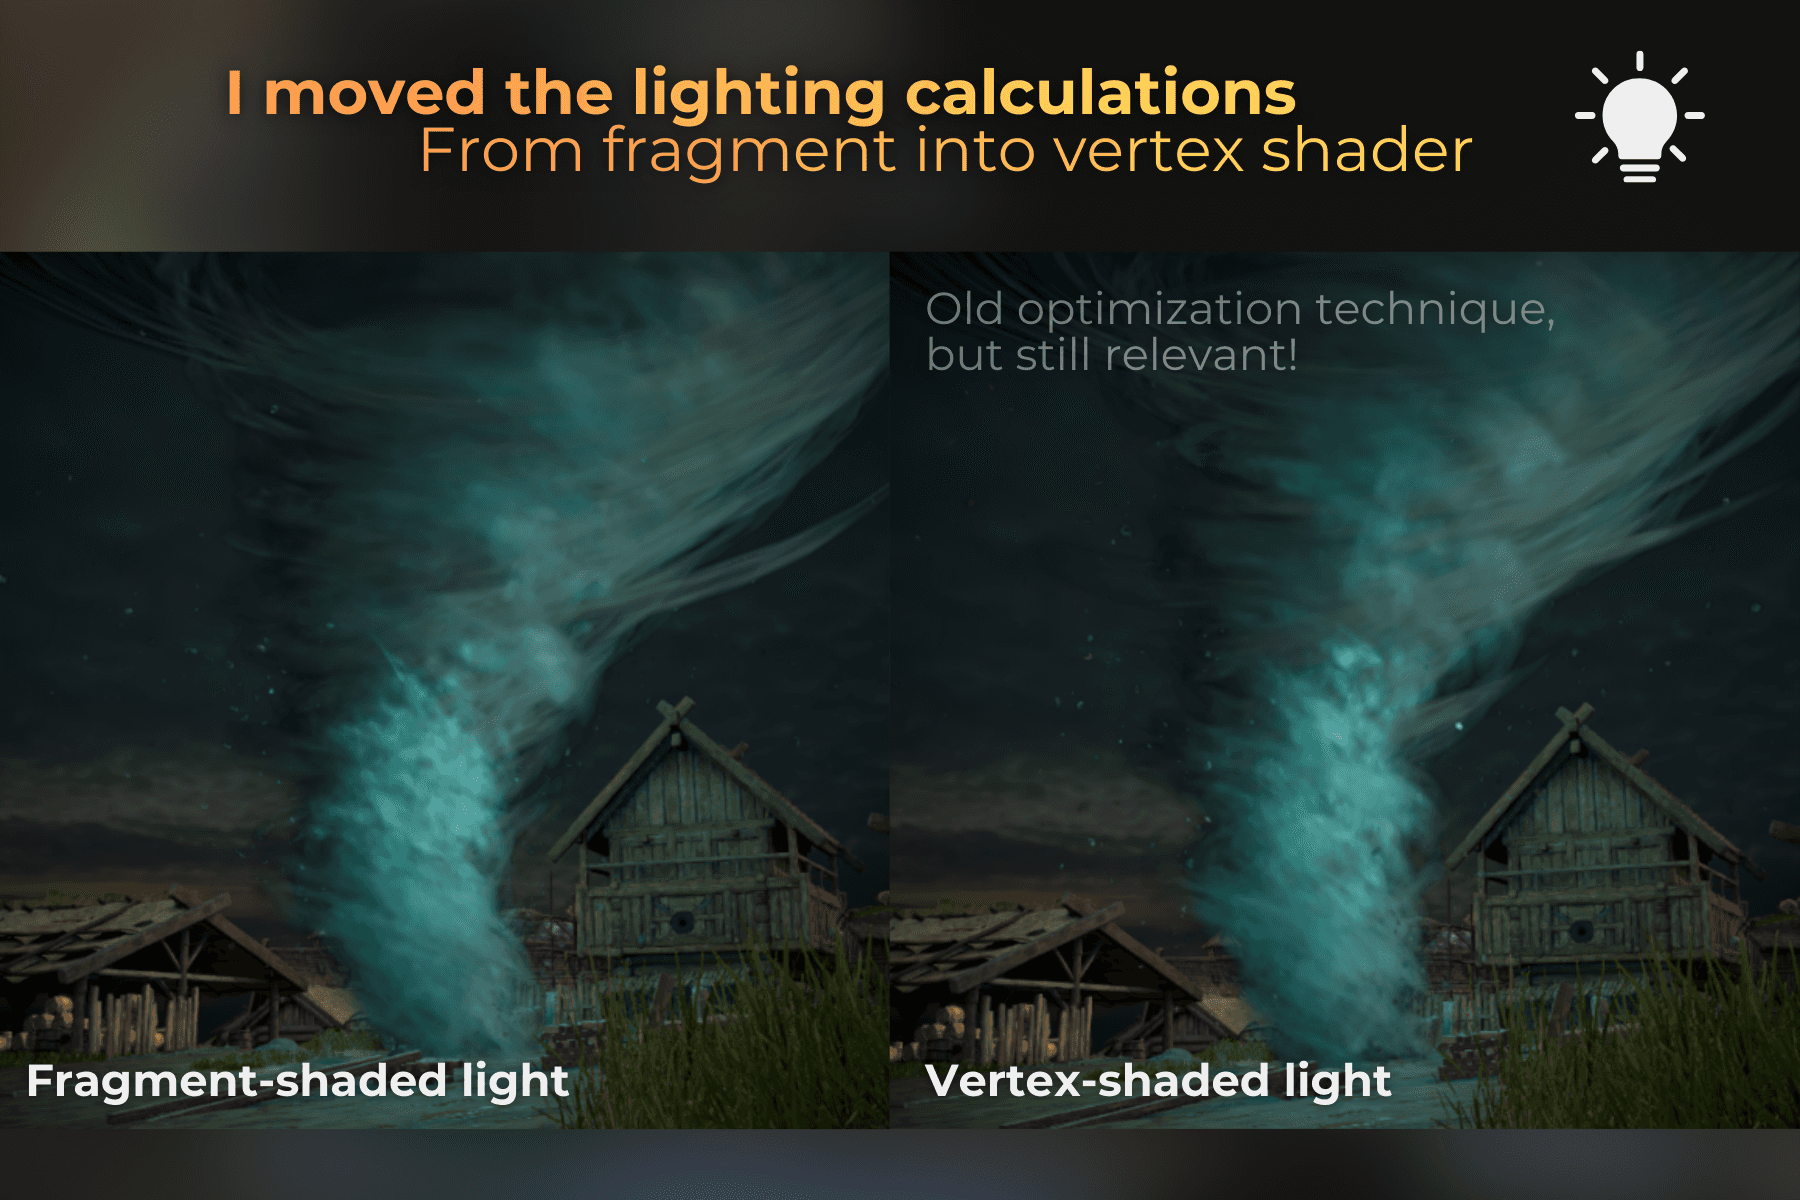
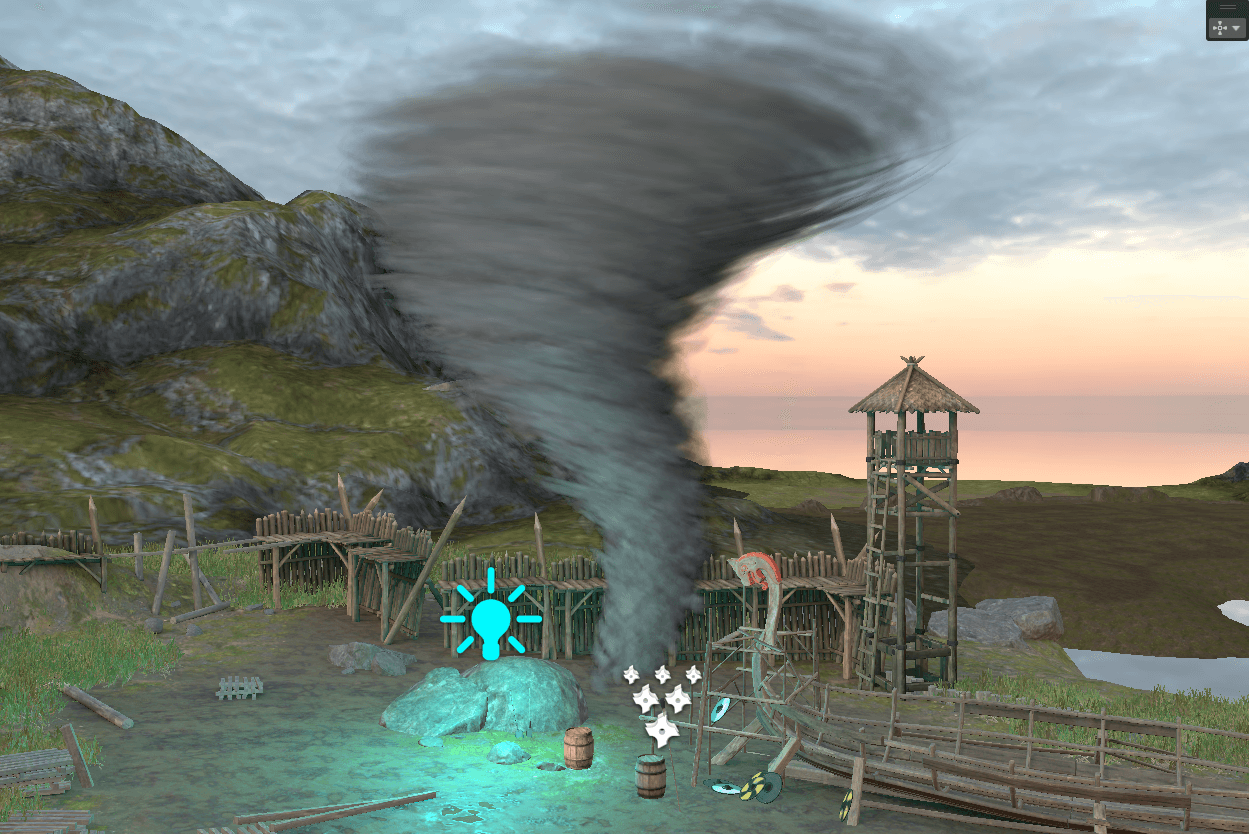
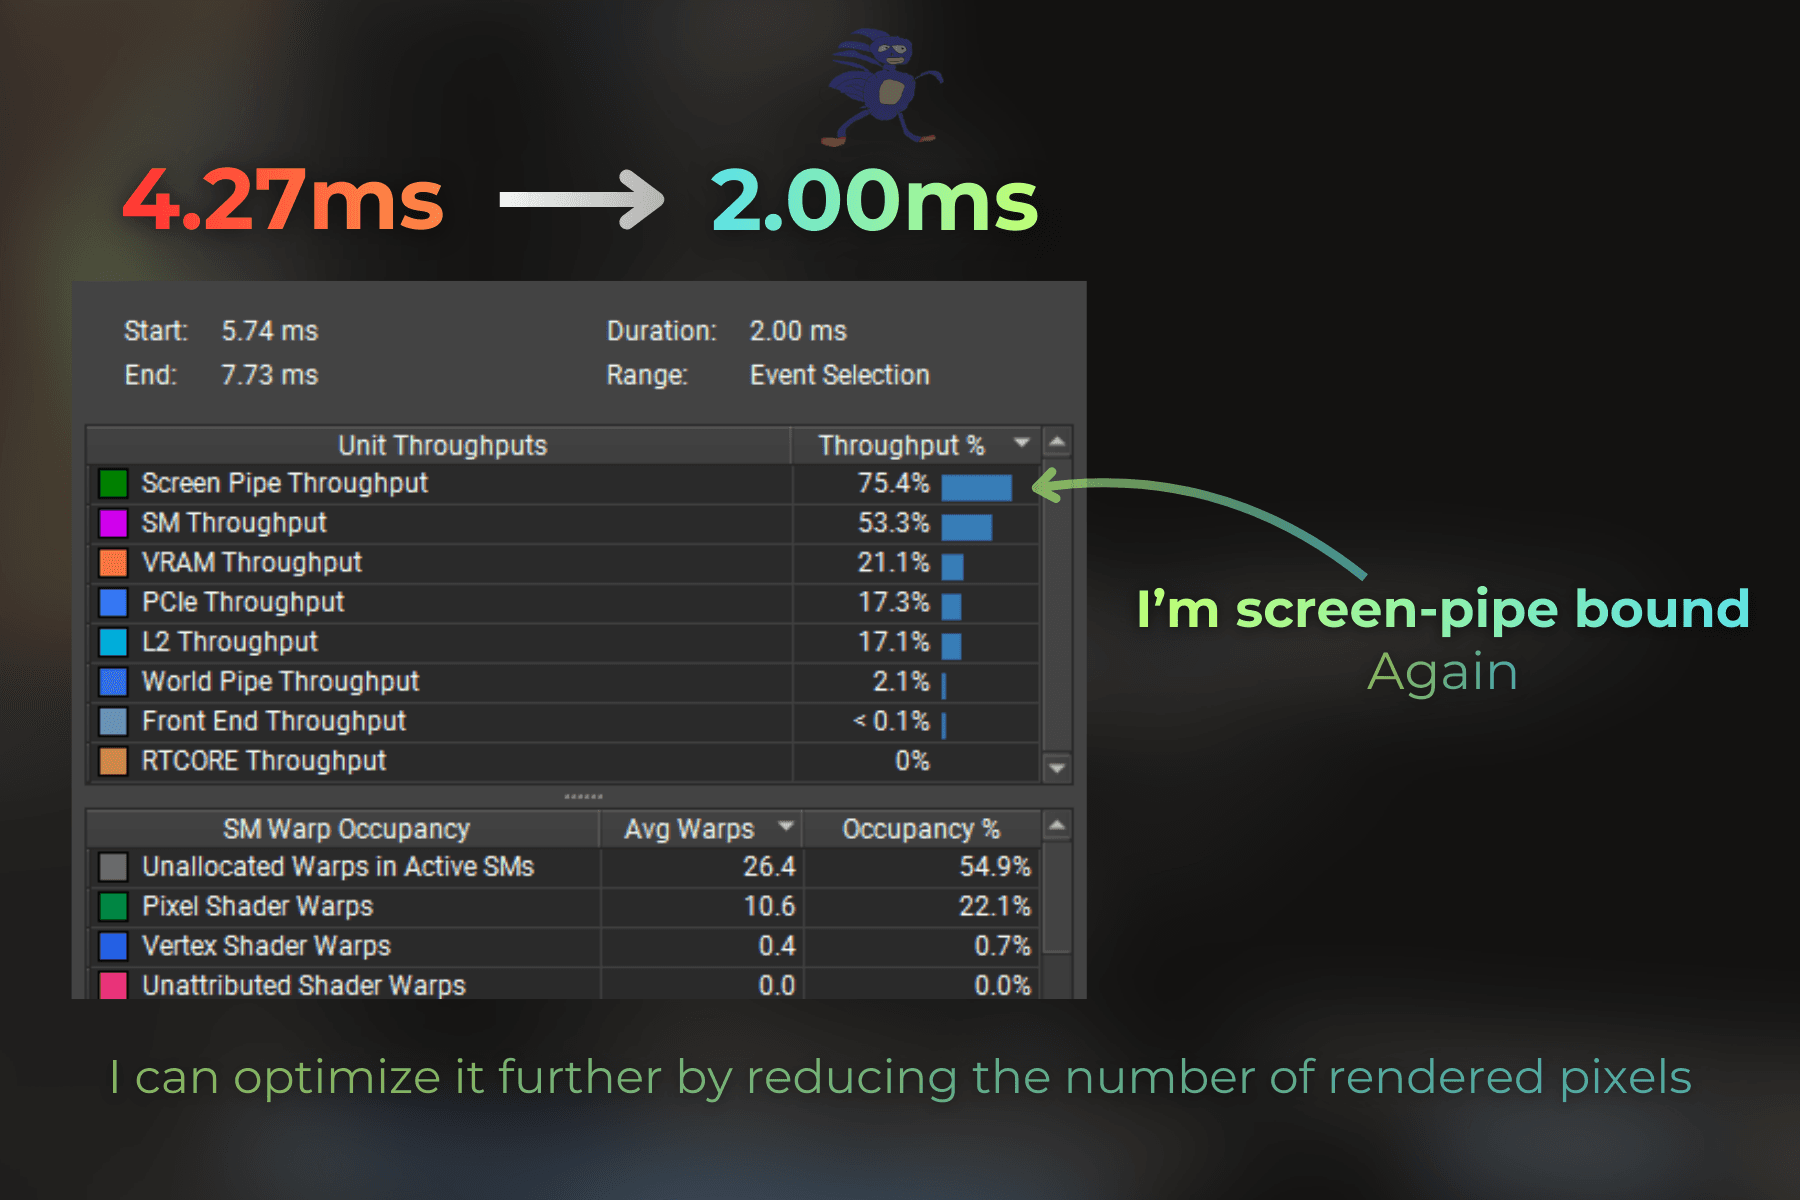
And now the results. Render time dropped from 4.27ms to 2.00ms. Now, on RTX 3060 in 1440p, that's quite a satisfying result - especially for volumetric-like and dense content.
Now look at this. A tornado covering a large portion of the screen, rendering in 2.00ms.
___
Further optimization ideas:
The tornado remains screen-pipe bound, so the only way to optimize further is to reduce the number of pixels rendered by this effect.
In a real scenario, these are the optimization ideas I would consider:
Design the game so the tornado never fills most of the screen by controlling camera angles.
Lower the tornado's density by reducing the number of instances and making strips thinner.
Render the tornado to a lower-resolution buffer and then upscale.
___
Summary
Procedural draws let you render geometry without any mesh data. The GPU skips the Vertex Attribute Fetch stage and provides only SV_VertexID and SV_InstanceID to the vertex shader. You use these IDs to generate vertices on the fly.
Key takeaways:
Stateless particles use instance ID + time to create animated, randomized effects without CPU mesh handling.
In Unity, use the Graphics API (recommended) or CommandBuffer to execute procedural draws.
Hash functions turn instance IDs into random values for position, scale, and lifetime.
Combining lifetime cycles with instance IDs creates continuously respawning particles.
Optimization results (RTX 3060, 1440p):
Started at 27.19ms - way too slow.
Switched render targets from 32-bit to 16-bit → 7.89ms
Reduced instance count and strip width → 4.27ms
Moved lighting from fragment to vertex shader → 2.00ms
That's a 13x speedup by understanding where the GPU spends its time.
___
If you have questions or feedback, feel free to reach out on my LinkedIn.