Case study
Optimization
Rendering
Intermediate
Optimizing whole frame - case study
10 min

This is a Unity template project that I use to experiment with different rendering techniques. In this article, I will do a few editor-to-profiler iterations and optimize this project as much as possible on an RTX 3060.
Agenda:
Benchmark setup
Render pipeline overview
Optimization iterations (make the scene run as fast as possible without making the visuals worse)
Benchmark setup
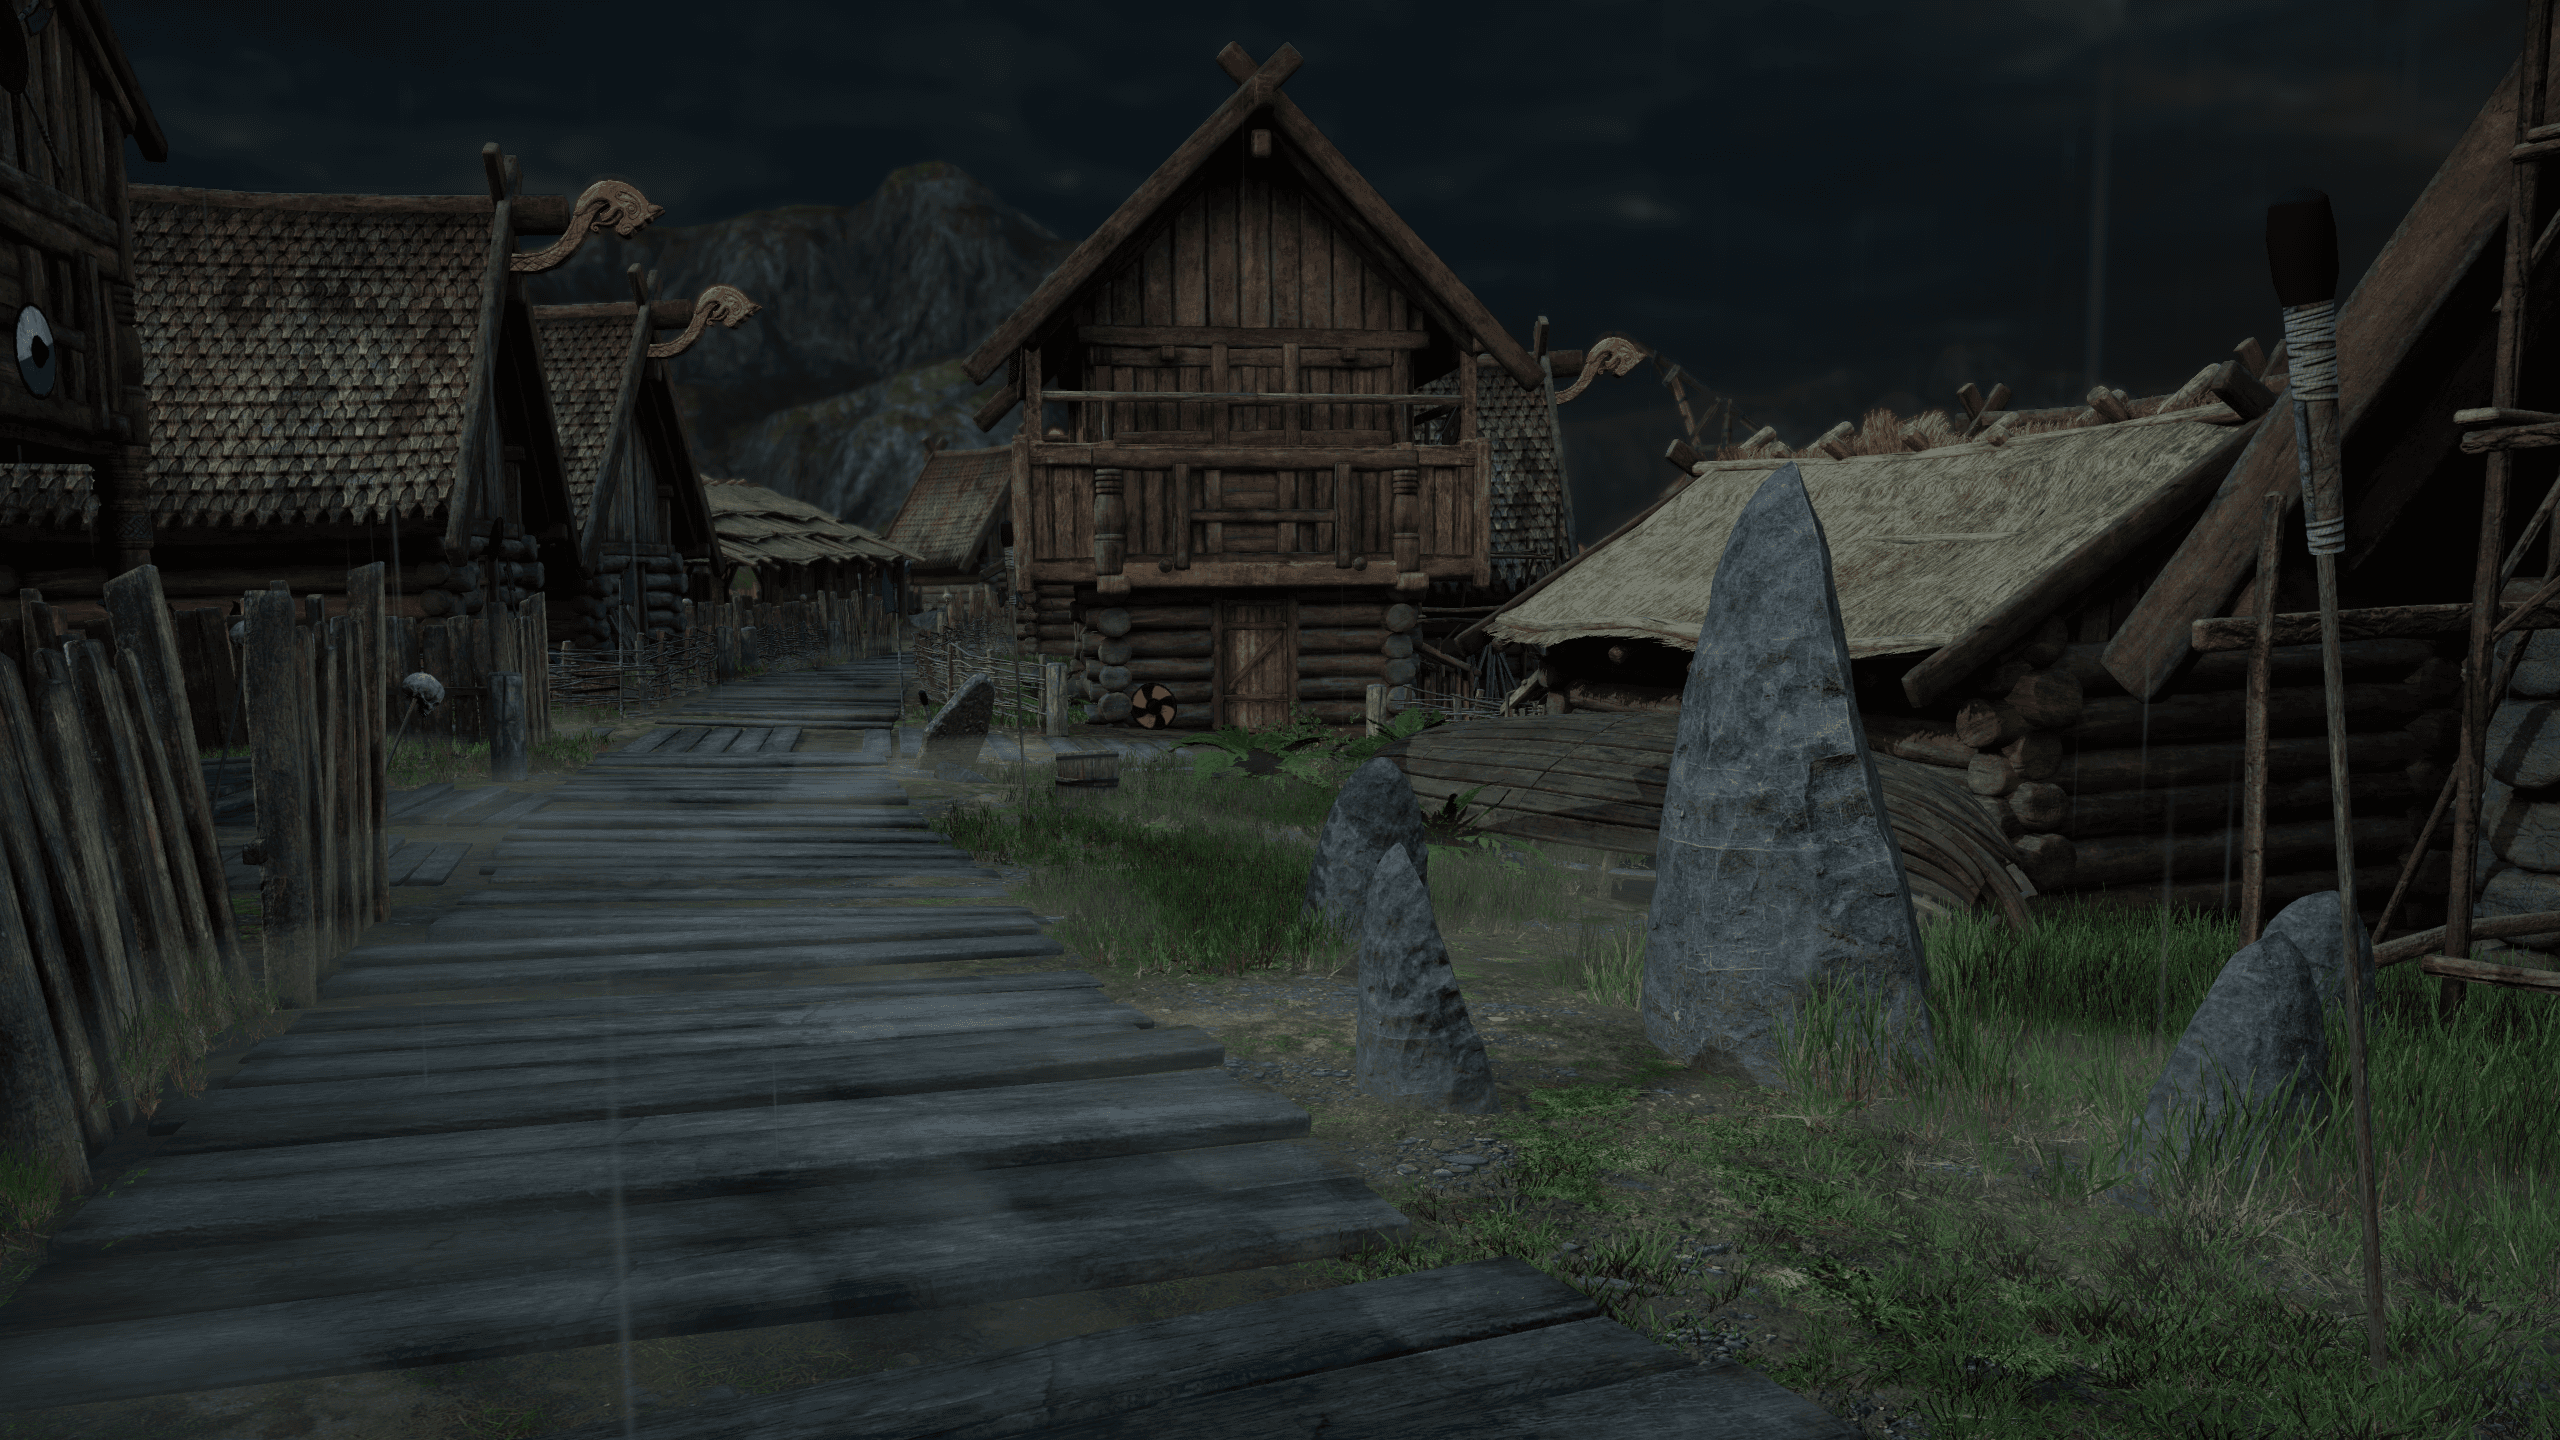
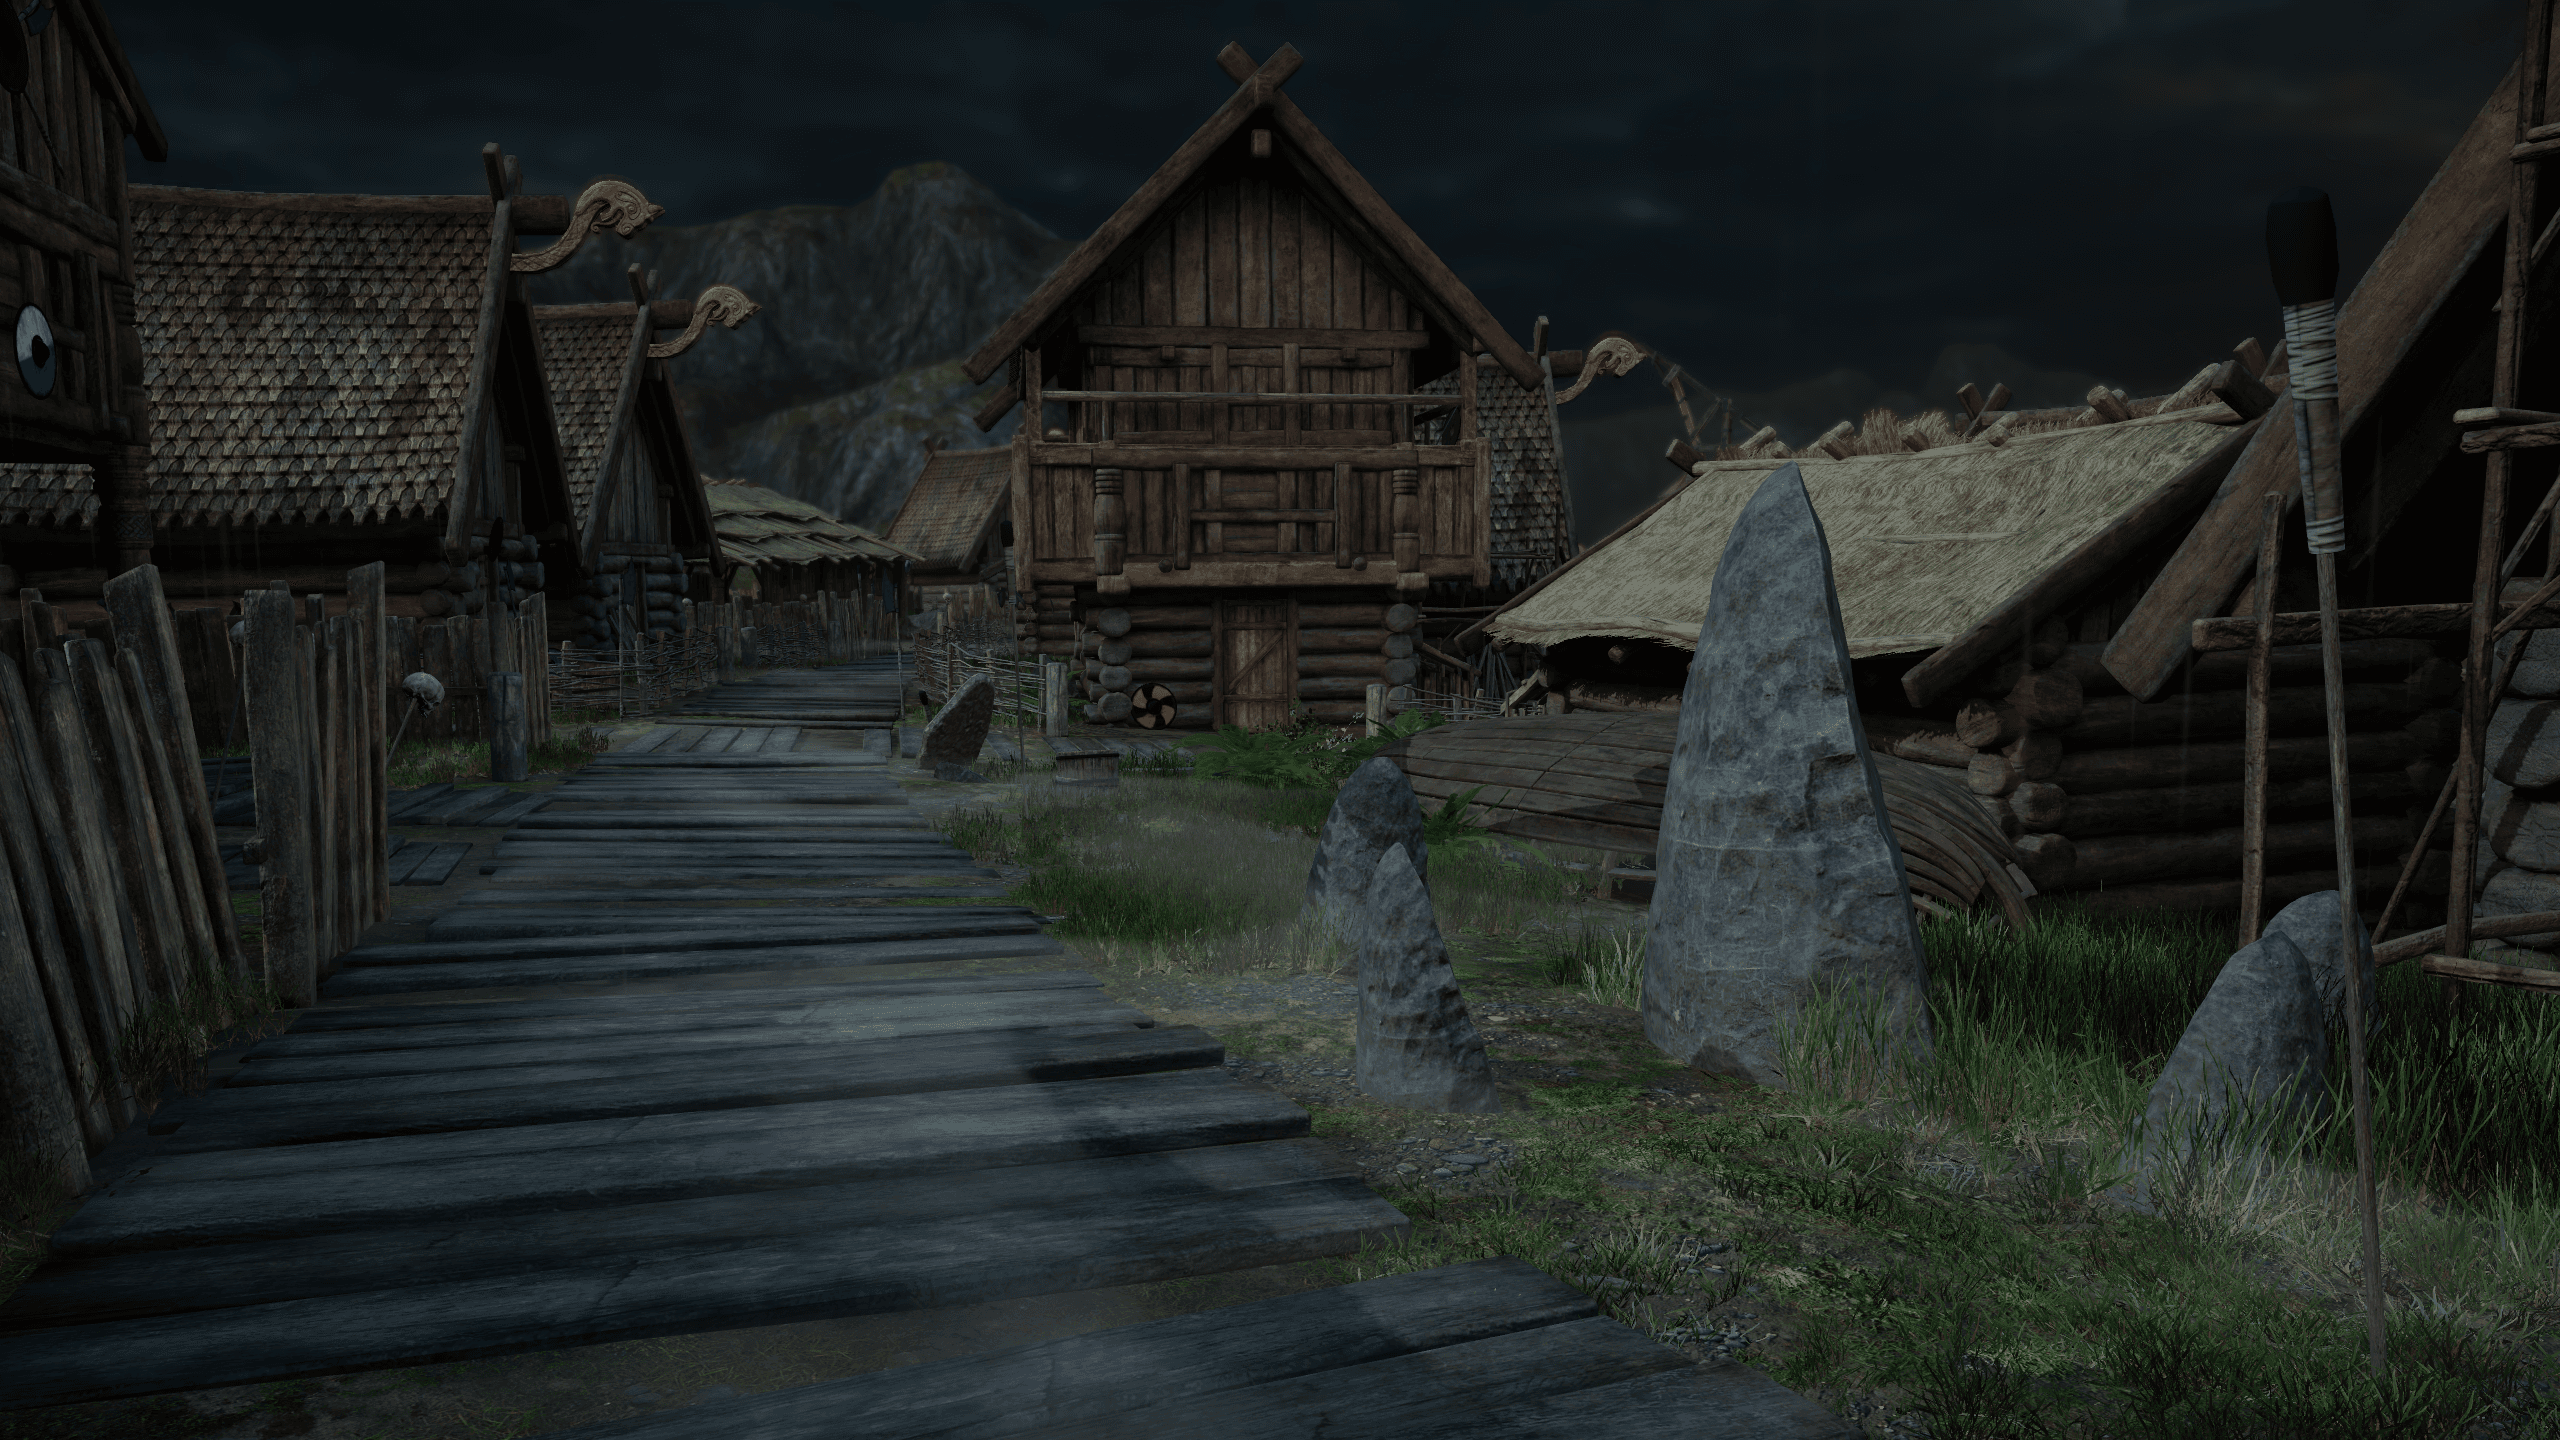
I prepared a setup that renders this camera angle:
The camera covers most of the village.
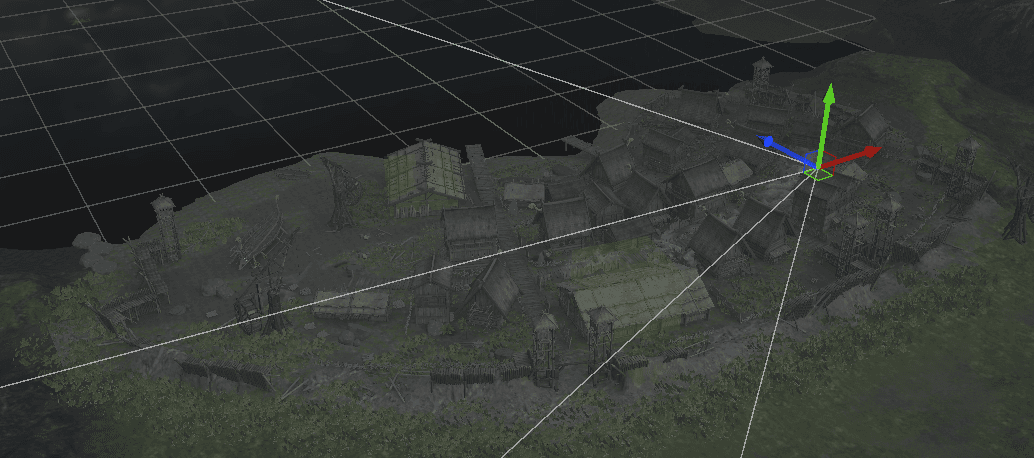
Each time, I will profile the same camera angle to ensure I always measure the same workload.
This is my setup:
Unity 6000.2.9f1,
URP, Forward+ rendering path.
DirectX 12 graphics API.
RTX 3060 rendering 2560x1440.
NVIDIA Nsight Graphics for profiling.
___
Render pipeline overview
I will explain the render pipeline in detail below. In this capture, the whole frame takes around 11.80 ms to render.
In an average frame, other programs can interrupt GPU work, so I need to be careful and ignore markers that include those interruptions. The interruptions can be visible as the red markers at the top of screenshot below.
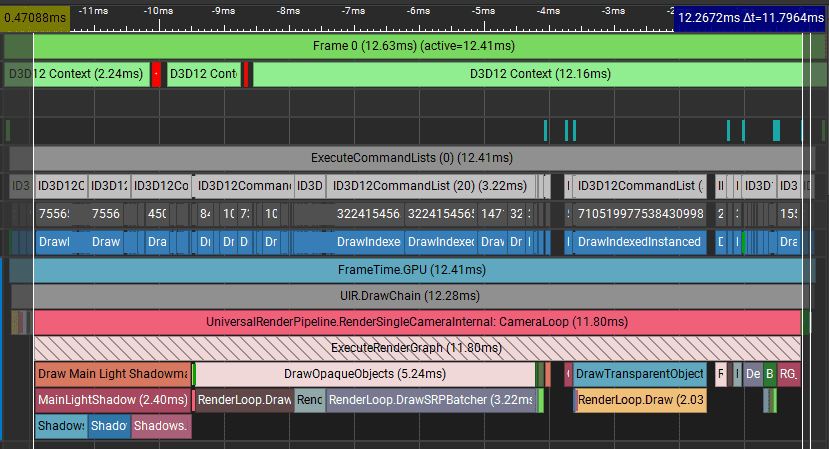
:image-description:
For example, shadowmap above takes 2.40ms to render, but it contains one interruption by the other program running on my PC. So it is slighlty faster than that.
When I profile, I like to capture multiple frames, and when the GPU profiler can't report frame interruptions, I use the shortest captured markers.
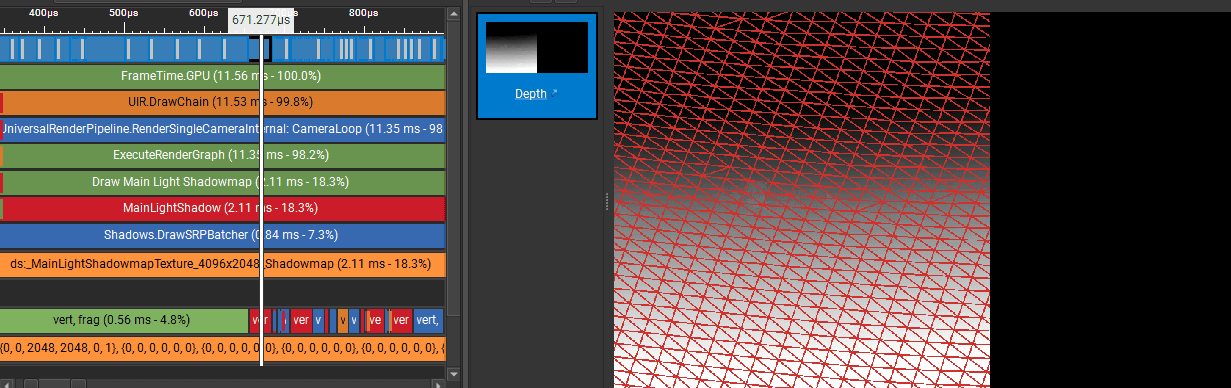
Shadowmap
The rendering starts by rendering two cascades of the shadowmap for the directional light. Each cascade is 2048x2048 with 16-bit depth.
The shadowmap renders 761 draw calls in 2.12 ms.
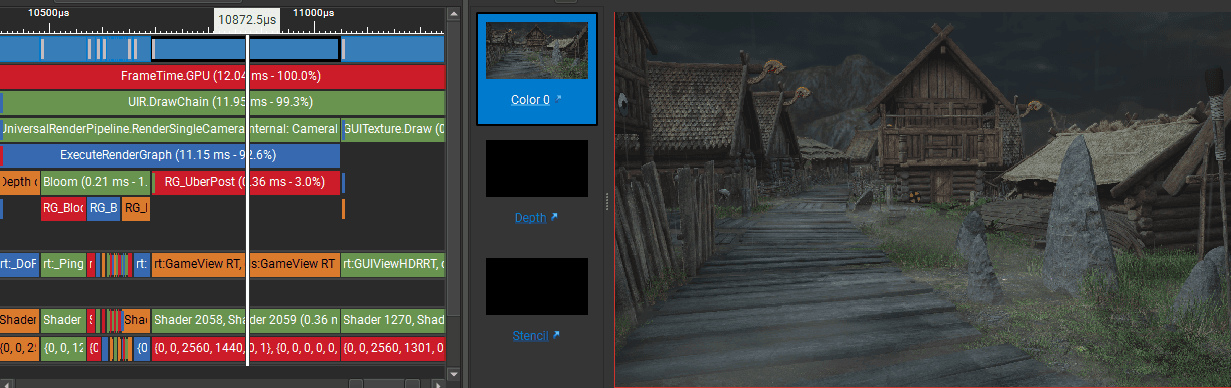
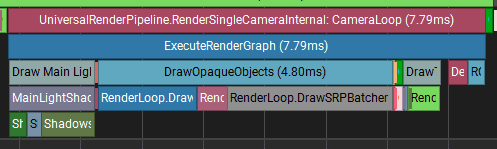
Opaque objects
Then, opaque objects are rendered into a color buffer. This pass uses 608 draw calls to render the 2560x1440 color buffer with R11G11B10_Float color format and D32_Float depth.
Opaques take 4.94 ms to render. Lighting is included in each fragment shader here.
Skybox and depth copy
In the next step, the skybox is rendered and the depth buffer copy is created.
This takes 0.12 ms in total.
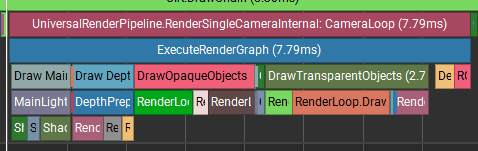
Order-independent transparency
This pass renders two buffers that accumulate transparency. In my scene, this is used for rain droplets. Two rendered buffers are composited on top of the opaque objects.
Order-independent transparency renders in 0.40 ms.
Traditional transparency
Then I render transparent objects using traditional transparency.
Note: I am aware that I should not mix two different transparency methods. I use this project for personal rendering experiments, so I am fine with it. In this scene, I do not notice any artifacts from mixing those two.
This transparency pass renders the near-ground fog using shell texturing. It takes 1.47 ms.
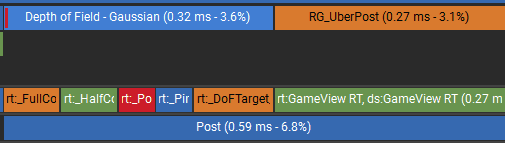
Antialiasing
For antialiasing, I use SMAA, which takes 0.47ms.
Postprocess
Next is depth of field, which blurs the background mountains a bit.
It takes 0.32 ms.
Then there is bloom. However, the scene does not contain any bright pixels, so the effect is rendering basically nothing - easy optimization here.
It takes 0.21 ms.
And an uber postprocess pass that applies effects like vignette and color grading.
It takes 0.36 ms.
___
Optimization iterations
Now I will go through the main passes and try to make the frame faster while keeping the visuals the same.
When an optimization changes the look, I will call it out and treat it as a potential quality setting.
___
Shadowmap
It renders two shadowmaps with 2K resolution and D16 depth. I do not want to lower the quality of the game, so I will keep the shadow render distance and cascade count as-is.
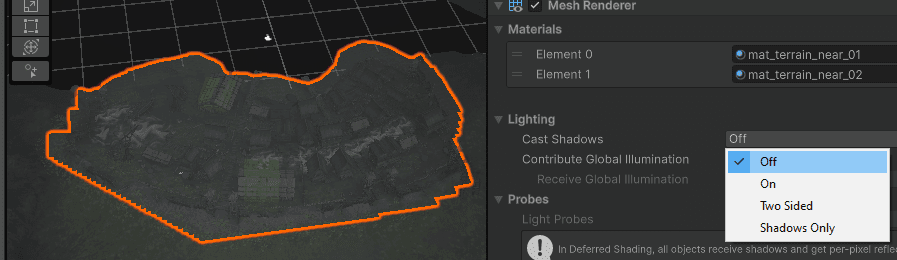
I noticed that the terrain is rendered into the shadowmap. In my case the ground mesh is completely flat and it can't cast any shadows.
I disabled shadow casting for the terrain so it is not rendered into the shadowmap.
This reduced the shadowmap time from 2.06 ms to 2.05 ms. Not much, and it could be measurement noise.
:center-px:
So I kept searching. Rendering grass into the shadowmap takes more than 1.1 ms.
The grass shader uses a discard instruction that prevents the GPU from using early depth rejection and forces fragment shading during shadow rendering. This makes the grass rendering so slow.
:center-px:
For the other objects in the shadowmap, no pixel shader warps are launched:
:center-px:
So I tried disabling shadows for the grass. I jumped into the project, searched for all grass renderers (t:Renderer grass), and disabled shadow casting for them. Here is the visual difference.
The grass clearly looks different. In the real project I would discuss this change with the art director and I would recommend an additional grass quality setting to include in the game's menu.
With grass shadows disabled, the shadowmap pass renders more than 2x faster. The time dropped from 2.05 ms to 0.98 ms.
:center-px:
Further optimization ideas:
This could be improved further by culling surfaces that do not contribute to the shadows, or by baking simplified shadow proxy meshes.
I am satisfied with this optimization for now, so I will move to opaque objects.
___
Occlusion culling
Opaques take 4.95 ms to render. The first thing that pops up is that the frame renders a lot of occluded objects that do not contribute much to the final image.
In one of my previous articles, I implemented custom occlusion culling that is faster than Unity's built-in occlusion culling and GPU resident drawer for this scene. Here you can find it.
So I enabled occlusion culling for this scene:
After I enabled the occlusion culling:
Shadowmap dropped from 0.98 ms to 0.74 ms (-0.24 ms)
Opaques dropped from 4.95 ms to 4.73 ms (-0.22 ms)
:center-px:
___
Optimizing the grass
Then I noticed that a significant portion of the frame time is used by the grass:
:center-px:
I noticed that grass is rendered before the terrain.
I decided to move grass rendering to the end of the opaque queue to batch all grass patches together. This can also reduce how much grass gets blended on top of other pixels.
I modified the render queue of the grass materials:
:center-px:
This saved 0.03 ms, from 4.73 ms to 4.70 ms. It can be measurement noise.
:center-px:
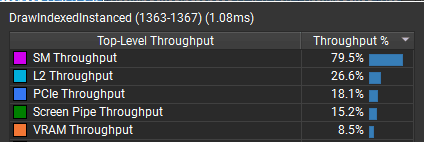
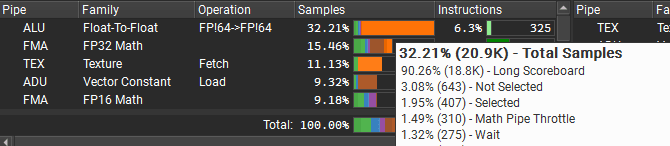
Let's continue searching for further improvements. The grass renders with only 15.2% of the screen pipe throughput and is bottlenecked by the shader. So I decided to focus on the grass shader.
:center-px:
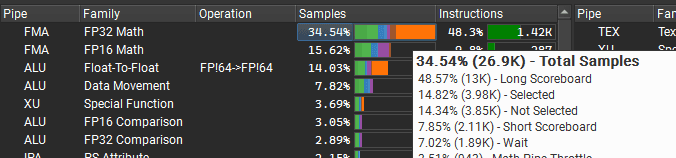
The grass shader is stalled on texture reads (a long scoreboard stall is often caused by texture fetch latency). So I focused on removing memory reads.
This is the shader.
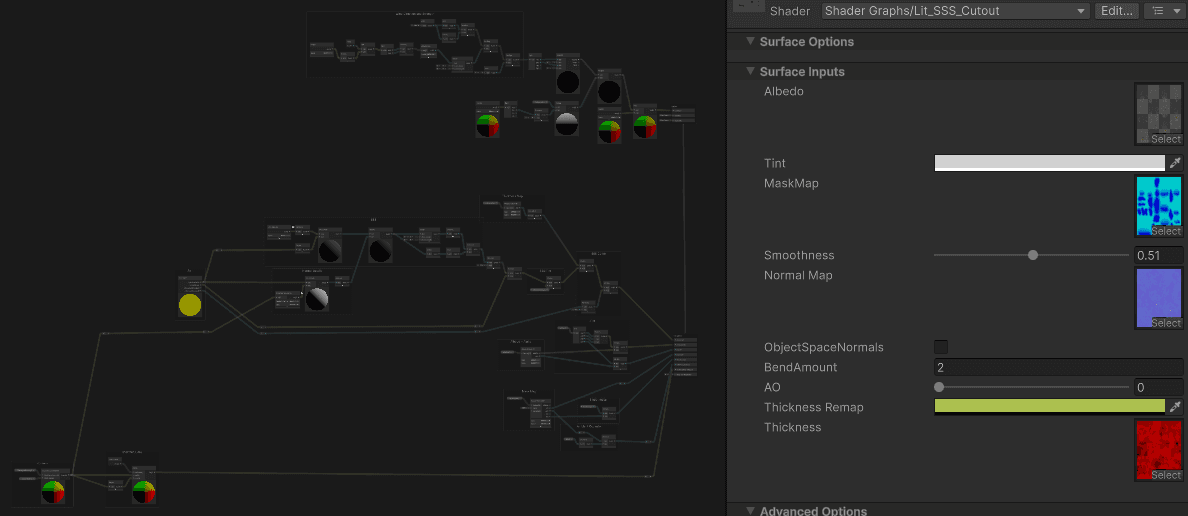
I simplified the shader a bit and removed the thickness texture and the mask texture.
The main difference is that the grass does not react to shadows in the same way, so I would also include this in the game's quality settings. The brighter grass in the comparison below is the original one. The darker is the one that is optimized.
Now, opaques render in 4.28 ms instead of 4.70 ms. That is 0.42 ms faster.
:center-px:
___
Texture filtering
Now I will try to optimize opaques by experimenting with project settings, like target color format and overall quality settings.
I noticed that most shaders during the opaque pass are stalled on texture fetches, which is suspicious because the RTX 3060 should be quite strong at texture sampling.
:center-px:
I browsed the quality settings and noticed that anisotropic filtering was forced for all textures. Anisotropic filtering has a worse cache hit rate because it samples higher-resolution mip levels.
I disabled the forced setting and kept anisotropic filtering enabled only where it matters (like terrain and grass).
Opaques dropped from 4.28 ms to 3.95 ms. That is 0.33 ms faster.
:center-px:
Texture stalls dropped from 90.29% to 87.13%. Not the best results, but I'm glad the issue could be solved by a single toggle in the project settings.
:center-px:
___
Color format
I tried disabling HDR, which changed the color format from R11G11B10 to R8G8B8A8.
The visuals were visibly worse and render time did not improve, so I reverted this change. However, I would expect that for some of the GPUs this could actually matter.
:center-px:
___
Antialiasing
I also experimented with disabling MSAA, but the visuals got visibly worse, so I kept MSAA enabled.
Disabling MSAA would speed up rendering a lot, reducing opaque rendering from 3.95 ms to 3.38 ms. That is 0.57 ms faster and worth considering as a quality setting.
:center-px:
However, increasing MSAA to 4x increased render time by 0.25 ms, while SMAA costs 0.47 ms.
So I decided to increase MSAA to 4x and remove SMAA completely. This saved 0.22 ms overall.
___
Order-independent transparency
Order-independent transparency takes 0.42 ms. The render pipeline renders traditional transparency later anyway, so decided to remove the custom order-independent pass and integrate rain particles into the traditional transparency pass.
This render pipeline modification is beyond the scope of this article, so I will show only the results.
After removing the order-independent pass (0.42 ms), rain particles take 0.05 ms to render during the traditional transparency pass. So I saved 0.37 ms here.
:center-px:
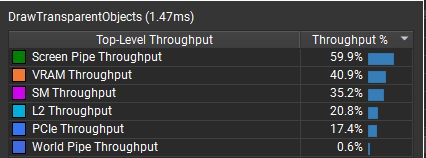
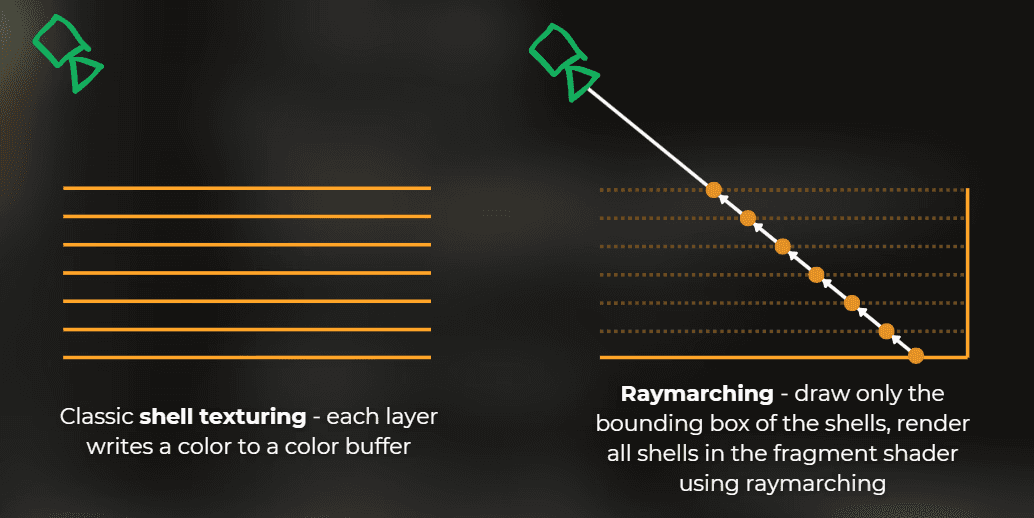
Shell texturing
Now it is time to optimize the fog. The fog renders in 1.43 ms, and it uses shell texturing, which works by rendering multiple layers of transparent planes.
It is bottlenecked by blending color pixels onto the screen.
:center-px:
I decided to replace shell texturing with raymarching. I explained this technique in my other article: Shell texturing vs raymarching
It works by raymarching all the transparent layers in the shader code, and blending the final color once.
After I implemented this, transparent rendering dropped from 1.47 ms to 0.81 ms, which is 0.66 ms faster.
___
Rescaling the transparent objects
I can optimize transparency further by reducing the number of transparent pixels rendered. When fog covers a big area of the screen, I can make the fog particles a bit smaller. I went through the fog particles and rescaled them.
By doing so, transparency rendering dropped from 0.81 ms to 0.66 ms (-0.15 ms).
___
Postprocess
Postprocess is a bit faster than it was before because I removed SMAA, effectively making it 0.47 ms faster. However, I still needed to fix one thing.
I need to remove bloom, because it does not contribute in this scene.
To optimize that, I changed the default bloom settings. It contained a very small intensity and a high threshold value, so Unity was rendering the bloom pass even if it did not contribute to the frame. Unity skips bloom when intensity is 0 or below.
:center-px:
0.21 ms shaved, bloom is not rendered anymore.
___
Depth prepass
I tried to enable a depth prepass to speed up opaque rendering. To make it work properly, I needed to move vegetation rendering from opaques to transparents.
In the end, the benefit was the same as the cost, and the time with and without depth prepass was exactly the same, which was quite fun to see.
Before depth prepass:
:center-px:
:image-description:
Note: I messed some previous optimizations (yes, I made them during the playmode and some of them were reverted...), this is why the opaques take longer to render during this measurement.
After depth prepass:
:center-px:
___
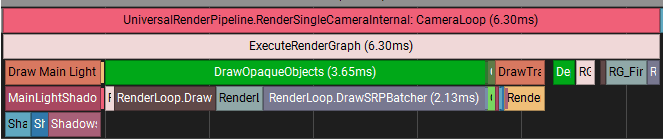
Upscaling
Now, time for the cheat button: upscaling. I will use FSR 1.0, since this upscaler does not require additional rendering like motion vectors or transparency coverage. It just works like a postprocess effect.
Setting the resolution to 80%, render time decreased from 7.79 ms to 6.30 ms.
:center-px:
However, I did not like the look of the upscaler, so I disabled it. I would still implement this as an optional feature in the game settings.
___
Final frame comparison
Now it is time to compare the original frame to the optimized one. During the experiments I was also playing with different parameters, and some of my changes were reverted after exiting the playmode...
I ensured that I enabled all the implemented optimizations except resolution downscaling.
Optimizations measured:
Disabling terrain shadow casting (no measurable change) and disabling grass shadows (big change)
Simplifying the grass shader
Disabling forced anisotropic filtering
Reordering grass to render after the terrain
Occlusion culling
Replacing shell-textured fog with raymarching
Slightly downscaling fog particles to reduce overdraw
Moved rain particles to traditional transparency
Disabling SMAA and replacing it with 4x MSAA
Removing bloom postprocess
I also measured that on a different day, and my GPU is rendering everything slightly faster for whatever reason. The mystery of real-world measurements, I guess.
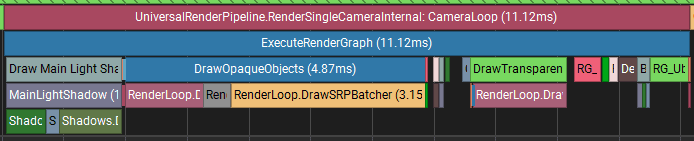
Before: 11.12 ms
:center-px:
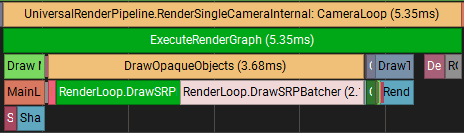
After: 5.35 ms (-5.77 ms)
:center-px:
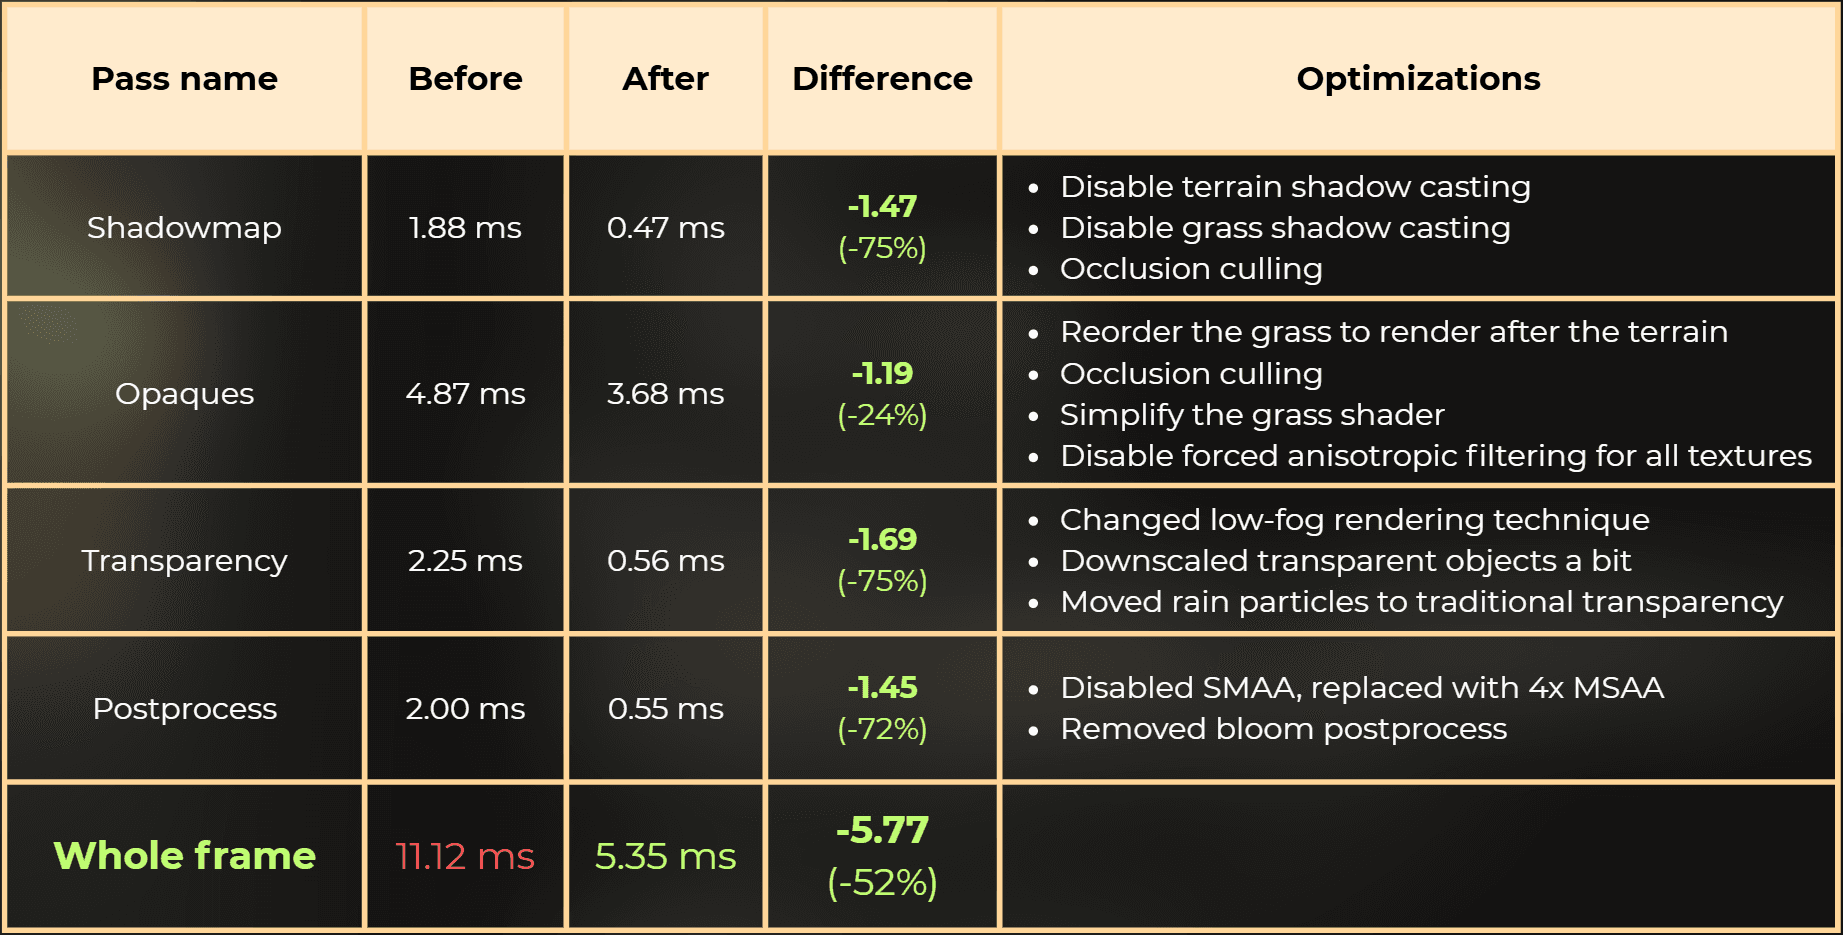
Final comparison table:
___
Summary
With this optimization pass I took the scene from 11.12 ms down to 5.35 ms on an RTX 3060 at 1440p, without using resolution downscaling.
The biggest wins in this project were:
Shadow rendering: removing grass shadows from the shadowmap
Transparency: replacing shell texturing with raymarching and reducing overdraw
Shader cost: simplifying the grass shader and reducing texture fetch pressure
Pipeline cleanup: removing the order-independent transparency pass and removing bloom when it does not contribute
If I were shipping this, I would expose a few toggles as quality settings (grass shadows, MSAA level, and optional upscaling), because these choices are content-dependent and can change the look.
Before:
After:
___
Want more?
You may also like:
How to use native GPU profilers with Unity editor
How to properly benchmark your game
Custom occlusion culling, faster than GPU resident drawer and Umbra
About 1 800 developers read my articles monthly, but I rarely get any more detailed feedback.
I will be greateful if you could leave a comment under my post, or leave me a DM message on LinkedIn - mention just a single thing that was especially useful for you from this article. Could be just one sentence, it helps me to improve the next articles.
Thanks a lot!
___
Want me to analyze your game?
Currently I’m building a hands-on GPU optimization course, and I want to include real production case studies from indie games.
So here’s my offer:
I’ll analyze your already released game for free and share actionable performance findings.
The only condition:
you grant me a license to reuse the case study and findings in future educational content (including the course).
If that sounds fair, drop me a DM message on LinkedIn!