In this article I show how to use texture baking to trade VRAM memory for GPU performance.
If a material is too expensive, but the result is not animated, I often consider baking the results into a texture - then render the mesh with a much simpler shader at runtime.
Here I will explain the full optimization loop that includes the texture baking:
Profiling a nice looking and costly shader.
Baking the expensive part into an albedo texture - I explain the baking with easy step-by-step instructions.
Replace the runtime shader with a cheap one.
Profile again and confirm the speedup.
___
Procedural rock texturing
In my project, I implemented a shader that textures rocks procedurally.
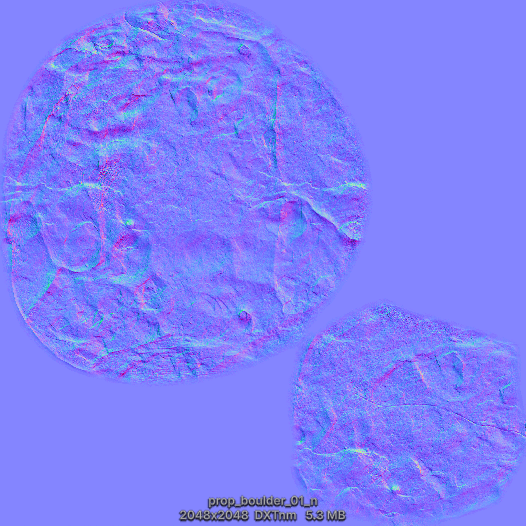
A single rock uses only a normal texture.
This is the normal texture used by this rock. The rest of the visuals is derived procedurally.
:center-px:
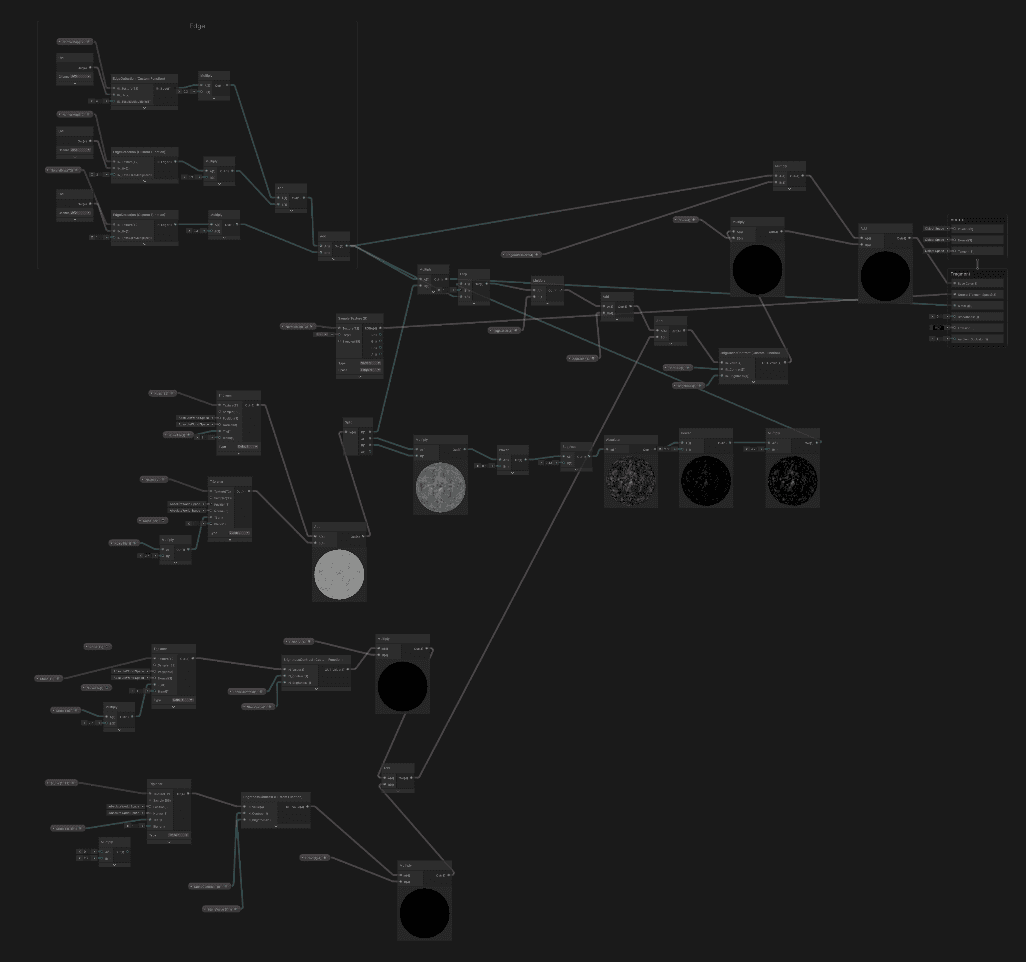
I vibe-coded a custom shader graph node for bevel edge detection. I used it on a normal map to get the sharp surface edges as a grayscale mask.
Here I combined 3 passes of edge detection, each with different parameters. That is 75 normal map samples in total.
Not something I want to use in production.
Then I used triplanar mapping and sampled two textures, tiled wood and tiled mud. I added them together.
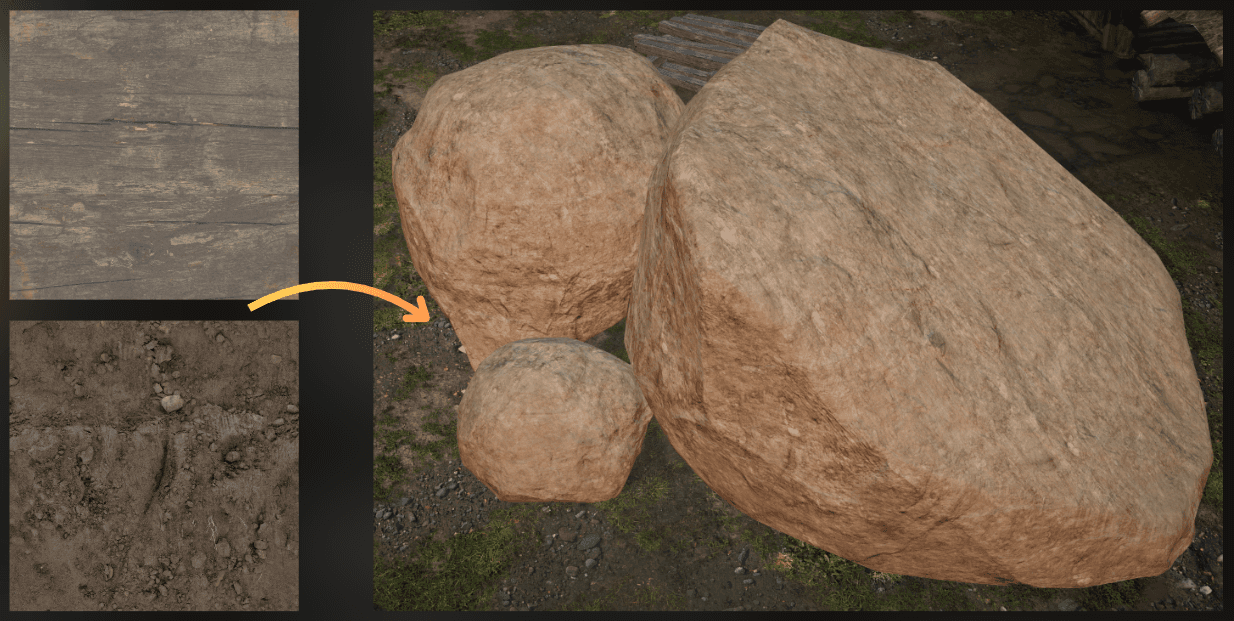
Then I combined edge detection with the triplanar mapping to get the final result. I used a color tint for both:

The final Shader Graph looks like this. Awful monster:
___
Profiling
Let's profile this shader. I profiled this scene at 1440p on my RTX 3060:
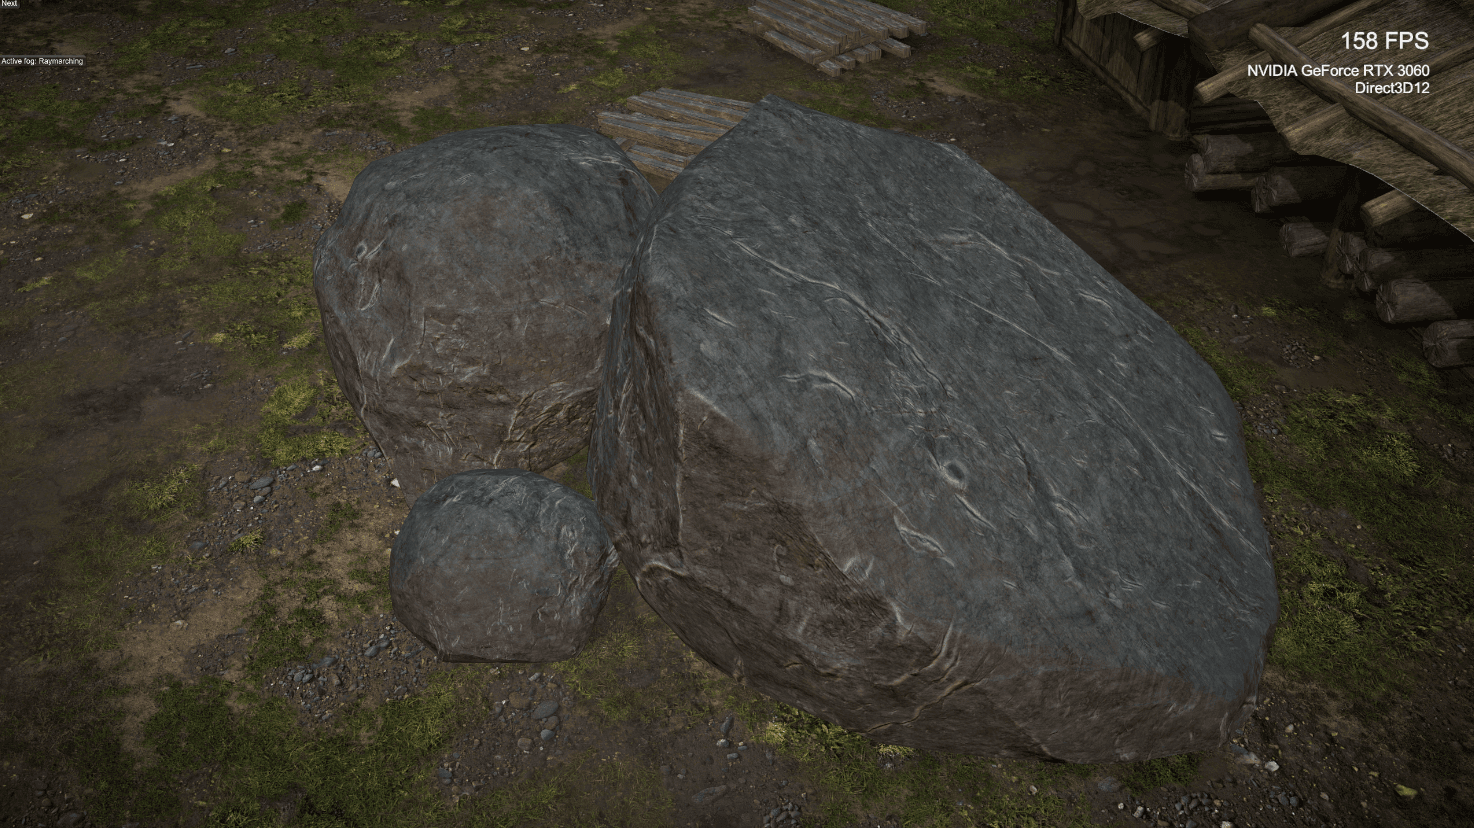
And as expected, the shader is painfully slow.
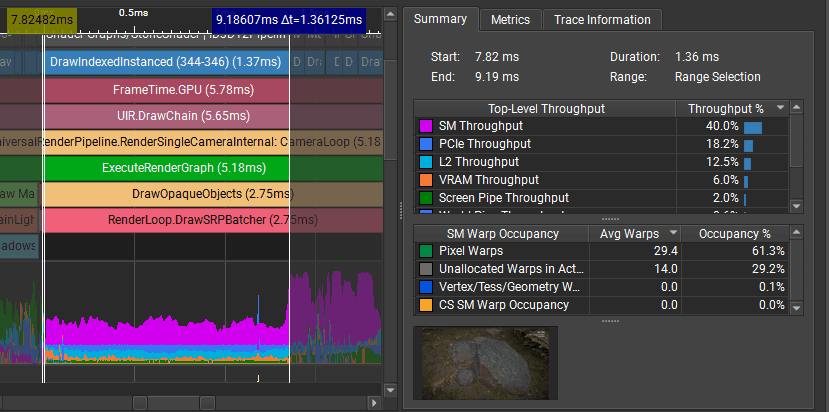
Most units are underutilized. The GPU produces pixels at 2% efficiency (screen pipe). Rendering 3 stones took 1.36ms.
What is wrong?
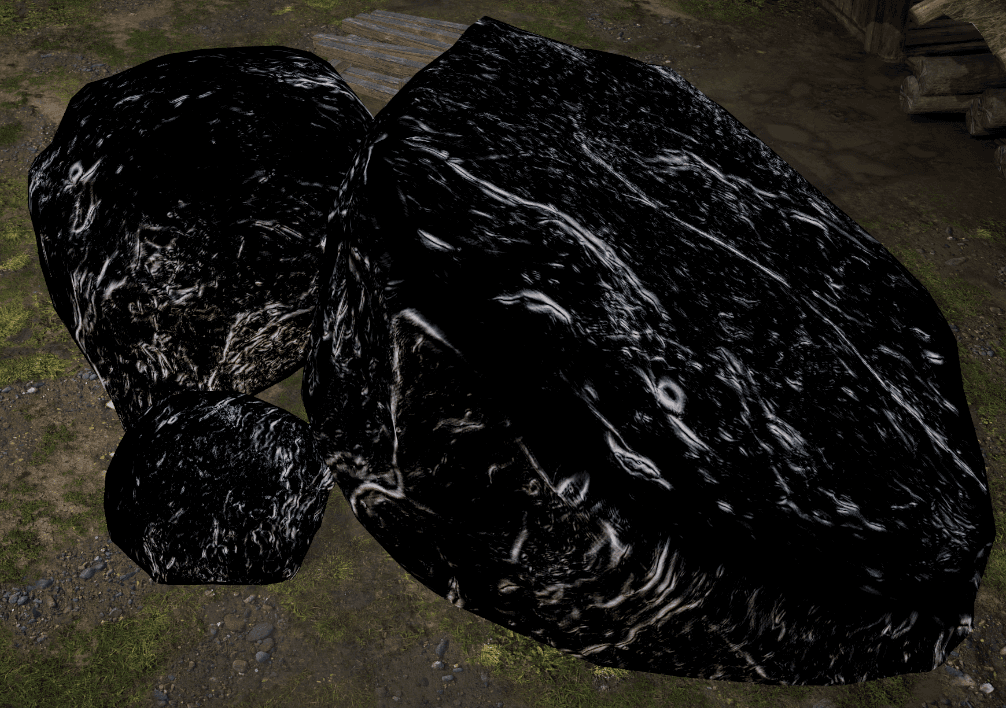
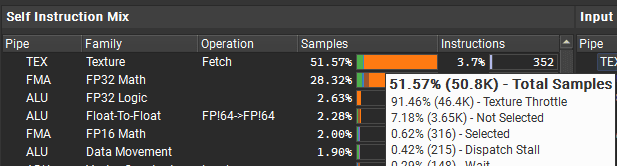
The shader uses too many texture samples. High-quality edge detection needs a lot of samples, which is not a good fit for a stylized runtime shader. In Nsight, you can see the shader spends most of its time stalled waiting for texture fetches (91.46%):
:center-px:
Not good.
___
How to optimize?
I like the look and I want to keep it in my game. How can I optimize it so the shader is not a bottleneck?
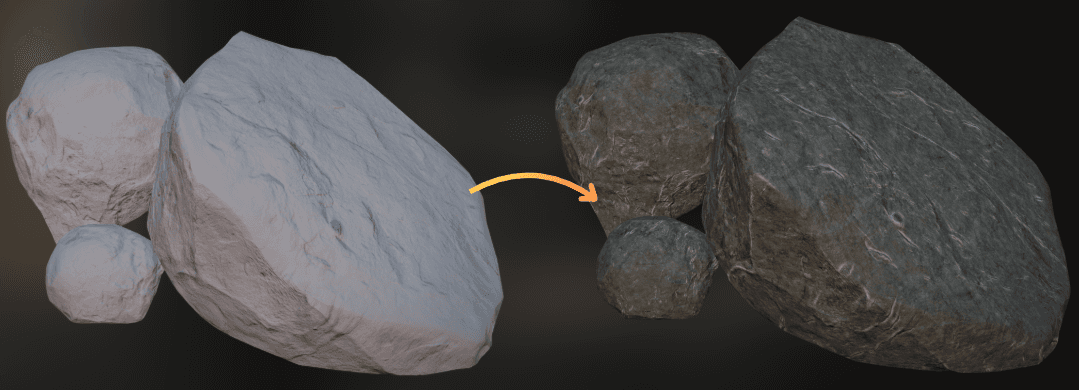
The answer is: I can trade memory for higher performance by baking the albedo texture for this mesh.
I can bake the albedo texture using this shader. Then I can use that albedo texture with a much simpler material, so I get the same result with only a few texture samples at runtime.
___
Texture baking basics
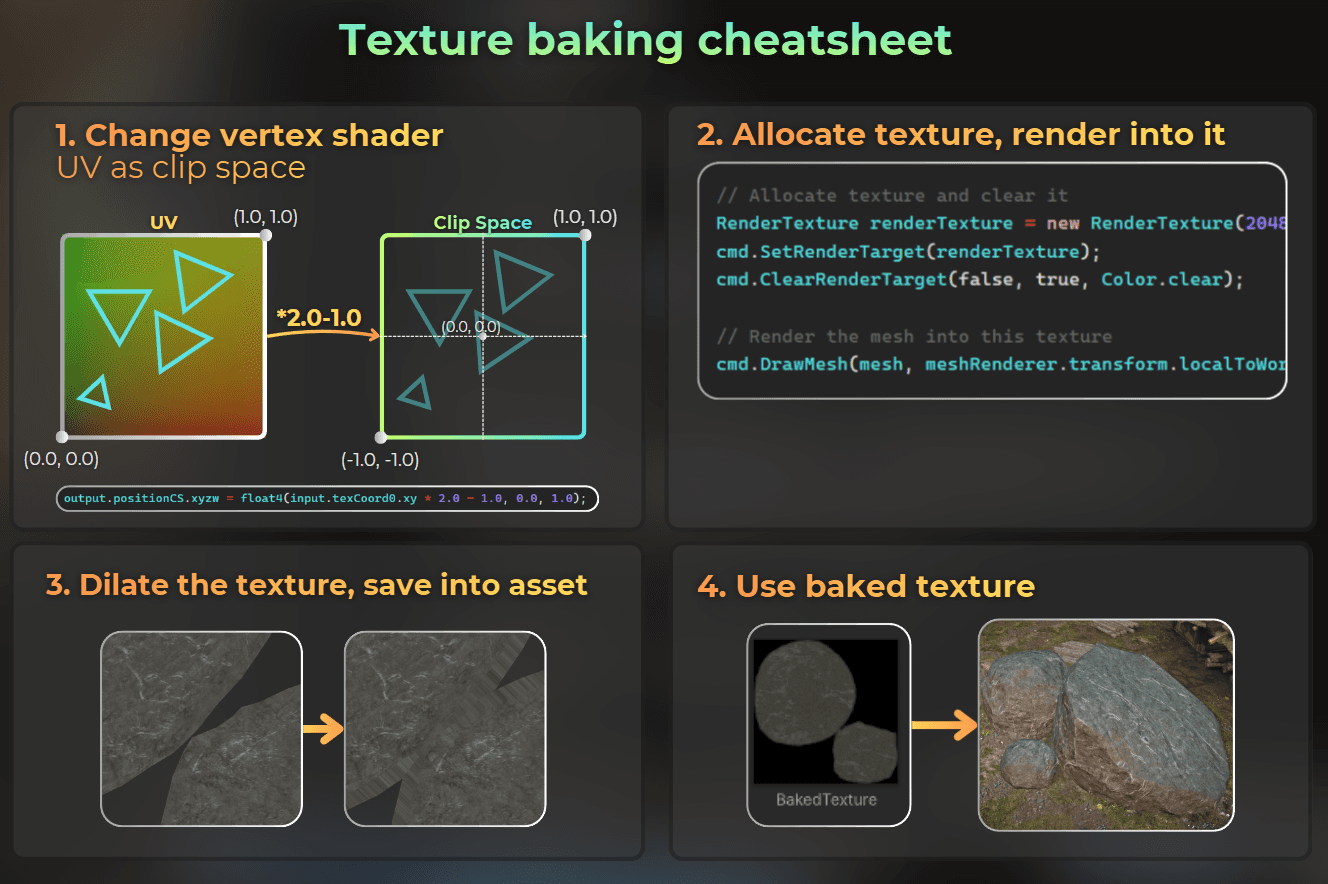
This may sound complex, but baking into a texture takes only a few steps:
Render the mesh into a custom texture
Modify the vertex shader to make it render into UV space
Save the rendered texture as an asset
:center-px:

___
1. Render into a texture
When baking into a texture, the goal is to render a single mesh into a target texture, instead of the standard camera view. So I just need a render texture as the target.
Then I render the mesh with its material into the texture:
RenderTexture renderTexture = new RenderTexture(2048, 2048, 0);
cmd.SetRenderTarget(renderTexture);
cmd.ClearRenderTarget(false, true, Color.clear);
cmd.DrawMesh(mesh, meshRenderer.transform.localToWorldMatrix, material, 0, 0
RenderTexture renderTexture = new RenderTexture(2048, 2048, 0);
cmd.SetRenderTarget(renderTexture);
cmd.ClearRenderTarget(false, true, Color.clear);
cmd.DrawMesh(mesh, meshRenderer.transform.localToWorldMatrix, material, 0, 0
RenderTexture renderTexture = new RenderTexture(2048, 2048, 0);
cmd.SetRenderTarget(renderTexture);
cmd.ClearRenderTarget(false, true, Color.clear);
cmd.DrawMesh(mesh, meshRenderer.transform.localToWorldMatrix, material, 0, 0
___
2. Render UV as clip-space
Now I need to figure out how to render the object so it is rendered as UV-unwrapped, instead of using a classic perspective projection.
The trick here is to:
Ignore the perspective projection.
Remap vertex UV directly into a clip space position.
Disable depth tests and backface culling.
The vertex shader must output the vertex position in clip space. The GPU expects clip space in the range from -1 to 1. I can remap UV space from [0, 1] into [-1, 1].
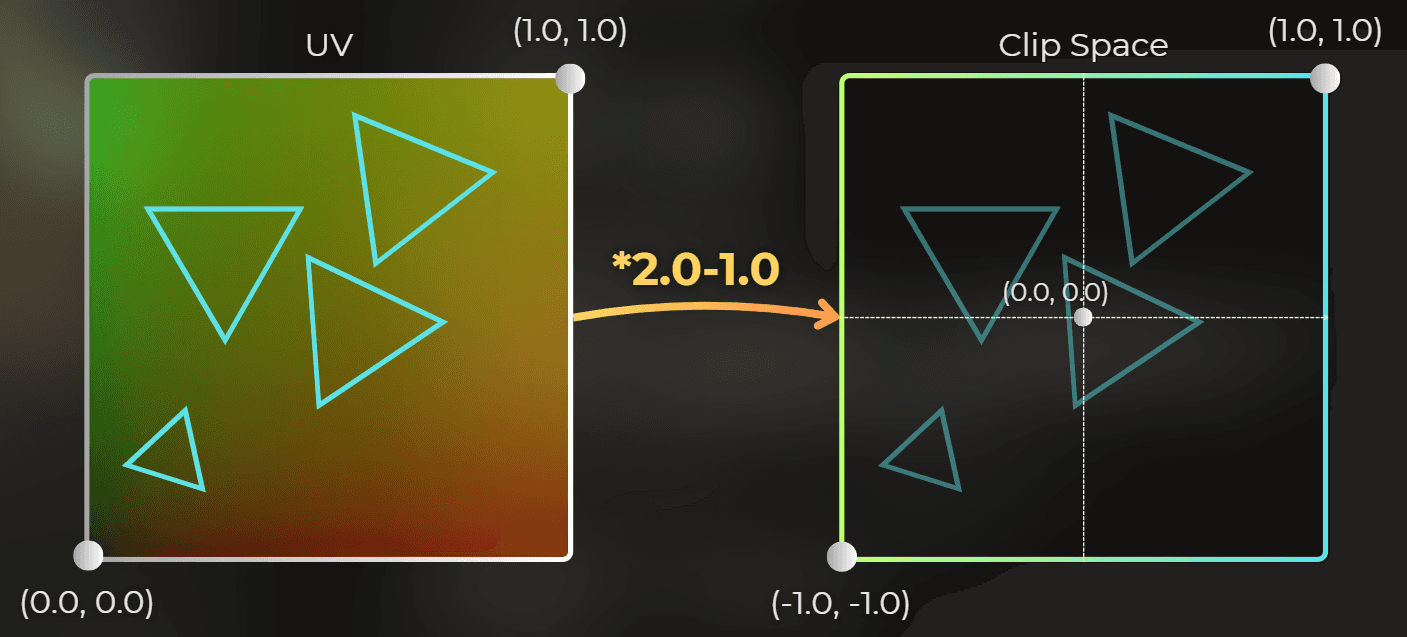
You can do this with one line in the vertex shader. Just before it finishes, override the clip space position:
output.positionCS.xyzw = float4(input.texCoord0.xy * 2.0 - 1.0, 0.0, 1.0);
#if UNITY_UV_STARTS_AT_TOP
output.positionCS.y *= -1.0;
#endif
output.positionCS.xyzw = float4(input.texCoord0.xy * 2.0 - 1.0, 0.0, 1.0);
#if UNITY_UV_STARTS_AT_TOP
output.positionCS.y *= -1.0;
#endif
output.positionCS.xyzw = float4(input.texCoord0.xy * 2.0 - 1.0, 0.0, 1.0);
#if UNITY_UV_STARTS_AT_TOP
output.positionCS.y *= -1.0;
#endif
___
3. Save the texture
After rendering, I save the texture into an image file. Then it is ready to use with a different shader.
___
Implementation
Here is how I implemented texture baking in my project:
I created a second version of the original shader for baking
I created an editor window that I will use for baking
I allocated custom texture and rendered the mesh into it.
I saved the texture into an asset.
I replaced the original material with the optimized one.
Fix issues
___
1. Creating a second version of the original shader
First, I modify the original shader to render into UV space, instead of using a perspective projection.
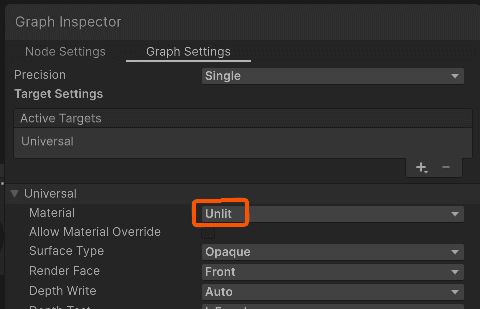
I want to render the unaltered albedo for this pass, so I changed the shader type from Lit to Unlit to avoid applying lighting when baking the model.
:center-px:
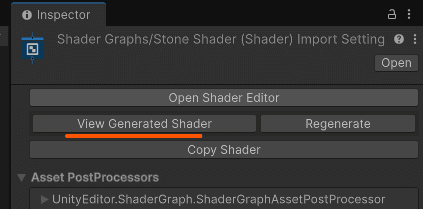
Unity does not make it easy to override clip space position in Shader Graph, so I generated the shader code from the graph and modified it.
:center-px:
I changed the shader name and added a _Baking suffix:
Shader "Shader Graphs/StoneShader"
Shader "Shader Graphs/StoneShader_Baking"
Shader "Shader Graphs/StoneShader"
Shader "Shader Graphs/StoneShader_Baking"
Shader "Shader Graphs/StoneShader"
Shader "Shader Graphs/StoneShader_Baking"
Then, I disabled depth testing and backface culling in the first pass:
:center-px:

Then I modified the PackedVaryings method to override the calculated clip-space position:
PackedVaryings PackVaryings (Varyings input)
{
PackedVaryings output;
ZERO_INITIALIZE(PackedVaryings, output);
output.positionCS.xyzw = float4(input.texCoord0.xy * 2.0 - 1.0, 0.0, 1.0);
#if UNITY_UV_STARTS_AT_TOP
output.positionCS.y *= -1.0;
#endifPackedVaryings PackVaryings (Varyings input)
{
PackedVaryings output;
ZERO_INITIALIZE(PackedVaryings, output);
output.positionCS.xyzw = float4(input.texCoord0.xy * 2.0 - 1.0, 0.0, 1.0);
#if UNITY_UV_STARTS_AT_TOP
output.positionCS.y *= -1.0;
#endifPackedVaryings PackVaryings (Varyings input)
{
PackedVaryings output;
ZERO_INITIALIZE(PackedVaryings, output);
output.positionCS.xyzw = float4(input.texCoord0.xy * 2.0 - 1.0, 0.0, 1.0);
#if UNITY_UV_STARTS_AT_TOP
output.positionCS.y *= -1.0;
#endifNow the shader is ready. I saved the generated shader as a .shader asset in my project:
:center-px:

___
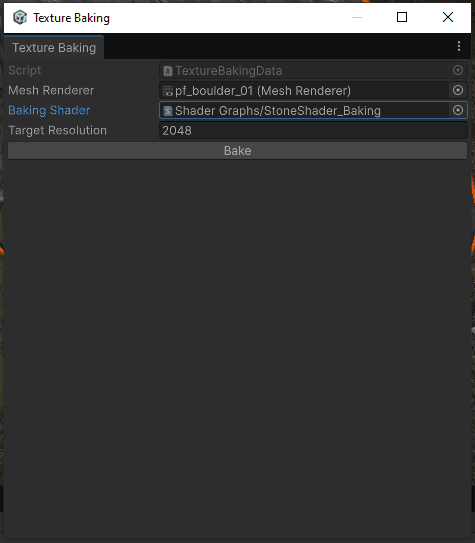
2. Creating the editor window
I want to run baking from an editor window. I started by creating the data needed to bake the object into a texture:
public class TextureBakingData : ScriptableObject
{
public MeshRenderer meshRenderer;
public Shader bakingShader;
public int targetResolution = 2048;
public class TextureBakingData : ScriptableObject
{
public MeshRenderer meshRenderer;
public Shader bakingShader;
public int targetResolution = 2048;
public class TextureBakingData : ScriptableObject
{
public MeshRenderer meshRenderer;
public Shader bakingShader;
public int targetResolution = 2048;
Then I created an editor window:
using System;
using System.IO;
using UnityEditor;
using UnityEngine;
using UnityEngine.Rendering;
public sealed class TextureBakingWindow : EditorWindow
{
[SerializeField]
private TextureBakingData data;
private Editor dataEditor;
private RenderTexture bakedTexture;
[MenuItem("Tools/Texture baking")]
public static void Open()
{
GetWindow<TextureBakingWindow>("Texture Baking");
}
private void OnEnable()
{
if (data == null)
{
data = CreateInstance<TextureBakingData>();
data.hideFlags = HideFlags.DontSave;
}
dataEditor = Editor.CreateEditor(data);
}
private void OnGUI()
{
dataEditor.DrawDefaultInspector();
if (GUILayout.Button("Bake"))
bakedTexture = BakeTexture();
if (bakedTexture != null)
{
if (GUILayout.Button("Save"))
SaveTexture();
var rect = EditorGUILayout.GetControlRect(false, position.width);
GUI.DrawTexture(rect, bakedTexture);
}
}
private RenderTexture BakeTexture()
{
return null;
}
private void SaveTexture()
{
This is what the window looks like:
:center-50:
___
3. Render mesh into texture
Now it's time to render the mesh into the custom texture. Let's implement the method that bakes the texture. The comments explain each step:
private RenderTexture BakeTexture()
{
MeshFilter meshFilter = data.meshRenderer.GetComponent<MeshFilter>();
if (meshFilter == null)
return null;
Mesh mesh = meshFilter.sharedMesh;
if (mesh == null)
return null;
Material material = data.meshRenderer.sharedMaterial;
if (material == null)
return null;
material = new Material(material);
material.hideFlags = HideFlags.DontSave;
material.shader = data.bakingShader;
CommandBuffer cmd = CommandBufferPool.Get(nameof(TextureBakingWindow));
RenderTexture renderTexture = new RenderTexture(data.targetResolution, data.targetResolution, 0);
cmd.SetRenderTarget(renderTexture);
cmd.ClearRenderTarget(false, true, Color.clear);
cmd.DrawMesh(mesh, data.meshRenderer.transform.localToWorldMatrix, material, 0, 0);
Graphics.ExecuteCommandBuffer(cmd);
CommandBufferPool.Release(cmd);
DestroyImmediate(material);
return renderTexture
And look, baking already works!
___
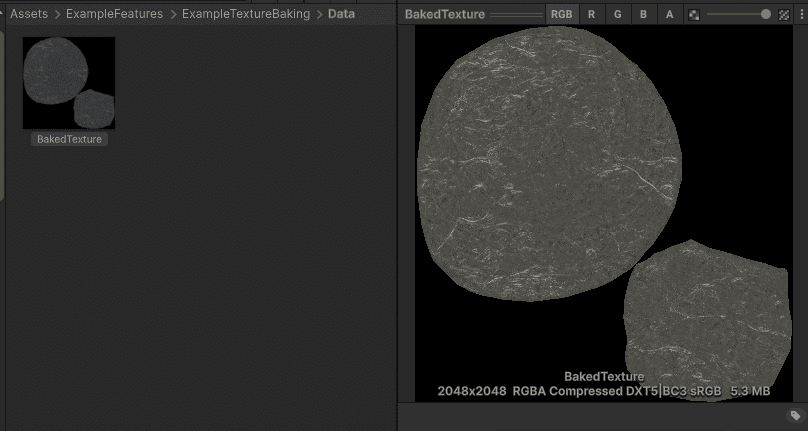
4. Saving the texture into an asset
Now it's time to save the texture into a file.
I open a file dialog to choose where to save it.
private void SaveTexture()
{
string path = EditorUtility.SaveFilePanel(
"Save baked texture as PNG",
"Assets",
"BakedTexture.png",
"png"
);
if (string.IsNullOrWhiteSpace(path))
return;
if (!path.EndsWith(".png", StringComparison.OrdinalIgnoreCase))
path += ".png";
RenderTexture previous = RenderTexture.active;
try
{
RenderTexture.active = bakedTexture;
var tex2D = new Texture2D(bakedTexture.width, bakedTexture.height, TextureFormat.RGBA32, false, true);
tex2D.ReadPixels(new Rect(0, 0, bakedTexture.width, bakedTexture.height), 0, 0);
tex2D.Apply(false, false);
byte[] png = tex2D.EncodeToPNG();
DestroyImmediate(tex2D);
File.WriteAllBytes(path, png);
AssetDatabase.Refresh();
}
catch (Exception e)
{
Debug.LogException(e);
EditorUtility.DisplayDialog("Save Texture Failed", e.Message, "OK");
}
finally
{
RenderTexture.active = previous
Here is saving in action:
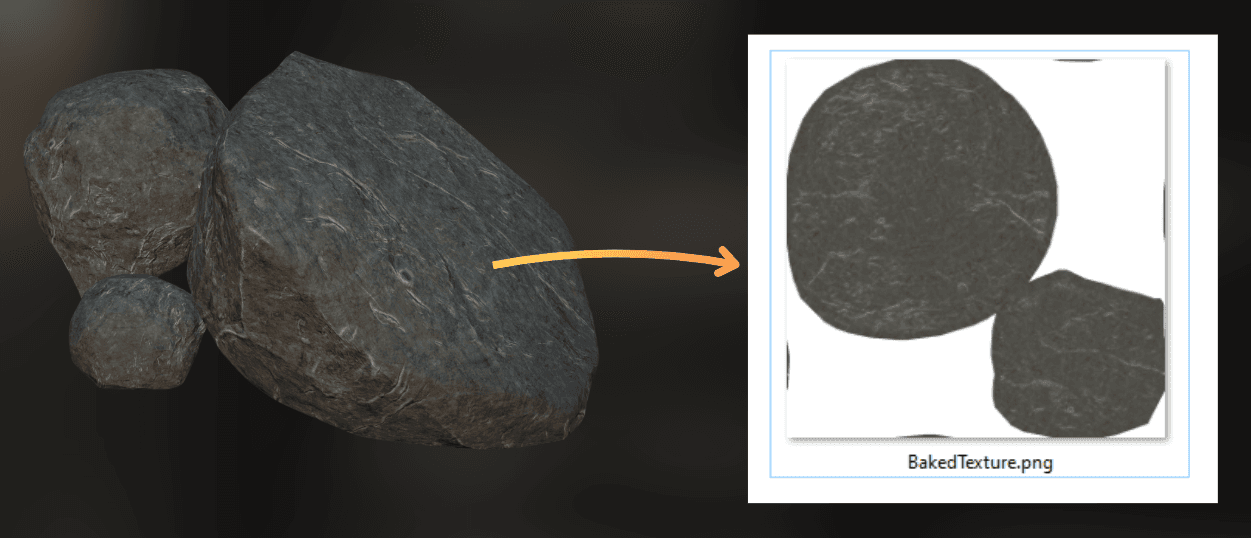
Now I have the baked texture in the assets!
___
5. Replacing the original material with the optimized one
I made a shader that uses only the albedo texture and the normal map to render the objects.
:center-50:
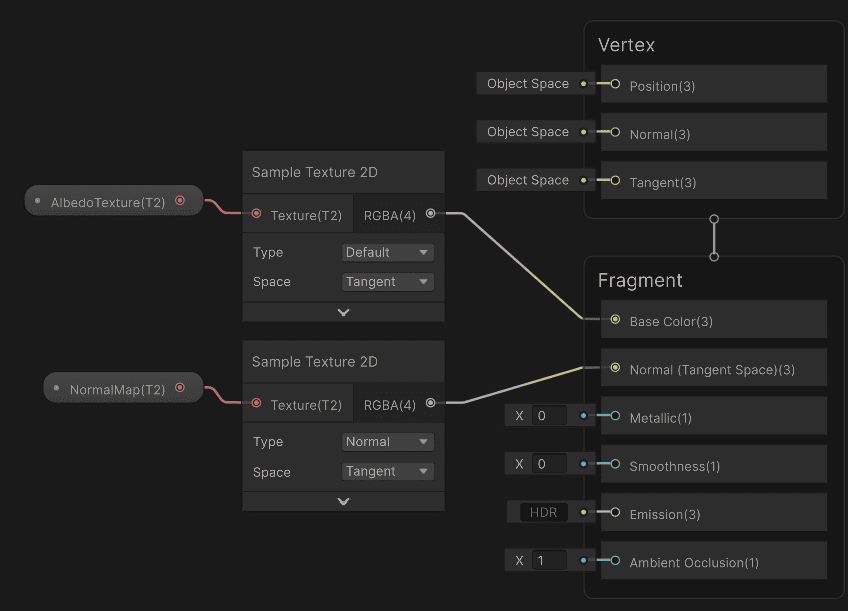
Then I created a material that uses the baked texture.
In the video below, I toggle between the original shader and the baked texture. The baked texture is the brighter one.
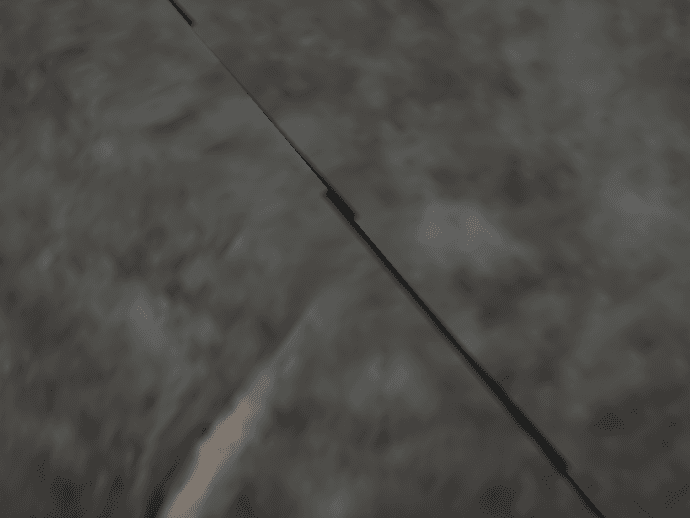
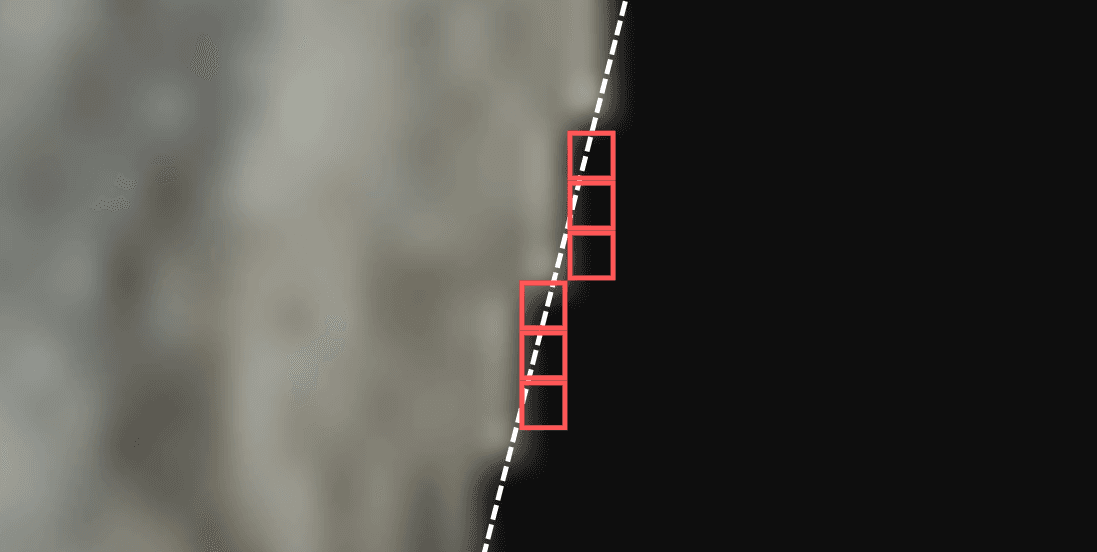
There is a problem. Black pixels appear on the UV seams of the model.
:center-50:
___
6. Fix issues
Now I need to fix the black pixels. They appear because bilinear filtering mixes in neighboring pixels that were never baked, and they bleed into the model.
I can fix this by adding dilation. It works flooding the non-baked pixels with the neighboring baked ones.
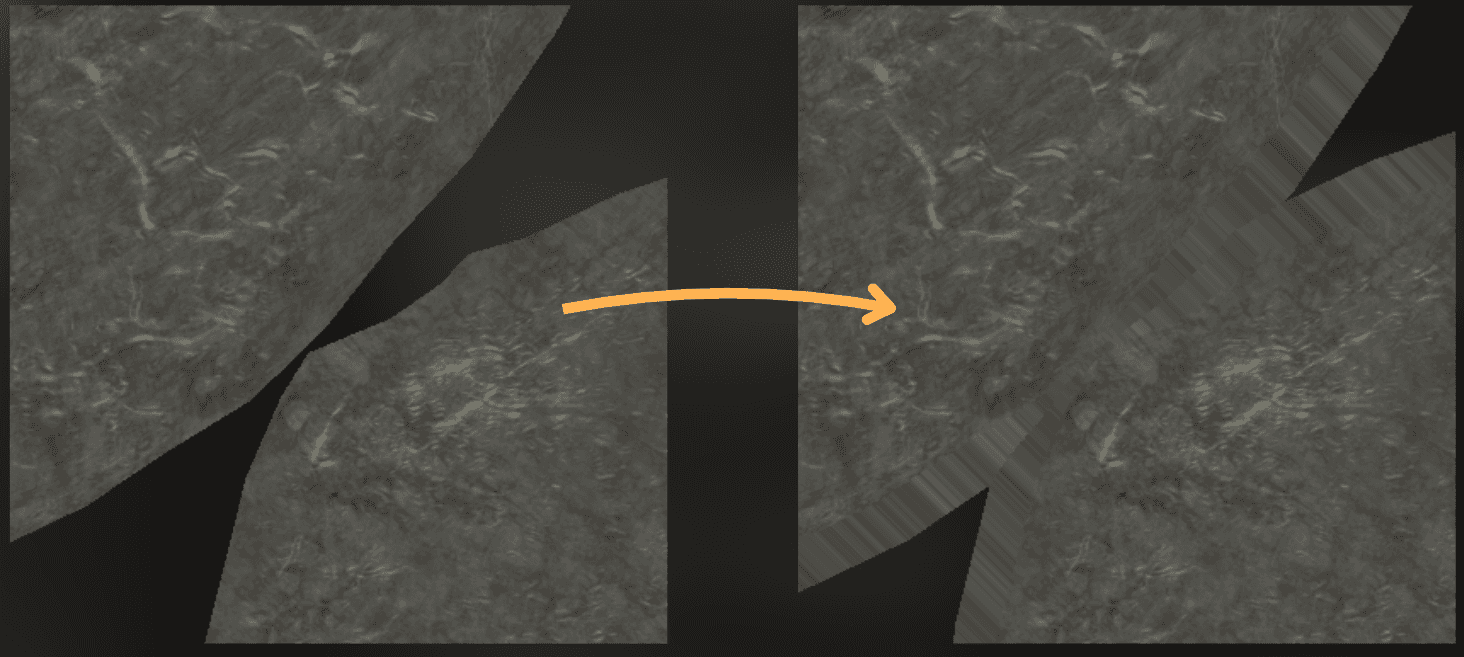
I used this shader to "blit" the baked texture to create the dilation.
float4 frag(FragmentData input) : SV_Target0
{
const float AlphaThreshold = 0.1;
uint w, h;
_MainTex.GetDimensions(w, h);
float2 texel = 1.0 / max(float2((float)w, (float)h), 1.0.xx);
float2 uv = input.uv;
float4 c = _MainTex.Sample(linearRepeatSampler, uv);
float4 best = c;
if (best.a <= AlphaThreshold)
{
[unroll]
for (int y = -1; y <= 1; y++)
{
[unroll]
for (int x = -1; x <= 1; x++)
{
float4 s = _MainTex.Sample(linearRepeatSampler, uv + texel * float2(x, y));
best = (s.a > best.a) ? s : best;
}
}
best = (best.a > AlphaThreshold) ? best : c;
}
return best
Then I added a dilation step to the baking algorithm:
...
Graphics.ExecuteCommandBuffer(cmd);
RenderTexture renderTextureTemp = new RenderTexture(data.targetResolution, data.targetResolution, 0);
for (int i = 0; i < 10; i++)
{
Graphics.Blit(renderTexture, renderTextureTemp, data.dilateMaterial);
Graphics.Blit(renderTextureTemp, renderTexture, data.dilateMaterial);
}
CommandBufferPool.Release(cmd);
DestroyImmediate(material);
renderTextureTemp.Release();
This is the difference between the dilated texture and the original one:
It fixed the seams:
___
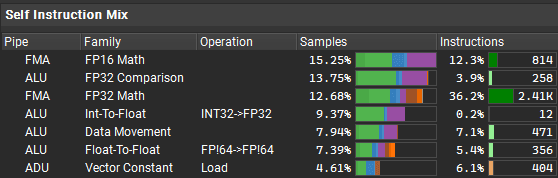
Profiling after optimization
Now it's time to compare the performance of the original shader to the optimized one. Again, I profiled on an RTX 3060 at 1440p.
The baked texture rendered 4.5x faster in this case!

The shader is no longer bound by texture fetches:
:center-px:
___
Summary
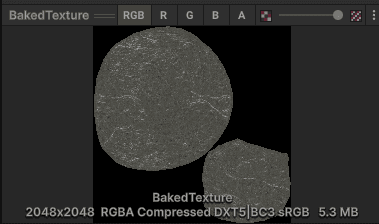
I optimized the shader by baking it into a texture. This lets me skip the costly computation in the shader and replace it with a single texture read.
This is a good optimization technique, but it trades memory for GPU performance. In this case, the shader renders 4.5x faster. However, it adds 5.3MB to VRAM.
:center-px:
Pros:
You keep the same look, but move the heavy work out of the runtime shader.
You reduce the number of texture samples and expensive math per pixel.
You get more stable performance on multiple devices, because sampling one texture has more predictable behaviour than complex algorithms.
Baked textures are easy to reuse across multiple instances of the same mesh.
Cons:
You spend VRAM and disk space for the baked textures.
You add an authoring step and more tooling, which can slow iteration.
Baking can expose UV issues (seams, padding, filtering), so you may need extra fixes like dilation.
If the look depends on time or dynamic inputs, baking reduces or removes that flexibility.
In short, texture baking is a good option when your shader is the bottleneck and the result can be treated as static. If you are already close to your memory budget, or your material needs to stay fully dynamic, this trade might not be worth it.
And, cheatsheet as a bonus:
Want me to analyze your game?
Currently I’m building a hands-on GPU optimization course, and I want to include real production case studies from indie games.
So here’s my offer:
I’ll analyze your already released game for free and share actionable performance findings.
The only condition:
you grant me a license to reuse the case study and findings in future educational content (including the course).
If that sounds fair, drop me a DM message on LinkedIn!