You only need one evening to implement your first custom physics engine.
I love this topic. Call me a weirdo, but when I'm on holiday, I love to go to some cozy place in nature, enjoy the views, and then... take out my laptop and work on my own physics engine 😆
This article is a practical template for the simplest solver. It is not physically accurate, but it is stable, fast, and very customizable.
In this article:
I explain what the Verlet solver is and when to use it.
I show the simplest simulation loop.
I provide a step-by-step implementation plan in Unity.
I compare this approach to Unity Physics and explain trade-offs.
At the end of this article, you should be able to create a physics solver like this:
___
What is Verlet Integration?
The Verlet solver is one of my favorite physics tools when I need simple, fast, and stylized physics.
If your game needs full rigidbody realism and easy integration with other engine systems, built-in physics is usually better.
However, if you need soft bodies, simulated ropes, cloth simulation, or stylized motion that fits your game feel, implementing custom physics is often worth it.
Why bother?
Built-in physics is not designed for every use case. I used custom physics when:
Built-in physics performance limited the game, but the required features were simple enough to implement on my own. Usually, a minimal feature set, implemented well, runs faster than a full physics engine.
I used a Verlet solver for custom mechanics, for example tension simulation for a bridge-building game or collisions with voxelized SDFs.
For example, I created a realtime SDF voxelization and used a Verlet solver to implement physics there.
Many developers use it for cloth simulation (source: https://joaen.github.io/assets/verlet/).
It also works well for physics-stylized games, like World of Goo, or my game jam project about me eating jam :v.
Verlet integration is such a simple physics simulation method that you can get it running in a weekend.
So, how does it work?
The Verlet solver works by simulating spheres. A sphere is the basic object in this solver. With constraints, you can assemble many other structures from spheres.
So, let's look at the properties of a Verlet object.
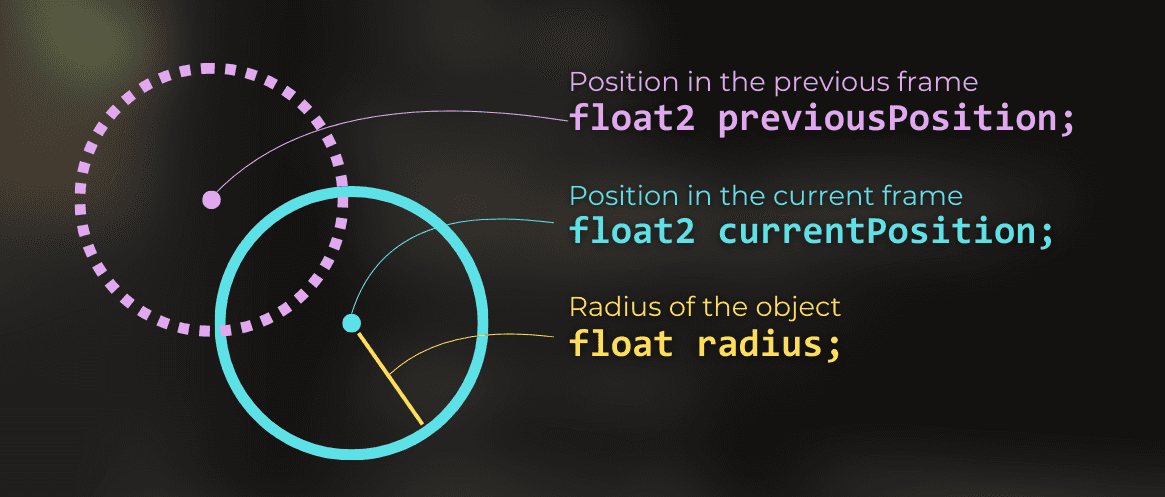
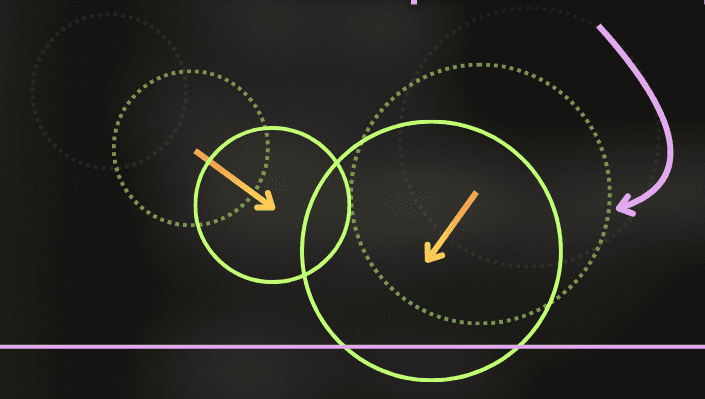
The simplest 2D object is just a sphere with three values:
previousPosition - position of this object in the previous frame
currentPosition - current position of this object
radius - radius of this object
Everything else is extra, so I will focus here only on those three properties.
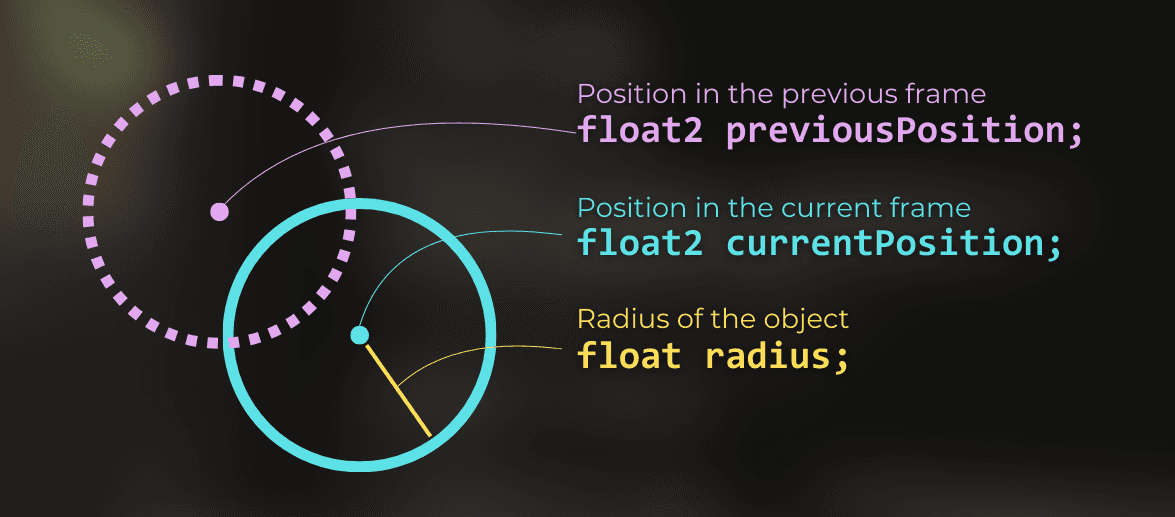
Notice that no velocity field is required. Velocity is derived from two positions.

To control velocity, I manipulate the previous position or current position.
Notice that there is no angular momentum!
___
The 4-step simulation frame
A Verlet solver simulation frame can be split into 4 stages. Below I explain the theory first, then show the implementation.
The full loop can be split into 4 simple stages:
Velocity integration
Dynamic collisions
Constraints (optional)
Static collisions
This loop should run once per physics tick. In Unity, I usually call it in FixedUpdate().
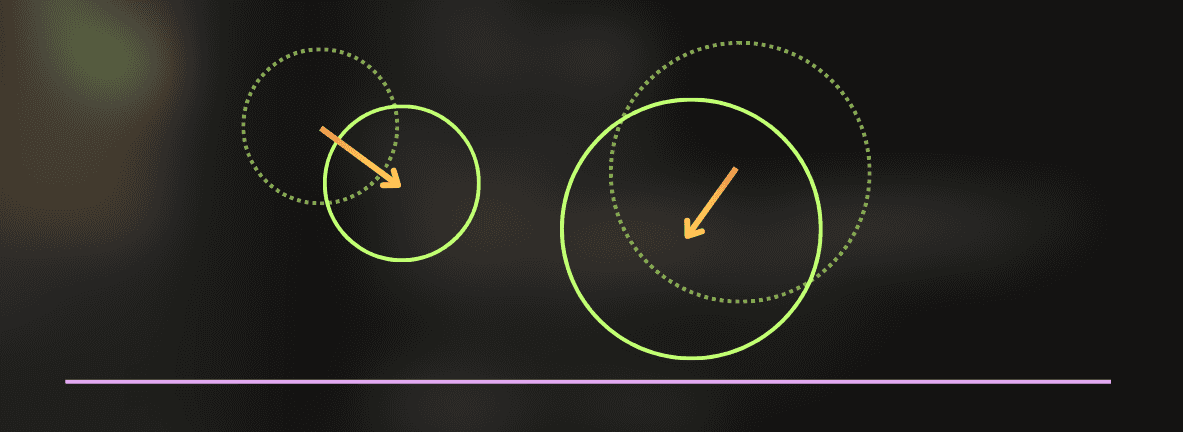
1) Velocity integration
Velocity integration moves each object according to its velocity, calculated from currentPosition and previousPosition.
At this stage:
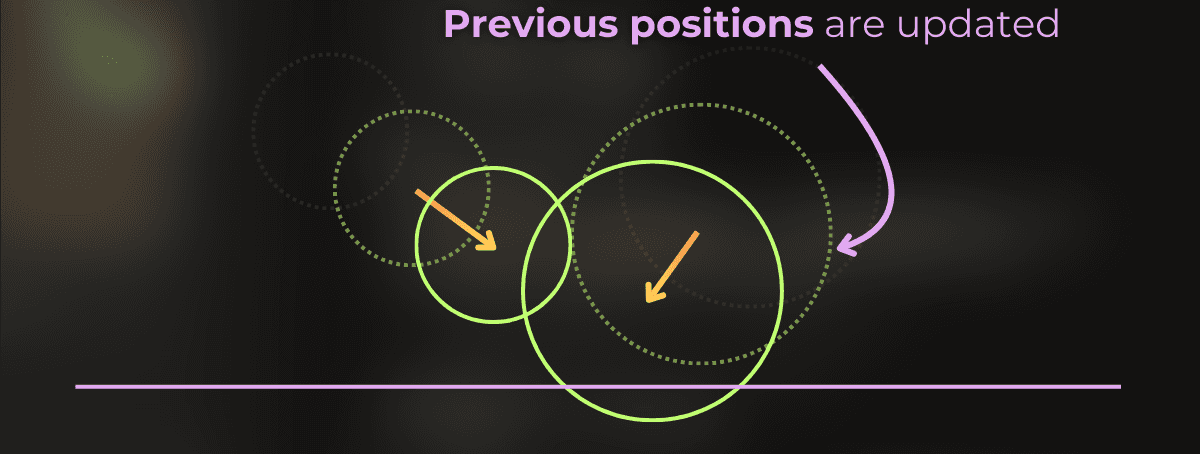
Calculate velocity using previousPosition and currentPosition.
Override previousPosition with currentPosition.
Modify current position by velocity and gravity.
Do this for every object. You can mark objects as kinematic and skip updates for them.
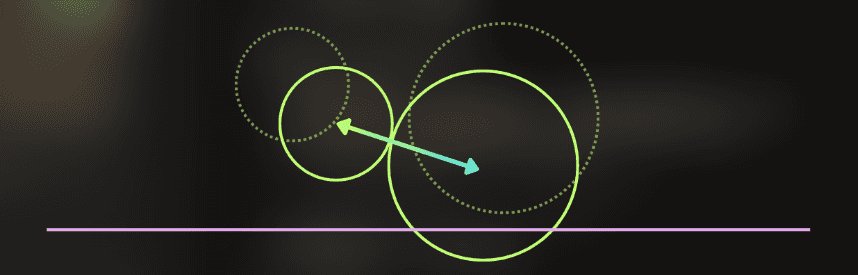
2) Dynamic collisions (body vs body)
In this step, I need to detect every collision between the simulated spheres.
A collision happens when distance between centers is smaller than combined radii.

In this case, I need to push two objects apart, so they just touch.

I need to detect every collision. The simplest way is O(n*n): for each object, test collisions with every other object. For small simulations, this simple approach can be very efficient.
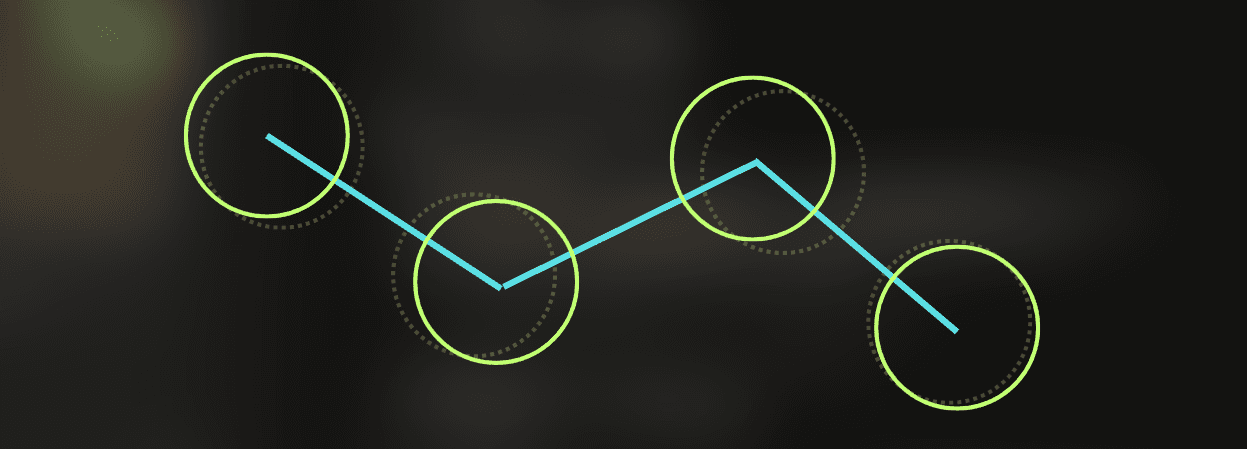
3) Constraints (optional)
Constraints are extra rules applied after collisions.
Example: ropes can be simulated by chaining multiple spheres together, but the distance between spheres must stay constant.
So if during the simulation, distances vary:
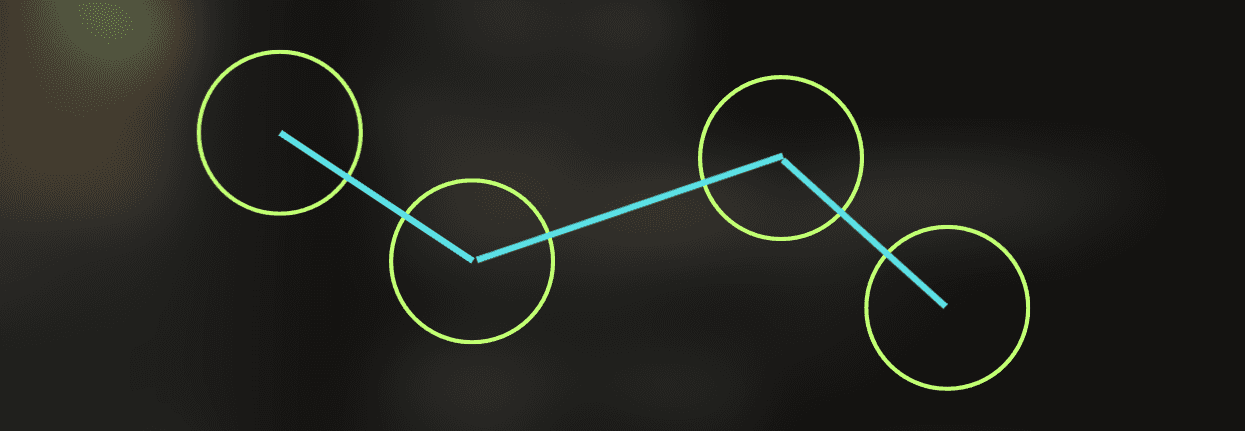
I adjust current positions to better satisfy the constraint:

Usually this is implemented by considering each connection separately, so a few iterations are needed for stability.
You can implement any constraint you want, like angle constraints or spring constraints. In every case, it works by moving only currentPosition from an incorrect position to a correct one.
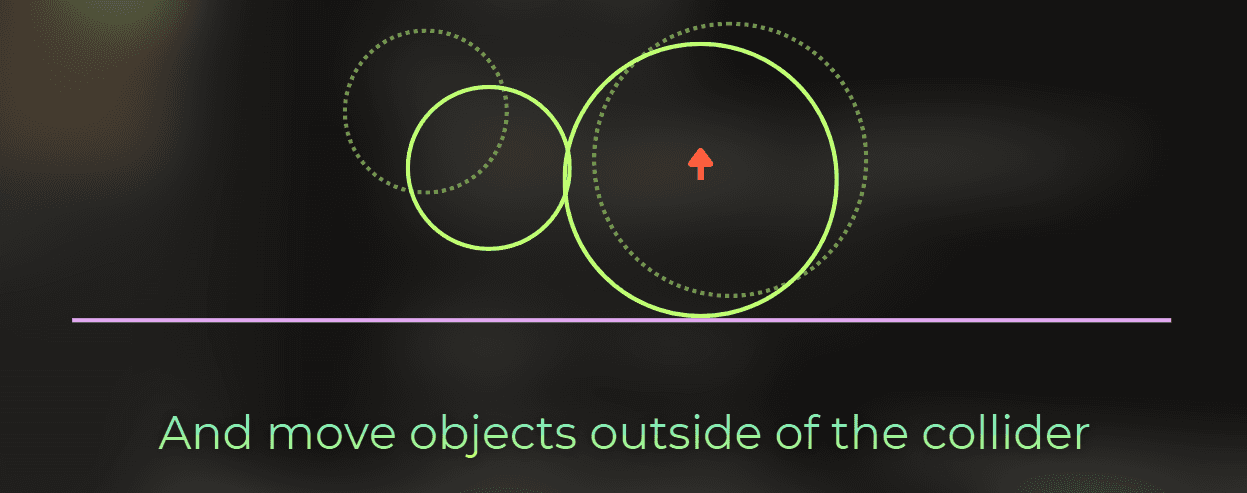
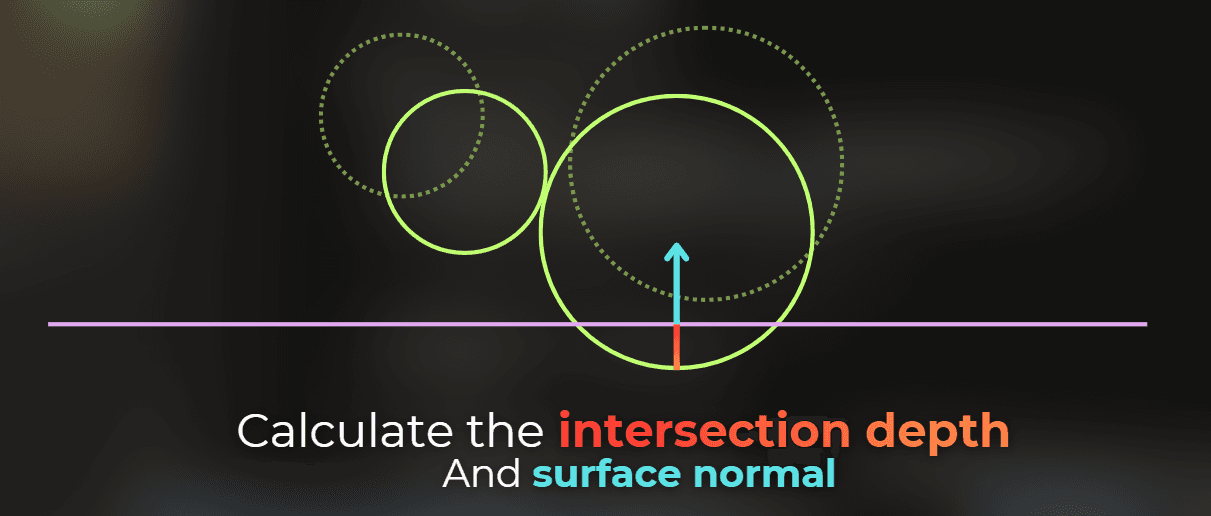
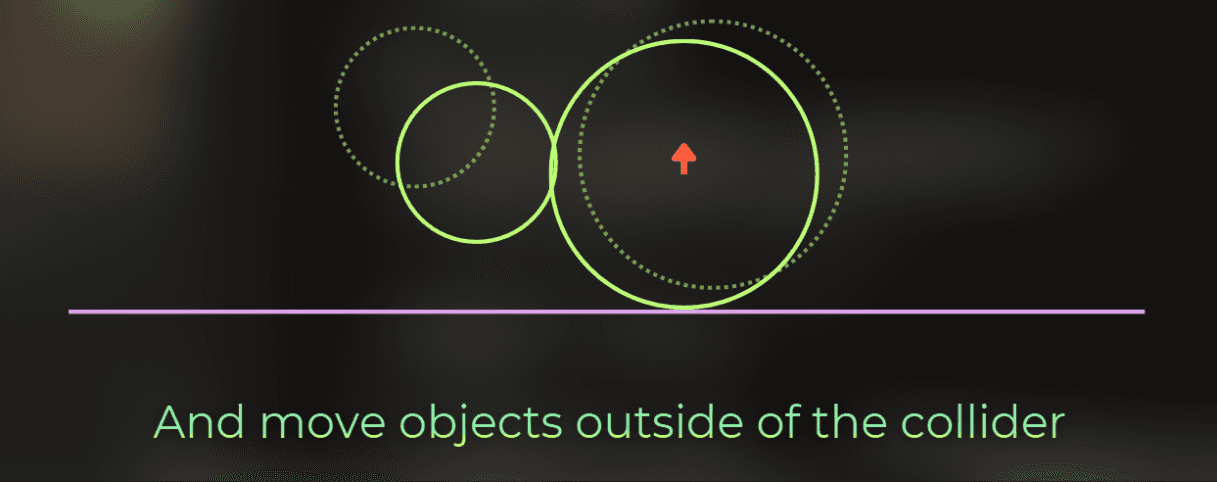
4) Static collisions (body vs world)
The last step is collisions with the world.
The goal is to detect every object that intersects static colliders.
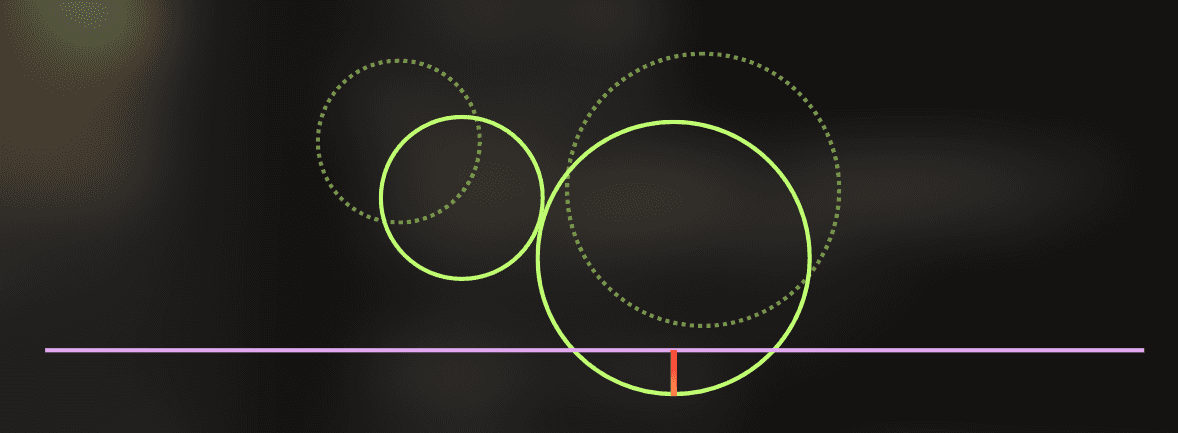
And move it to the closest position that is outside of the collider.
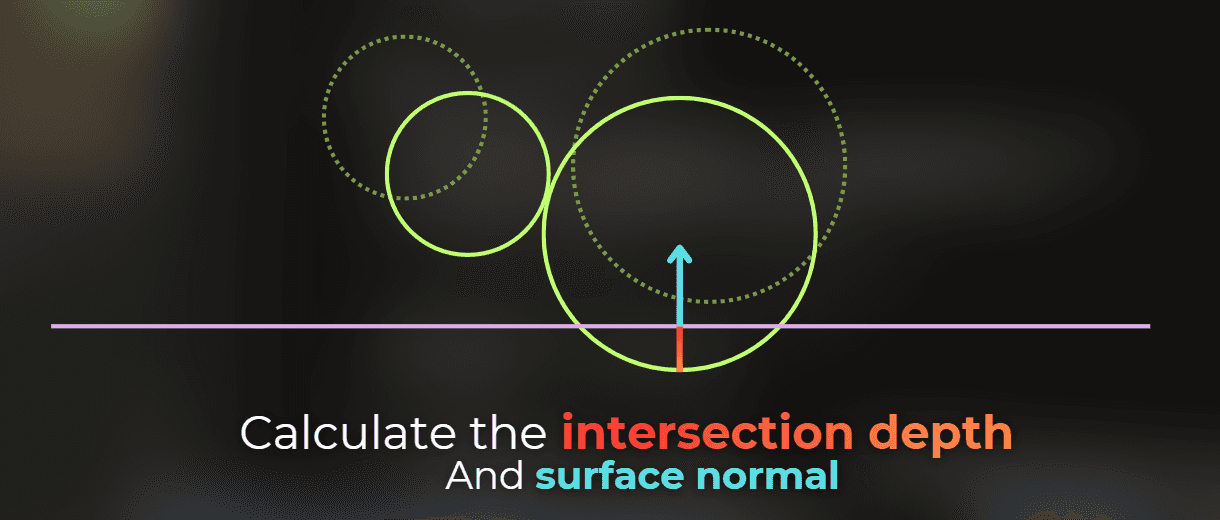
I usually represent static geometry with signed distance fields (SDFs). This makes collision checks clean and easy to work with.
Notice that in this solver, I do not use object velocity when resolving constraints and collisions. Velocity is only used to move objects at the start of the frame. Since velocity is derived from previousPosition and currentPosition, adjusting currentPosition modifies velocity directly.
So you get basic physics simulation without even thinking about many classic physics properties.
___
Putting it together - implementation time
Now let's implement the Verlet solver in Unity using C#.
I keep the frame loop intentionally simple, and for static collisions I show an SDF-based approach as one practical option.
At the end we will have this implementation:
Simulation frame
The first step will be to implement the overall simulation frame that will execute all the simulation steps.
This is the simple order I will use each frame:
Integrate all bodies
Solve dynamic collisions
Solve constraints (optional, often iterative)
Solve static collisions
I started by implementing a VerletSolver component responsible for running the whole simulation.
public class VerletSolver : MonoBehaviour
{
private void FixedUpdate()
{
SolveVelocity();
SolveObjectCollisions();
SolveConstraints();
SolveInvalidPositions();
public class VerletSolver : MonoBehaviour
{
private void FixedUpdate()
{
SolveVelocity();
SolveObjectCollisions();
SolveConstraints();
SolveInvalidPositions();
public class VerletSolver : MonoBehaviour
{
private void FixedUpdate()
{
SolveVelocity();
SolveObjectCollisions();
SolveConstraints();
SolveInvalidPositions();
Step 1 - Velocity integration
In the first step I will move the objects. But I need the objects first!
So I added a list of VerletObjects to the solver. It will store all the simulated objects.
public class VerletSolver : MonoBehaviour
{
public List<VerletObject> objects = new List<VerletObject>();
private void FixedUpdate
public class VerletSolver : MonoBehaviour
{
public List<VerletObject> objects = new List<VerletObject>();
private void FixedUpdate
public class VerletSolver : MonoBehaviour
{
public List<VerletObject> objects = new List<VerletObject>();
private void FixedUpdate
Then I implemented the VerletObject class using the basic object properties.
This is the VerletObject class
[System.Serializable]
public class VerletObject
{
	public float radius;
	public float2 previousPosition;
	public float2 currentPosition;

	public float2 Velocity
	{
		get => currentPosition - previousPosition;
		set => previousPosition = currentPosition - value
[System.Serializable]
public class VerletObject
{
	public float radius;
	public float2 previousPosition;
	public float2 currentPosition;

	public float2 Velocity
	{
		get => currentPosition - previousPosition;
		set => previousPosition = currentPosition - value
[System.Serializable]
public class VerletObject
{
	public float radius;
	public float2 previousPosition;
	public float2 currentPosition;

	public float2 Velocity
	{
		get => currentPosition - previousPosition;
		set => previousPosition = currentPosition - value
And I moved each object according to the velocity:
public class VerletSolver : MonoBehaviour
{
public List<VerletObject> objects = new List<VerletObject>();
public float2 gravity = new float2(0.0f, -9.81f);
private void FixedUpdate()
{
SolveVelocity();
}
private void SolveVelocity()
{
for (int i = 0; i < objects.Count; i++)
{
VerletObject o = objects[i];
float2 velocity = (o.currentPosition - o.previousPosition) + gravity * pow(Time.fixedDeltaTime, 2);
o.previousPosition = o.currentPosition;
o.currentPosition = o.currentPosition + velocity
Debug view
Now I have the first simulation step that should move objects from frame to frame. However, I cannot display the objects yet.
I quickly drafted debug gizmos to see the simulation. I added the OnDrawGizmos method that draws all objects as white wire spheres:
public class VerletSolver : MonoBehaviour
{
...
private void OnDrawGizmos()
{
Gizmos.color = Color.white;
foreach (var obj in objects)
Gizmos.DrawWireSphere(float3(obj.currentPosition, 0.0f), obj.radius
public class VerletSolver : MonoBehaviour
{
...
private void OnDrawGizmos()
{
Gizmos.color = Color.white;
foreach (var obj in objects)
Gizmos.DrawWireSphere(float3(obj.currentPosition, 0.0f), obj.radius
public class VerletSolver : MonoBehaviour
{
...
private void OnDrawGizmos()
{
Gizmos.color = Color.white;
foreach (var obj in objects)
Gizmos.DrawWireSphere(float3(obj.currentPosition, 0.0f), obj.radius
Now it is time to test the simulation. I created a new component used only to initialize objects in the simulation:
public class VerletSolverInitializer : MonoBehaviour
{
public List<VerletObject> objects;
private void OnEnable()
{
var solver = GetComponent<VerletSolver>();
foreach (var o in objects)
{
o.previousPosition = o.currentPosition;
solver.objects.Add(o);
}
}
private void OnDisable()
{
var solver = GetComponent<VerletSolver>();
solver.objects.Clear();
}
private void OnDrawGizmosSelected()
{
Gizmos.color = Color.white;
foreach (var obj in objects)
Gizmos.DrawWireSphere(float3(obj.currentPosition, 0.0f), obj.radius
This is my configuration. I added the VerletSolver component to the scene, and then VerletSolverInitializer to initialize the objects.
Yay! The first simulation step works!
Step 2 - Dynamic collisions
Now that objects move correctly, the next step is collision solving. To solve collisions, I need to detect which objects overlap.

And then move them apart
I decided to check every object against every other object. I added this function to VerletSolver, with explanations in comments.
private void SolveObjectCollisions()
{
for (int i = 0; i < objects.Count; i++)
{
for (int j = i + 1; j < objects.Count; j++)
{
var firstObject = objects[i];
var secondObject = objects[j];
float distanceBetween = distance(firstObject.currentPosition, secondObject.currentPosition);
float minDistance = firstObject.radius + secondObject.radius;
if (distanceBetween >= minDistance)
continue;
float2 middlePoint = lerp(firstObject.currentPosition, secondObject.currentPosition, 0.5f);
float2 toFirst = normalize(firstObject.currentPosition - middlePoint) * minDistance * 0.5f;
float2 toSecond = normalize(secondObject.currentPosition - middlePoint) * minDistance * 0.5f;
firstObject.currentPosition = middlePoint + toFirst;
secondObject.currentPosition = middlePoint + toSecond
Now let's test it. I made a few objects overlap during initialization to trigger collisions, and it works.
Step 3 - Constraints
Now that basic collisions work, I can add constraints to shape object behavior. I will add a distance constraint that keeps two objects at a constant distance.
I created a DistanceConstraint class with references to two Verlet objects and a target distance between them.
public class DistanceConstraint
{
public VerletObject firstObject;
public VerletObject secondObject;
public float distance;
public class DistanceConstraint
{
public VerletObject firstObject;
public VerletObject secondObject;
public float distance;
public class DistanceConstraint
{
public VerletObject firstObject;
public VerletObject secondObject;
public float distance;
And I added the function that applies the constraint:
public class DistanceConstraint
{
...
public void Apply()
{
float2 middle = lerp(firstObject.currentPosition, secondObject.currentPosition, 0.5f);
float2 toFirst = firstObject.currentPosition - middle;
float2 toSecond = secondObject.currentPosition - middle;
firstObject.currentPosition = middle + normalize(toFirst) * 0.5f * distance;
secondObject.currentPosition = middle + normalize(toSecond) * 0.5f * distance
Then I added constraints to the solver: a constraints list, a simulation step, and gizmo drawing for constraints.
public class VerletSolver : MonoBehaviour
{
...
public List<DistanceConstraint> constraints = new List<DistanceConstraint>();
...
private void FixedUpdate()
{
SolveVelocity();
SolveObjectCollisions();
SolveConstraints();
}
...
private void SolveConstraints()
{
for (int i = 0; i < constraints.Count; i++)
constraints[i].Apply();
}
private void OnDrawGizmos()
{
...
Gizmos.color = Color.yellow;
foreach (var c in constraints)
Gizmos.DrawLine(float3(c.firstObject.currentPosition, 0), float3(c.secondObject.currentPosition, 0
I also added the option to define constraints in VerletSolverInitializer:
public class VerletSolverInitializer : MonoBehaviour
{
...
public List<int2> constraints;
private void OnEnable()
{
...
foreach (var c in constraints)
{
solver.constraints.Add(new DistanceConstraint()
{
firstObject = objects[c.x],
secondObject = objects[c.y],
distance = distance(objects[c.x].currentPosition, objects[c.y].currentPosition),
});
}
}
private void OnDisable()
{
...
solver.constraints.Clear();
Now, the constraints work properly!
Step 4 - Static collisions
With dynamic collisions and constraints in place, the last step is static collisions. There are many ways to handle them.
I like to use Signed Distance Fields.
A Signed Distance Field is a mathematical function that returns distance to the closest surface.
Then, the gradient of this function represents the normal vector of that closest surface.
In the visualization below, the yellow circle represents the distance to the closest surface, and the green segment represents the normal vector.
Source: https://www.shadertoy.com/view/wlcXD2
You can find SDF functions for many shapes here: https://iquilezles.org/articles/distfunctions2d/. These are simple mathematical functions and fit static collisions very well. I decided to use a box SDF. To keep it simple, every collider in my simulation is an axis-aligned box.
I used this box function, which assumes the box is centered and the second argument contains half of its size.
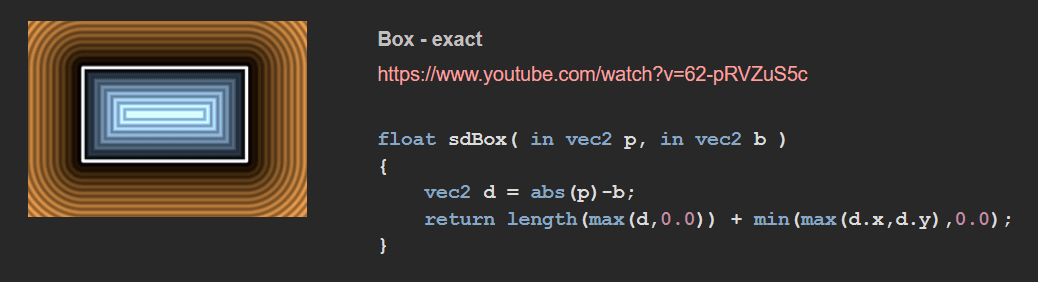
Then I implemented this class to represent one box collider in the Verlet solver. It is very simple:
public class BoxCollider
{
public float2 center;
public float2 extents;
public float SignedDistanceField(float2 position)
{
float2 d = abs(position - this.center) - extents;
return length(max(d, 0.0f)) + min(max(d.x, d.y), 0.0f
public class BoxCollider
{
public float2 center;
public float2 extents;
public float SignedDistanceField(float2 position)
{
float2 d = abs(position - this.center) - extents;
return length(max(d, 0.0f)) + min(max(d.x, d.y), 0.0f
public class BoxCollider
{
public float2 center;
public float2 extents;
public float SignedDistanceField(float2 position)
{
float2 d = abs(position - this.center) - extents;
return length(max(d, 0.0f)) + min(max(d.x, d.y), 0.0f
Then I added a list of box colliders to the VerletSolver, as well as the VerletSolverInitializer:
public class VerletSolver : MonoBehaviour
{
...
public List<BoxCollider> colliders = new List<BoxCollider>();
...
private void FixedUpdate()
{
SolveVelocity();
SolveObjectCollisions();
SolveConstraints();
SolveInvalidPositions();
}
...
private void SolveInvalidPositions()
{
for (int i = 0; i < objects.Count; i++)
{
var obj = objects[i];
}
}
...
private void OnDrawGizmos()
{
...
Gizmos.color = Color.green;
foreach (var c in colliders)
Gizmos.DrawCube(float3(c.center, 0), float3(c.extents * 2.0f, 0
Now I need to implement collisions using SDFs. I will do this in 2 steps:
Calculate the distance to the closest collider.
If the distance is lower than the object's radius - move the object out of the collider.
In the first step, I check if the object is inside the collider, then move it upward.
private void SolveInvalidPositions()
{
for (int i = 0; i < objects.Count; i++)
{
var obj = objects[i];
float sdf = GetCollidersSDF(obj.currentPosition);
if (sdf > obj.radius)
continue;
obj.currentPosition = obj.currentPosition + float2(0.0f, 0.01f);
}
}
private float GetCollidersSDF(float2 position)
{
float sdf = float.MaxValue;
for (int i = 0; i < colliders.Count; i++)
sdf = min(sdf, colliders[i].SignedDistanceField(position));
return sdf
This is quite enjoyable to watch. I got an up-acceleration trigger box, so collision detection works correctly.
Let's add proper detection. Now I know the distance to the nearest collider, so if I calculate the surface normal, I can move objects along the normal and place them outside the collider.
private void SolveInvalidPositions()
{
for (int i = 0; i < objects.Count; i++)
{
var obj = objects[i];
float sdf = GetCollidersSDF(obj.currentPosition);
if (sdf > obj.radius)
continue;
float2 obstacleSDFGradient = GetColliderSDFGradient(obj.currentPosition);
float2 collisionNormal = normalize(obstacleSDFGradient);
float moveDistance = (sdf - obj.radius);
obj.currentPosition = obj.currentPosition - collisionNormal * moveDistance;
}
}
private float GetCollidersSDF(float2 position)
...
private float2 GetColliderSDFGradient(float2 position)
{
float epsilon = 0.0001f;
float n10 = GetCollidersSDF(position - float2(epsilon, 0.0f));
float n01 = GetCollidersSDF(position - float2(0.0f, epsilon));
float p10 = GetCollidersSDF(position + float2(epsilon, 0.0f));
float p01 = GetCollidersSDF(position + float2(0.0f, epsilon));
return float2(p10 - n10, p01 - n01) / (epsilon * 2.0f
And it works!
Let's test it with more colliders!
___
Next steps
As you can see, implementing physics is not hard. However, there are many things to add before this is production ready. Here are features you can implement by extending this solution:
Include object's weight, friction and bounciness in the collisions.
Add collision callbacks
Sync Unity's transforms to the Verlet objects
Add more collider and constraint types
Add friction and bounciness parameter to the colliders
Create components to easily manage simulated objects, colliders and constraints
Create a debug tool for visualizing contact points, number of simulated objects, colliders, constraints
Add more simulation parameters, for example constraint iterations to increase stiffness
Add "rigidbody" objects using sphere-combined objects
Implement 3D simulation using the same methods
Fix edge cases, for example objects that perfectly overlap each other
Improve performance by using acceleration structures for dynamic and static collisions
Improve performance by using multithreading/burst
Implement cloth simulation
Implement ropes
Integrate your Verlet solver with Unity Physics
Implement continuous collision detection for fast-moving objects
Sleep and activation rules
Smooth interpolation (to avoid jagged movement)
Add a GPU-accelerated implementation
As you can see, the list of additional features can really go on and on. Below are a few examples I implemented in the past:
Breakable distance constraint, with object collision and weight support. For a bridge-building game.
Each bridge joint is a Verlet object. The connections break if the distance is off by 2%.
3D Verlet solver simulation, with bounce and friction support
SDF voxelization with verlet-based physics for character movements and bullet collision detection.
This worked smoothly on integrated GPUs. That was a good game jam.
More complex physics, including the fake "rigidbody" for sphere-combined objects (the tank in this case):
Cloth simulation (this is not my work, you can find the source here: https://joaen.github.io/assets/verlet/)
___
Performance comparison - Verlet solver vs Unity physics
What about performance? I implemented the same physics scenario using a Verlet solver and Unity Physics:
360 sphere objects
56 distance joints
6 box colliders
I used a custom Verlet solver implementation:
weight, bounce and friction support,
updating all transform positions, so each simulated object here is a GameObject
multithreaded
low-level/unsafe implementation using the Burst compiler (HPC#)
No acceleration structures
This is my Verlet Solver:
This is Unity Physics
From what I noticed, the chains seem more stable and less shaky in the Verlet solver. However, Unity Physics supports angular momentum.
When profiled in release builds, I measured ~600 frames of each simulation.
Custom Verlet implementation was running 5x faster than Unity physics.
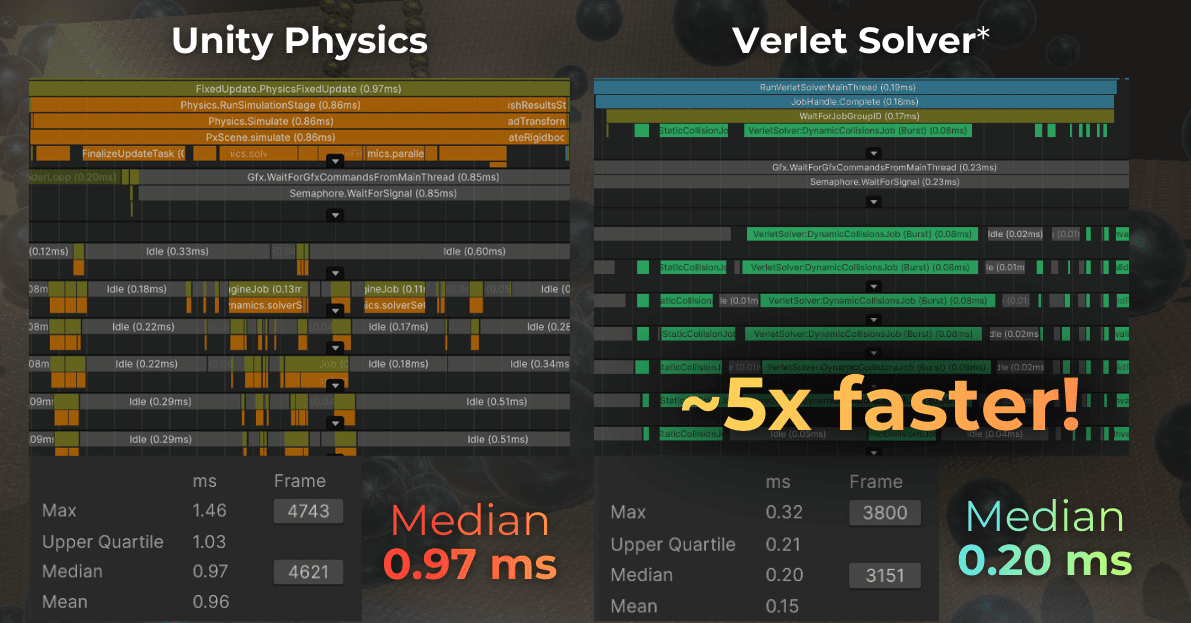
In my benchmark scene (360 spheres, 56 joints, 6 box colliders), this custom multithreaded implementation was around 5x faster on median frame time.
Important: this result is scenario-specific. Always profile your real gameplay cases.
I compared only one scenario because preparing these benchmarks is time-consuming.
My goal was to show that a well-implemented Verlet solver can perform much faster than an industry-standard physics engine in specific scenarios. You have full control and can simulate only what is required, which avoids overhead from features you do not need.
Often, a simpler physics implementation makes your game run faster. You do not need a general-purpose solution. You need one that works for your game.
___
Custom solver or industry standard physics engine?
Now, while it is easy to start experimenting with custom physics solver, it is important to understand when to use what.

Unity Physics - Pros:
Plug-and-play behavior
Easier team onboarding and maintenance
Easier integration with Unity engine systems
Built-in rigidbody features, with broad out-of-the-box tooling
Unity Physics - Cons:
Less control over low-level simulation rules
Can include overhead you may not need for simple, custom gameplay physics
Custom solvers, if implemented well, can be significantly faster

Custom Verlet Solver - Pros:
Full control over behavior and simulation pipeline
Stylized motion and highly predictable custom rules
Simple data model and frame loop that are easy to extend
Strong performance potential in focused use cases (in my benchmark: around 5x faster)
Custom Verlet Solver - Cons:
Every feature is your responsibility (friction, bounce, callbacks, extra colliders, constraints, etc.)
You must handle edge cases, stability improvements, and optimization work yourself
More engineering effort for tooling, debugging, and long-term maintenance
Not a full rigidbody replacement by default (for example, no angular momentum unless you build it)
Summary
Implementing a basic Verlet solver is really simple. Allocate a weekend for a fun project. You will not regret it.
If you want to build more intuition about the Verlet solver, check the video below. This specific video inspired me to experiment with custom physics engines, and now I enjoy doing this in my free time.
Verlet simulation basics:
https://youtu.be/lS_qeBy3aQI
Verlet simulation - multithreaded optimization with acceleration structures:
https://www.youtube.com/watch?v=9IULfQH7E90
Want me to analyze your game?
Currently I’m building a hands-on GPU optimization course, and I want to include real production case studies from indie games.
So here’s my offer:
I’ll analyze your already released game for free and share actionable performance findings.
The only condition:
you grant me a license to reuse the case study and findings in future educational content (including the course).
If that sounds fair, drop me a DM message on LinkedIn!