Year after year, the overhead of a single camera in Unity is getting higher and higher. At this point, some low-end devices may not be capable of having more than one active camera at the same time.
In this article, I show you how I reduce this overhead to the absolute minimum.
This article will be useful if you need to render custom content using a separate camera in very specific scenarios, like rendering an object's depth for snow trail rendering, water interactions, or an x-ray hit camera.
___
Unity's camera overhead
What is wrong with having an additional camera in the project?
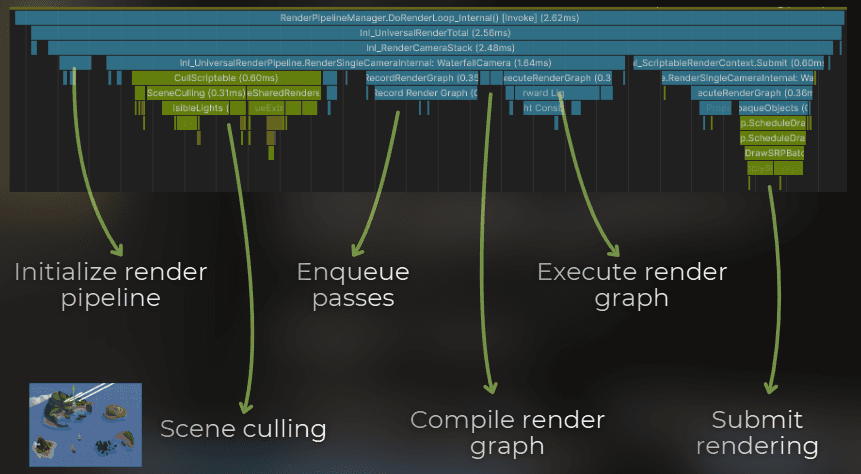
A camera needs to do a couple of steps to render the frame, and when combined, those tasks are quite costly. It needs to do frustum culling, filter the light sources, cull for shadow maps, filter object layers, sort the objects, and prepare render passes while also checking dependencies and culling unused passes.
The cost of the camera increased when Unity introduced the Render Graph, because it needs to process all the passes to figure out what can be culled. The Render Graph API helps keeping the rendering architecture cleaner, but it also means that Unity needs to process much more data before it even begins drawing.
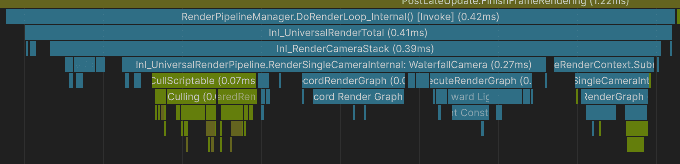
For example, the profiler sample below represents the camera overhead for rendering a small depth texture with only 3 objects.
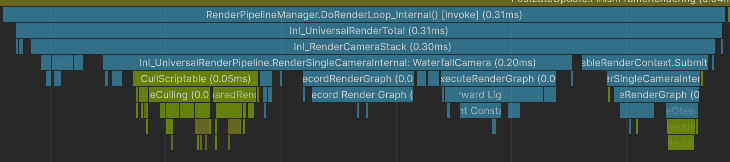
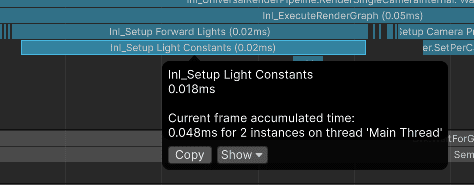
Notice that I render depth-only, and Unity will still process the lights, shadows, etc. With the Render Graph API, Unity needs to evaluate all this data to figure out if some of it can be culled during rendering. While all those steps are quick, they add up to a significant time.
:center-50:
___
How can I optimize it?
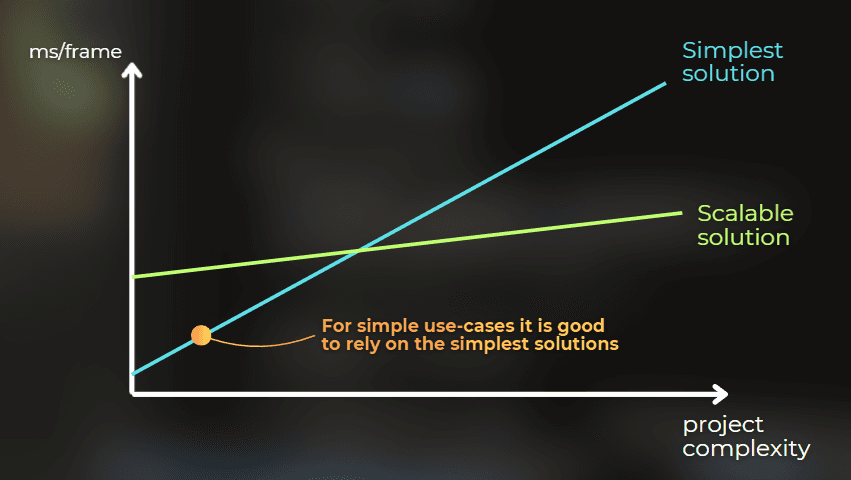
Unity designed cameras to be scalable and flexible, not lightweight. However, when working on a specific game, I can take advantage of a project's context and take some shortcuts.
For example:
I could skip the render graph evaluation if the rendering steps are simple.
I could skip the frustum culling if I know exactly which objects would be rendered, or if all of them are always visible in the frustum.
But the thing in Unity is that I can't just modify one camera to skip some of those steps, because those are core features of the camera in the render pipeline.
So there are two solutions to this problem:
Fork the render pipeline repository and adjust it to the project.
Develop a lightweight camera feature with a highly adjustable custom camera.
So the solution is to write a custom lightweight camera.
___
Case study!
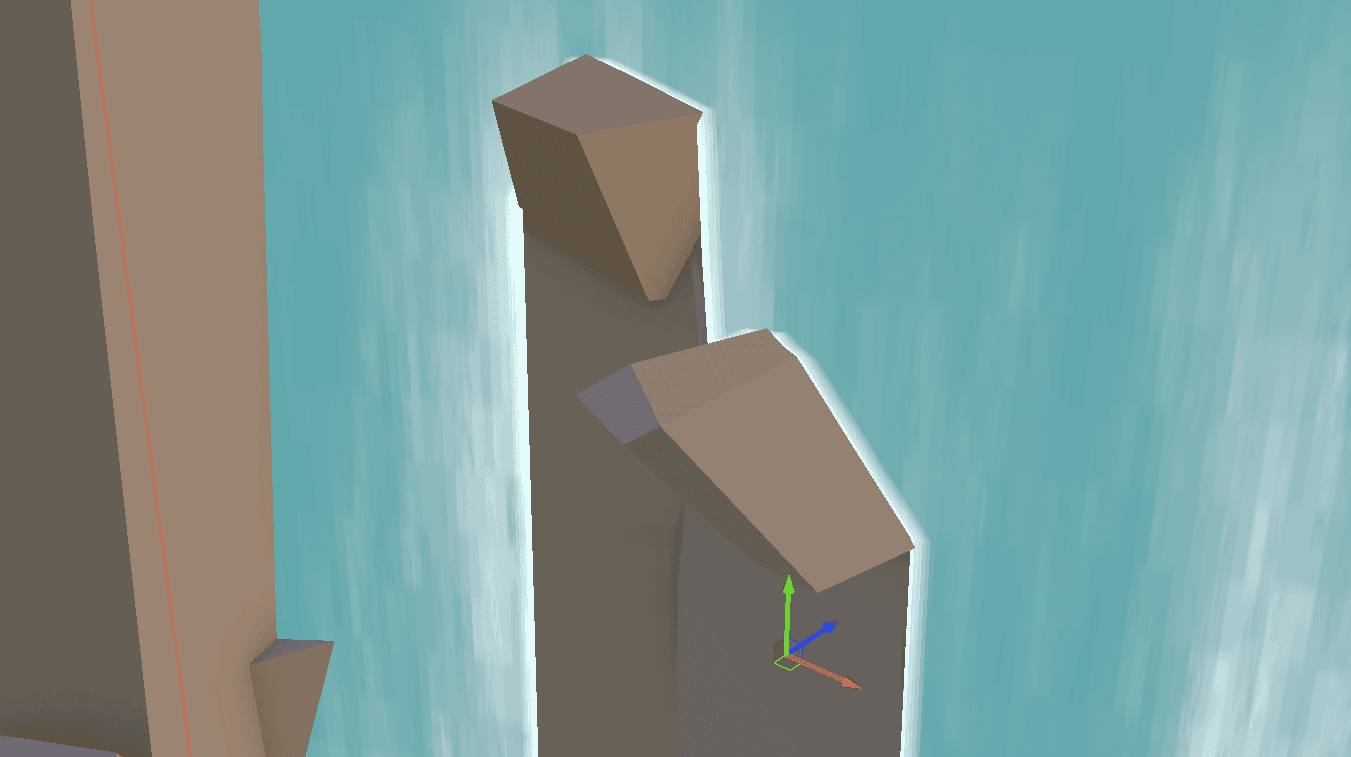
Let me show you how to do this. I will optimize the rendering of this waterfall, but I will focus only on the CPU overhead.
:image-description:
I created this effect for this article. It's not much but it's an honest work.
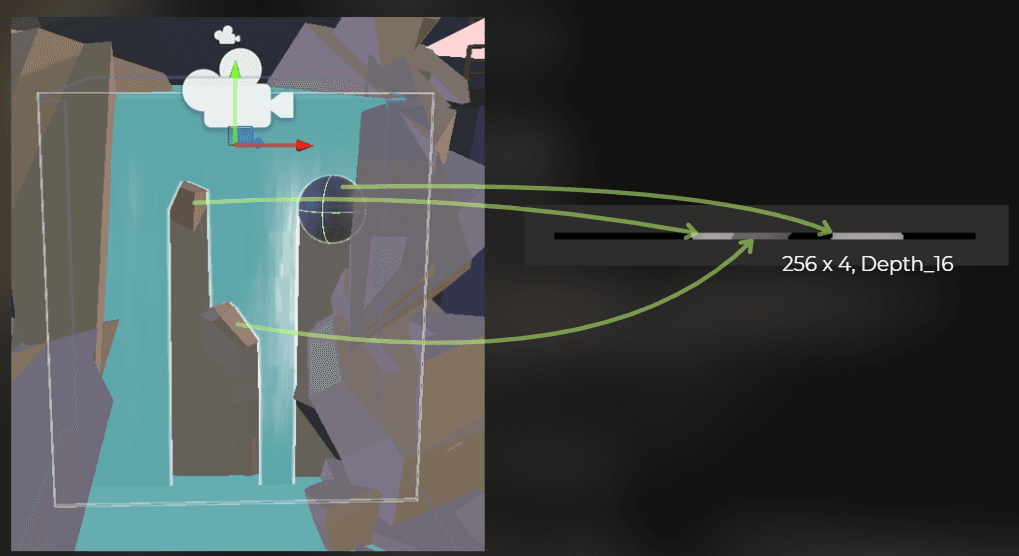
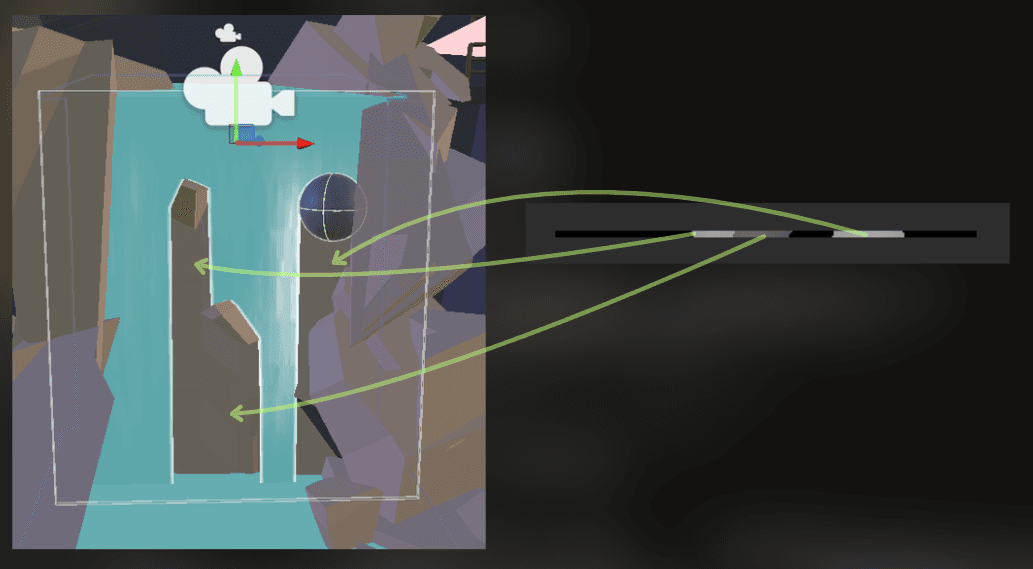
This waterfall works like this: at the top of the waterfall, there is a depth-only camera. It renders a small depth texture of the obstacles in the waterfall:

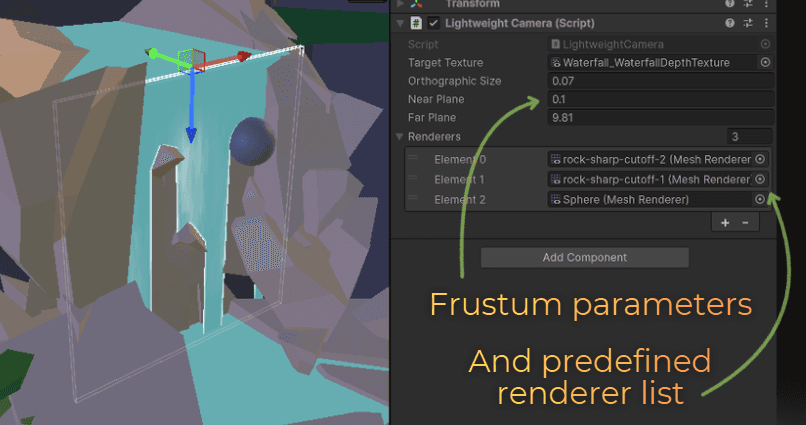
I set the camera to render as orthographic and customized the size and clipping planes to fit the waterfall as closely as possible.
:center-50:

The rendered depth texture has a 256x4 resolution. This is how the rendering looks like in the Frame Debugger:
This is the C# code that creates and sets the texture:
depthTexture = new RenderTexture(256, 4, UnityEngine.Experimental.Rendering.GraphicsFormat.None, UnityEngine.Experimental.Rendering.GraphicsFormat.D16_UNorm);
depthTexture.name = $"{gameObject.name}_WaterfallDepthTexture";
depthTexture.Create();
depthRenderCamera.targetTexture = depthTexture
depthTexture = new RenderTexture(256, 4, UnityEngine.Experimental.Rendering.GraphicsFormat.None, UnityEngine.Experimental.Rendering.GraphicsFormat.D16_UNorm);
depthTexture.name = $"{gameObject.name}_WaterfallDepthTexture";
depthTexture.Create();
depthRenderCamera.targetTexture = depthTexture
depthTexture = new RenderTexture(256, 4, UnityEngine.Experimental.Rendering.GraphicsFormat.None, UnityEngine.Experimental.Rendering.GraphicsFormat.D16_UNorm);
depthTexture.name = $"{gameObject.name}_WaterfallDepthTexture";
depthTexture.Create();
depthRenderCamera.targetTexture = depthTexture
The camera figures out which obstacles to render by using the gameobject layers:
:center-50:

Then, the waterfall shader uses the view-projection matrix of this camera, the depth texture, and world position to estimate whether the waterfall surface is occluded by the obstacle.
Shader properties are set using a property block:
Matrix4x4 viewProjectionMatrix = depthRenderCamera.projectionMatrix * depthRenderCamera.worldToCameraMatrix;
propertyBlock.SetMatrix(Uniforms._WaterfallViewProjectionMatrix, GL.GetGPUProjectionMatrix(viewProjectionMatrix, true));
propertyBlock.SetTexture(Uniforms._WaterfallDepth, depthTexture);
waterfallRenderer.SetPropertyBlock(propertyBlock
In the shader code, this is traditional shadow mapping:
float4 waterfallCameraPositionCS = mul(_WaterfallViewProjectionMatrix, float4(input.positionWS.xyz, 1.0));
float4 waterfallCameraPositionNDC = waterfallCameraPositionCS / waterfallCameraPositionCS.w;
float2 waterfallDepthUV = (waterfallCameraPositionCS.xy / waterfallCameraPositionCS.w) * 0.5 + 0.5;
float renderedDepth = _WaterfallDepth.SampleLevel(linearClampSampler, waterfallDepthUV, 0.0).r;
if (renderedDepth > waterfallCameraPositionNDC.z)
discard
___
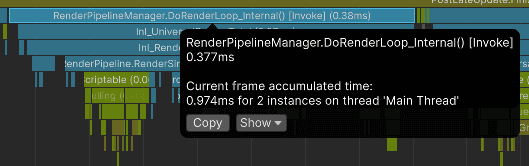
Initial profiling
I created a build and profiled it on an i5-10400F.
The depth camera has from 0.34 to 0.50 ms of overhead. Quite significant for something that renders only 3 objects... unacceptable!
Optimization!
Now let's optimize that. Let's analyze:
I know which object's to render - I can skip the culling
I know I need only depth - I can skip the render graph evaluation
I render just a few objects - I can skip the batching.
I need the depth texture, view-projection matrix, and objects list - nothing else.
And this is the whole trick - I will not use Unity's camera at all. Instead, I will bypass the whole overhead for a very specific use case by reimplementing the parts that I actually need: target texture setup, matrix setup, and draw calls for a known list of renderers.
Let's write a lightweight camera feature.
I will do this in a few steps:
Camera properties - specifying the minimal set of properties to render the camera.
Inject the rendering into the render pipeline
Implement the rendering
Implement the gizmos
If you want to learn about the rendering custom content into a texture, I also created a full article dedicated to that, as I think this is the most important skill for each technical-artist to learn. The below implementation is based on this article:
https://www.proceduralpixels.com/blog/rendering-into-texture-the-most-important-ta-skill
Camera properties
I will start by defining the camera. Originally, I used the camera's ortho size, near plane, and far plane parameters to set its frustum. I also used targetTexture to set the render target.
public class LightweightCamera : MonoBehaviour
{
public RenderTexture targetTexture;
public float orthographicSize;
public float nearPlane;
public float farPlane;
public List<Renderer> renderers = new List<Renderer
public class LightweightCamera : MonoBehaviour
{
public RenderTexture targetTexture;
public float orthographicSize;
public float nearPlane;
public float farPlane;
public List<Renderer> renderers = new List<Renderer
public class LightweightCamera : MonoBehaviour
{
public RenderTexture targetTexture;
public float orthographicSize;
public float nearPlane;
public float farPlane;
public List<Renderer> renderers = new List<Renderer
Inject into the render pipeline
Now, I need to trigger the rendering. I will utilize the RenderPipelineManager.beginContextRendering event in URP. It is executed at the beginning of each frame render.
private void OnEnable()
{
RenderPipelineManager.beginContextRendering += RenderCamera;
}
private void OnDisable()
{
RenderPipelineManager.beginContextRendering -= RenderCamera;
}
private void RenderCamera(ScriptableRenderContext context, System.Collections.Generic.List<Camera> allUnityCameras)
{
private void OnEnable()
{
RenderPipelineManager.beginContextRendering += RenderCamera;
}
private void OnDisable()
{
RenderPipelineManager.beginContextRendering -= RenderCamera;
}
private void RenderCamera(ScriptableRenderContext context, System.Collections.Generic.List<Camera> allUnityCameras)
{
private void OnEnable()
{
RenderPipelineManager.beginContextRendering += RenderCamera;
}
private void OnDisable()
{
RenderPipelineManager.beginContextRendering -= RenderCamera;
}
private void RenderCamera(ScriptableRenderContext context, System.Collections.Generic.List<Camera> allUnityCameras)
{
Rendering implementation
Now, let's implement the rendering. I need to do 3 steps:
Set the render target texture and clear it
Set view projection matrices
Render all the objects
I implemented this to exactly mimic Unity's camera behavior. This is what I came up with - explanation in the comments.
public Matrix4x4 ProjectionMatrix
{
get
{
float top = orthographicSize;
float right = orthographicSize * (targetTexture.width / (float)targetTexture.height);
float4x4 projectionMatrix = Matrix4x4.Ortho(-right, right, -top, top, nearPlane, farPlane);
return projectionMatrix;
}
}
public Matrix4x4 ViewMatrix => Matrix4x4.Scale(new Vector3(1.0f, 1.0f, -1.0f)) * transform.worldToLocalMatrix;
private void RenderCamera(ScriptableRenderContext context, System.Collections.Generic.List<Camera> allUnityCameras)
{
using (Markers.LightweightCameraRender.Auto())
{
if (targetTexture == null)
return;
CommandBuffer cmd = CommandBufferPool.Get(nameof(LightweightCamera));
cmd.SetRenderTarget(targetTexture);
cmd.ClearRenderTarget(true, false, Color.clear);
cmd.SetViewProjectionMatrices(ViewMatrix, ProjectionMatrix);
for (int i = 0; i < renderers.Count; i++)
{
var renderer = renderers[i];
cmd.DrawRenderer(renderer, renderer.sharedMaterial, 0 ,0);
}
context.ExecuteCommandBuffer(cmd);
CommandBufferPool.Release(cmd);
}
}
public static class Markers
{
public static readonly ProfilerMarker LightweightCameraRender = new ProfilerMarker(nameof(LightweightCameraRender
Yes, the above code is everything that is needed to have the simplest camera implementation in Unity.
But I would like to polish some things, as the frustum is not visualized in any way - this component feels like an empty object.
Gizmos
I quickly did some math and rendered a wireframe box that represents the target camera frustum:
private void OnDrawGizmosSelected()
{
Gizmos.matrix = transform.localToWorldMatrix;
Gizmos.color = Color.white;
float top = orthographicSize;
float right = orthographicSize;
if (targetTexture != null)
right *= (targetTexture.width / (float)targetTexture.height);
float3 center = new float3(0.0f, 0.0f, nearPlane + (farPlane - nearPlane) * 0.5f);
float3 extents = new float3(right * 2.0f, top * 2.0f, (farPlane - nearPlane));
Gizmos.DrawWireCube(center, extents
Sweet! My final code has just 84 lines of code and does everything that's needed!
At the end, I swapped Unity's Camera in my code with the LightweightCamera type, and everything worked fine.
This is how it looks in Frame Debugger:
___
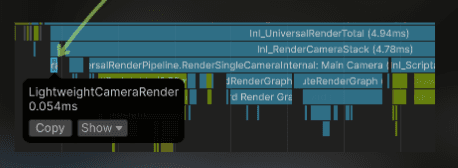
Final profiling results
Let's check...
:image-description:
There it is!
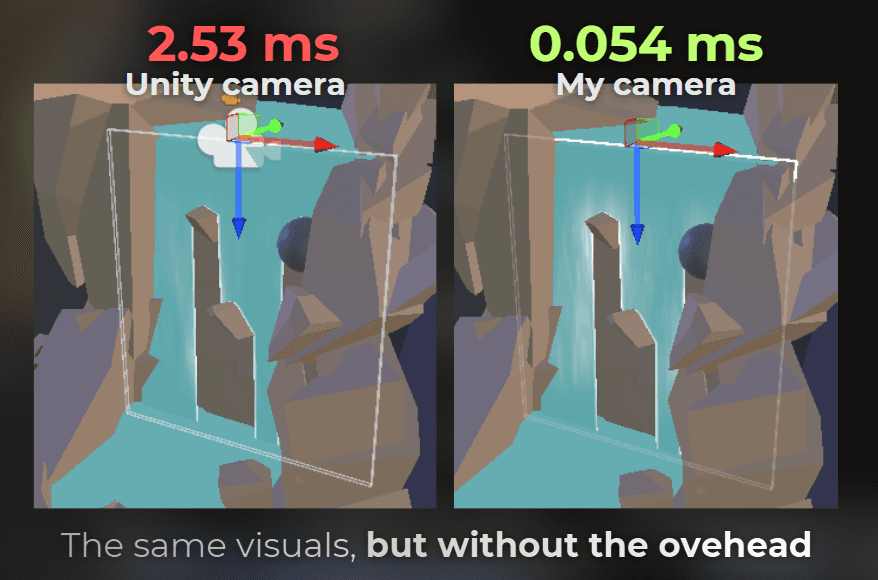
LightweightCamera takes from 0.008 ms to 0.013 ms, which is ~30x faster than Unity's camera.
Before:
:center-50:
After (31x faster):
:center-50:

I also compiled the project for Android and measured on Redmi 12:
___
Summary
So this is the final takeaway:
If I need the full flexibility of Unity's camera - I accept the cost. But if I know exactly what I want to render, then I can use the project context and build a very small custom rendering path for that one job.
In this case, I needed just a depth texture, a view-projection matrix, and a known list of renderers. So instead of paying for the whole camera pipeline, I replaced it with 84 lines of code and got around 30x lower CPU overhead.
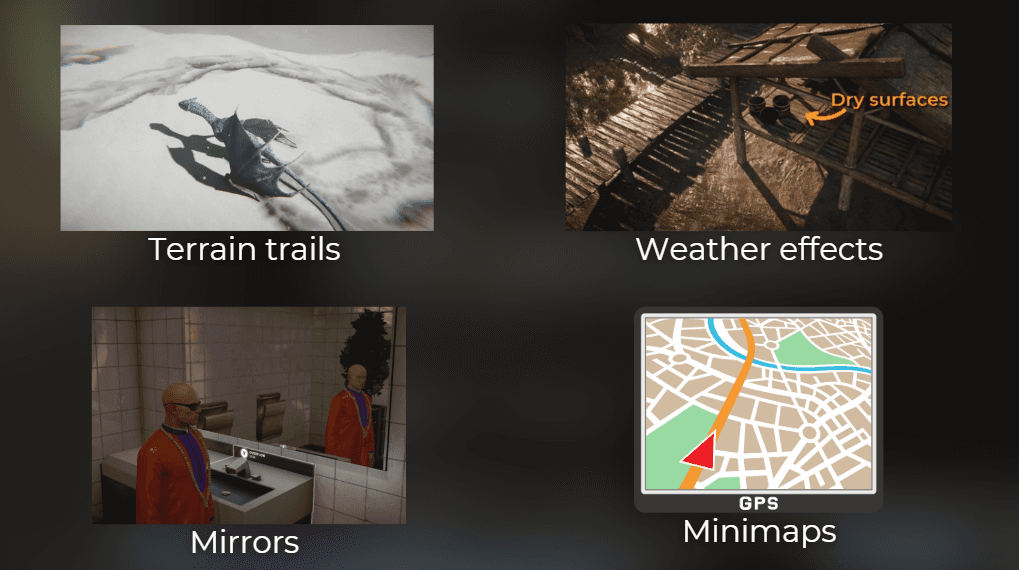
And now, when you see any plugin or asset that uses the Unity's camera to render a specific scenario - you know how to get rid of the whole overhead. This is especially useful if you're stuck with plugins that requires additional camera. For example Microsplat Trax renders depth of a few objects to render trails.
And there are more effects that can utilize additional simplified cameras.
This is one of those optimizations that I really like. Very small scope. Very concrete use case.
Good thing to remember is that general-use features are usually designed to be scalable, not lightweight
You may also like:
Rendering into a texture - the most important tech-art skill
Unless stated otherwise, all code snippets in this article are provided under the MIT License.