Intermediate
Rendering
Tutorial
Tech-Art
The art of debugging the rendering
15 min

Fixing your rendering: The Art of rendering debugging
Debugging the rendering is a complex problem. The GPU is a complex piece of hardware that, unlike the CPU, does not have a thinking brain but has powerful parallel computation capabilities.
Because the CPU must carefully instruct the GPU about the workload, both parts need to be checked for issues.
Here, I explain how I think about debugging rendering issues.
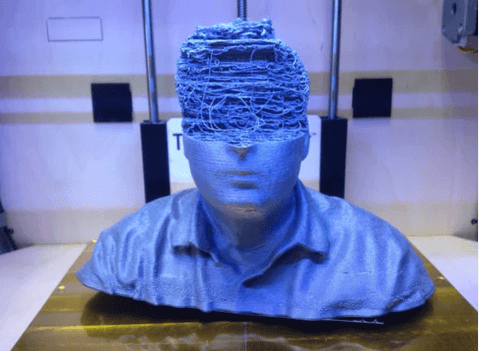
Rendering is like 3D printing
Think of the GPU as a 3D printer and the CPU as its user. Imagine you want to print a small character figure. What would you do?
Assemble the printer - Ensure all parts are assembled, the printer is powered up, and all drivers are up to date.
Bed leveling - depending on the printer, adjust the bed height using the software or some knobs to ensure that the nozzle is at the correct distance.
Prepare the print surface - clean the print bed with isopropyl alcohol to remove dust and oils. Apply any required adhesives.
Slicing the 3D model - open the 3D model in the slicer software and configure print settings. Generate the slices for the printer.
Install a correct printing nozzle - ensure it is selected for a correct printing size, filament, etc.
Load filament - preheat the nozzle, ensuring the correct temperature for your filament. Then insert the filament.
Start the printing - when the bed is set up, cleaned, filament configured, nozzle prepared, and model loaded, printing can start.
Failing at any of the steps above will likely result in an incorrect print. As a user, you are responsible for ensuring all these steps are completed correctly.
GPU works like a printer
The same applies to GPU rendering. The GPU is the printer, and the CPU instructs and configures the GPU to execute each print. Let’s remap the printing analogy to GPU rendering:
Assemble the printer - initialize the rendering API, ensure you can access the GPU driver.
Bed leveling - aka, create render textures, color buffers, depth buffers.
Prepare the print surface - aka, ensure the depth buffers and render textures are correctly cleared before the first draws.
Slicing the 3D model - aka, ensuring the model is ok, all vertices and triangles are properly set, and sent to the GPU. All vertex attributes must be correct.
Install a correct printing nozzle - load the vertex and shader programs.
Load filament - bind the correct textures and buffers that will be used by the shader programs.
Start the printing - execute the draw call.
Notice how many steps are required to make rendering work properly.
When debugging rendering, all of those steps need to be checked!
If you want to get familiar with the graphics pipeline and what happens on the GPU to render a single frame, I can recommend this series of articles by Fabian Geisen:https://fgiesen.wordpress.com/2011/07/09/a-trip-through-the-graphics-pipeline-2011-index/
___
Understand your pipeline
How do you debug rendering if most of this setup is handled by the engine?
Game engines do a lot to prepare instructions for the GPU. It is essential to be familiar with your game's render pipeline and what the engine does to prepare the frame.
By understanding how game engines work, you can pinpoint issues in the project setup based on their symptoms.
Examples:
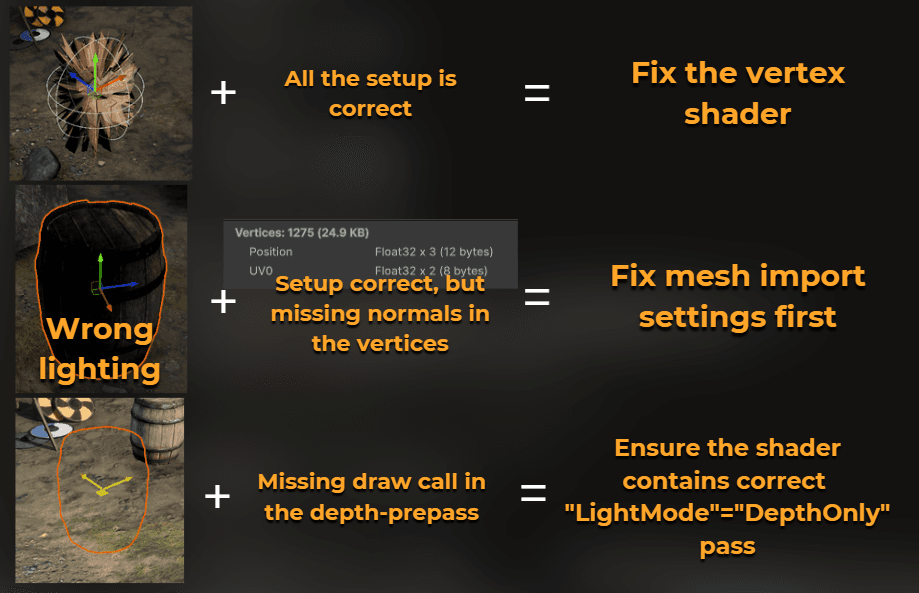
If you notice the wrong texture used by the shader in the debugger, you will know the material setup is wrong.
You may notice that the normals of the model are incorrect, and you need to adjust its import settings.
If the shader runs in the transparent pass instead of the forward pass, you will know the queue setup is wrong. If some of the meshes are not drawn in the shadowmap, then check the renderer shadow render settings or layer settings, also the renderer bounds.
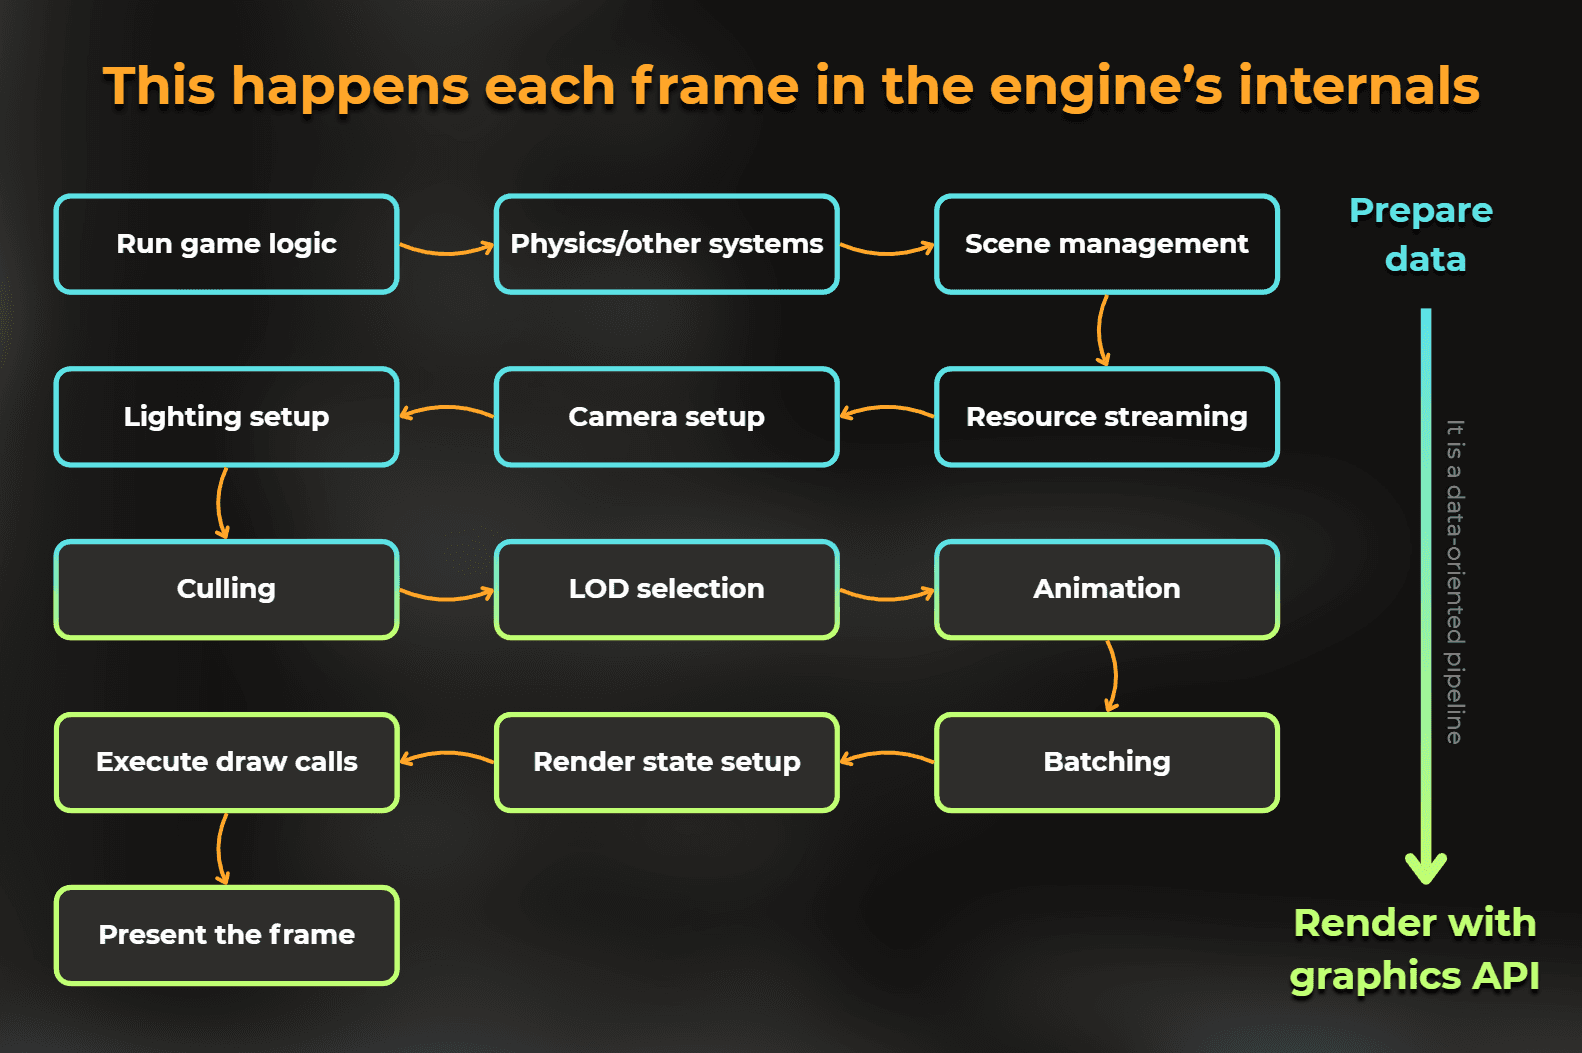
What do you need to understand to debug rendering properly? Here is what the engine does to render a frame. The layout:
Game logic - scripts update the positions of various objects, spawn projectiles, particles, change levels, etc.
Physics and other simulations - some other systems can also affect the state of scene objects, such as a physics engine, affecting the positions of objects and particles.
Scene management - engine updates scene hierarchy and internal spatial data structures to reflect objects’ states (ex., positions) that will be used for the rendering. Bounding boxes, spheres, or object-to-world matrices are updated.
Resource streaming and management - load assets from memory if needed, unload unused assets from memory.
Camera setup - Update the camera’s properties, like the view-projection matrix or culling planes.
Lighting calculation - determine active lights and their parameters. Prepare lighting data to be used on the GPU.
Visibility determination - frustum culling filters the objects that are visible to the camera. Engines create internal structures that store the culling results. Note that for techniques like shadow mapping, culling is also performed from the light’s perspective.
LOD selection - based on distance from the camera and other properties, some objects are swapped. For example, low-resolution meshes are used at far distances. LOD selection can be performed during culling.
Animation - Skeletal and other animations are updated, on-CPU workload is executed, or data for on-GPU animation is prepared.
Draw call preparation - sort and batch objects for efficient rendering, prepare material and shader parameters for each object, prepare vertex buffers, index buffers, and textures for each object/batch.
Render state setup - Set GPU render states (blending, depth testing, face culling, targets etc.), bind necessary shaders and resources.
Execute render passes - execute the render passes in the correct order. Render passes are groups of draw calls with a single goal. For example, the geometry pass renders color and depth buffers, the shadow pass renders scene depth from the light’s perspective, the lighting pass calculates lighting, and the transparency pass renders translucent objects. There is also a postprocess pass and a UI pass.
Present the frame - send the rendered frame to the screen.
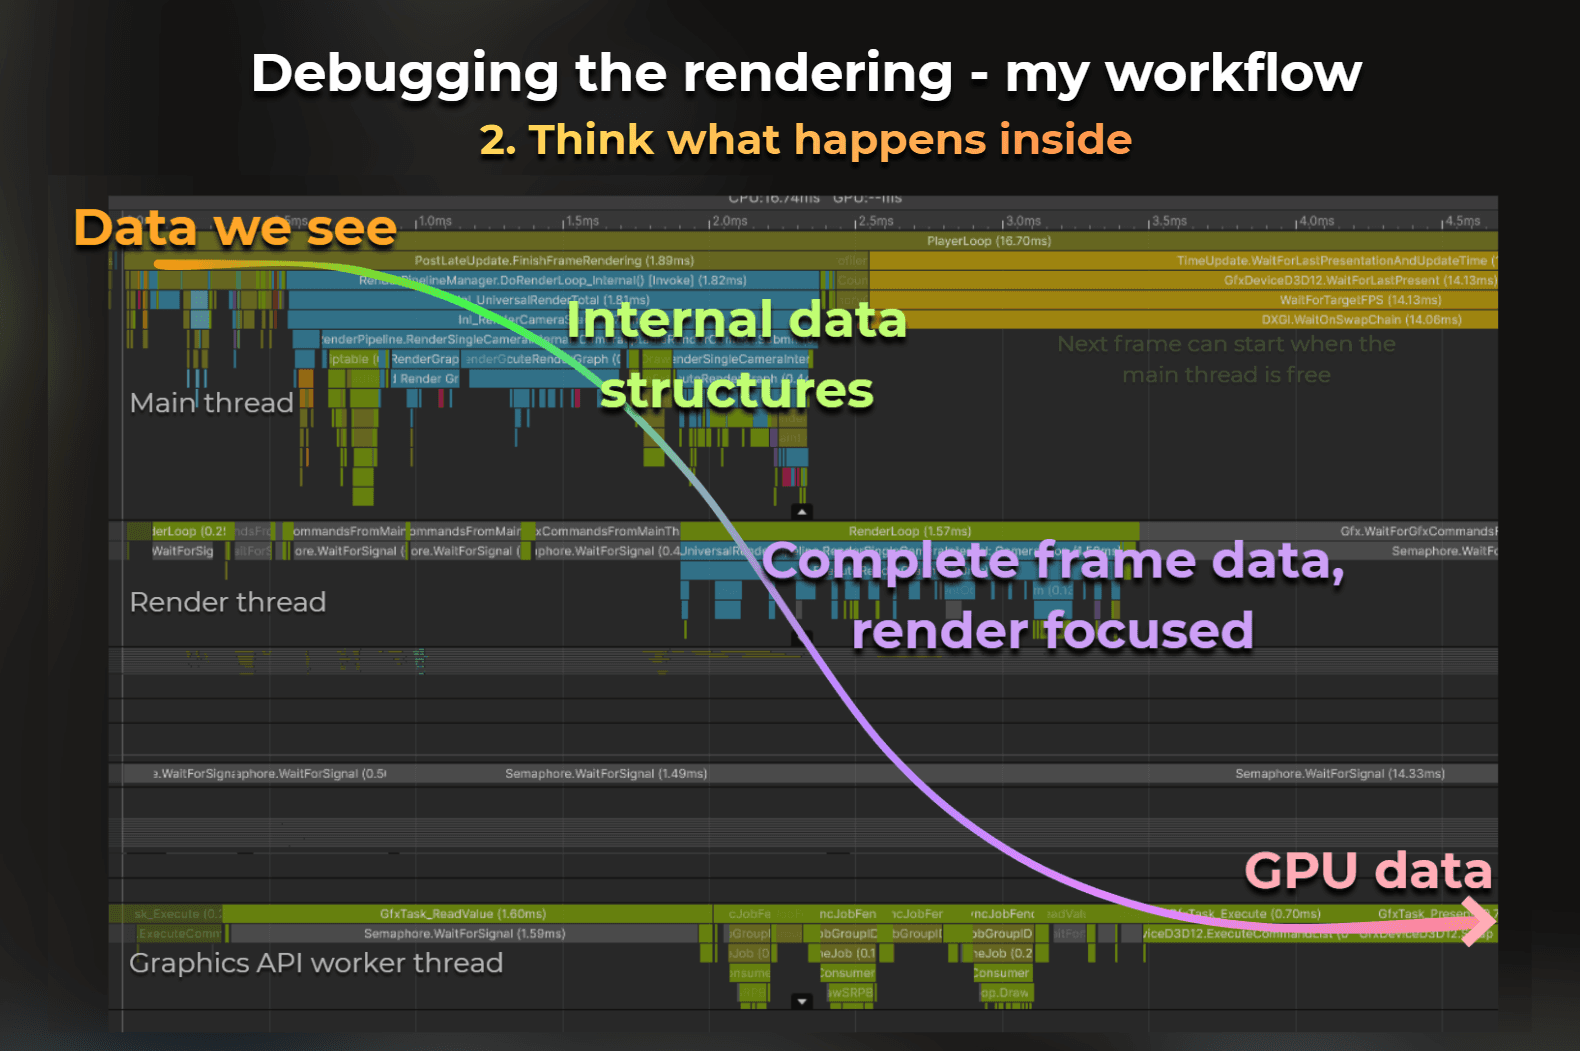
Ok, this was a high-level layout of the engine internals. It is important to understand when this happens and how. This is an example of one of the frames I captured with Unity’s profiler:
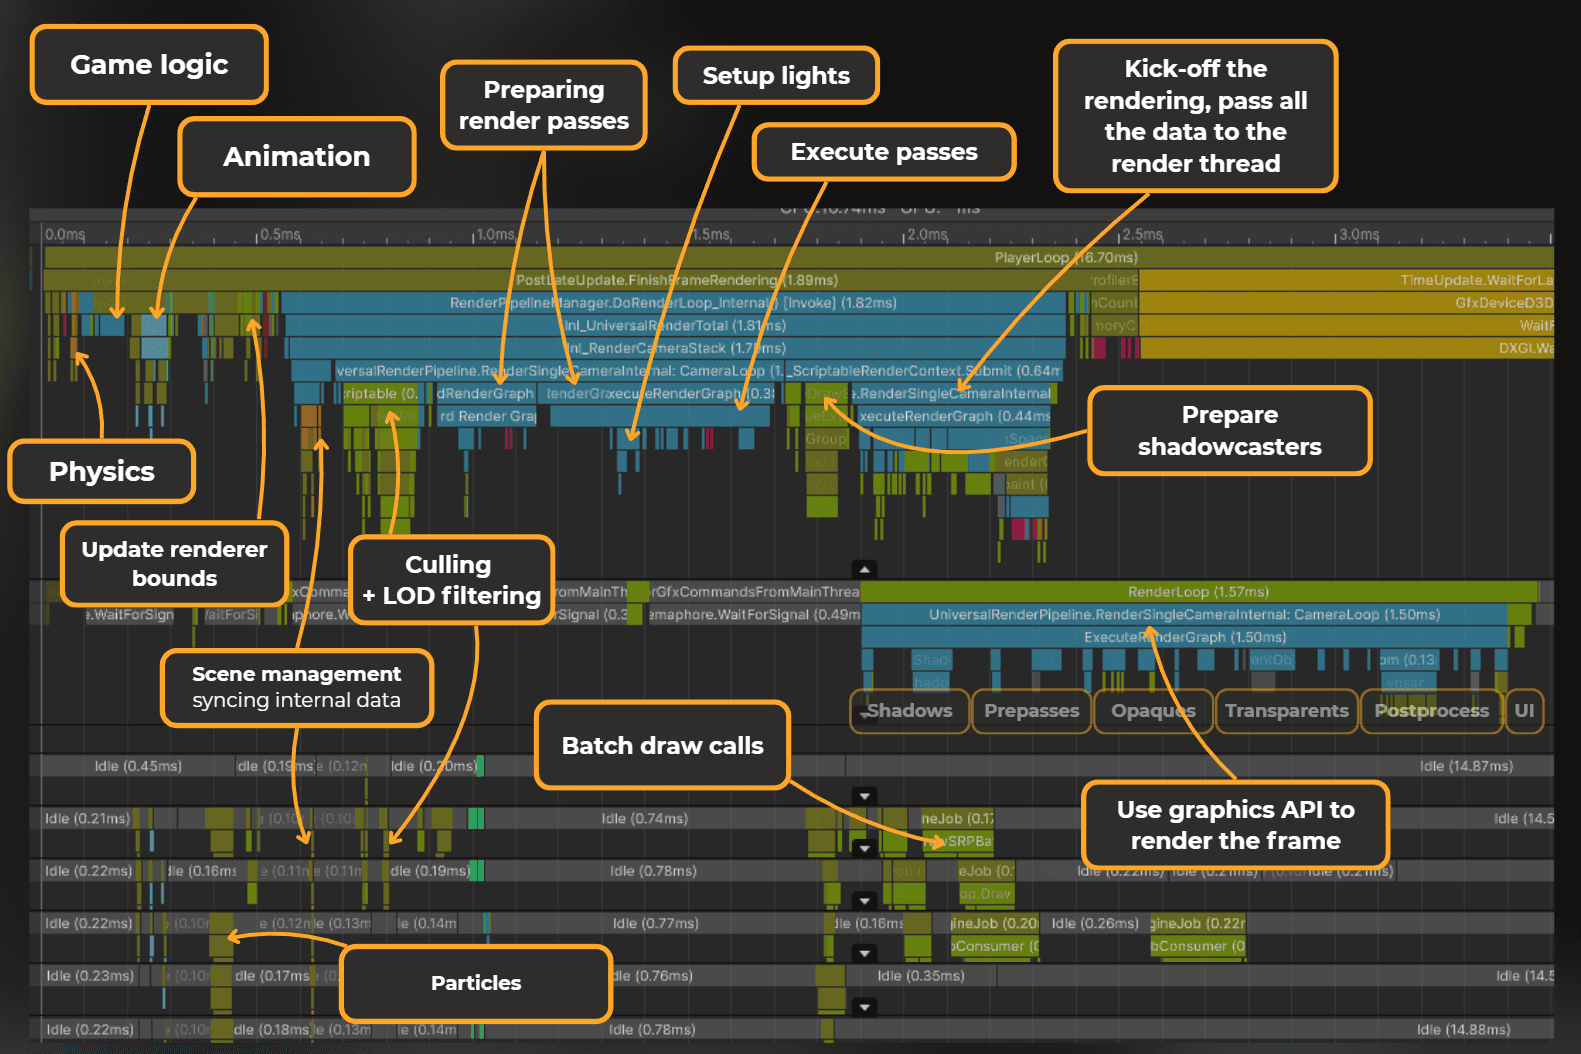
Notice the data flow. The frame starts with what we see in the project. But it quickly jumps into engine internals, being processed by the culling, preparing passes, lights. Then the frame data is passed to another thread - render thread - for communication with the GPU.
The last step here, on the data path, is what we observe using the GPU profilers.
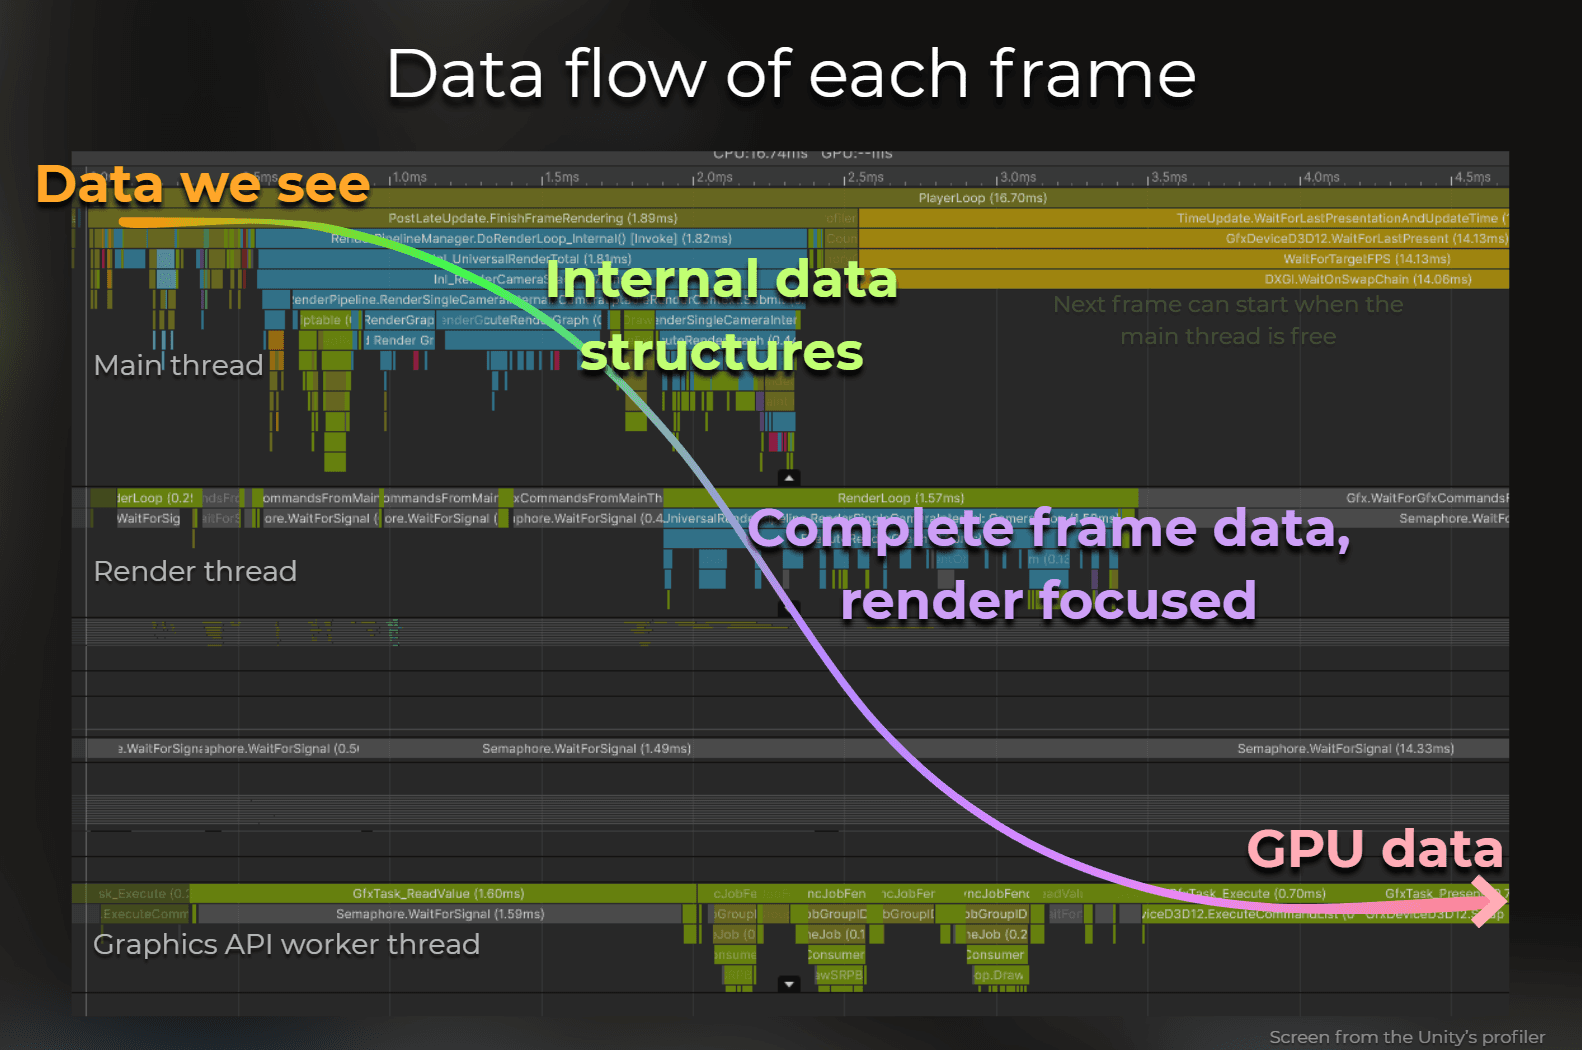
So, debugging the rendering issues is an inverse process. I examine the GPU data, reason out what happens in the engine internals, and then decide what to do in the project.

This was a high-level idea, let’s jump into the practice.
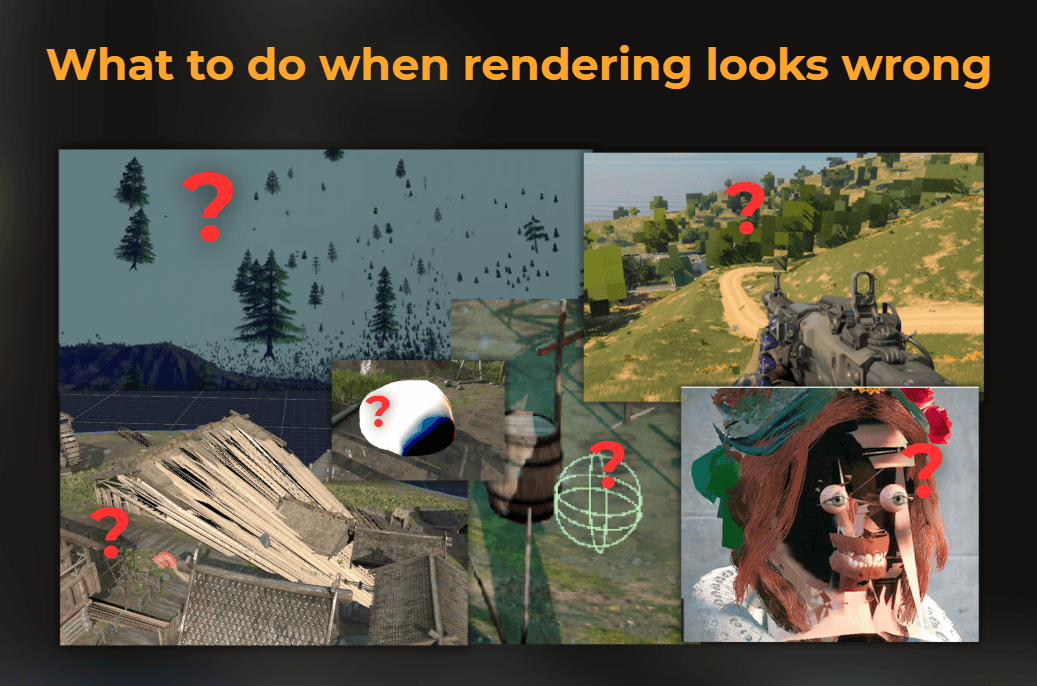
What to do when the rendering looks wrong?
Based on the printer analogy, if something does not look correct, I check all the GPU drawing setup. I use the graphics debugger and check the in-engine setup first. I try to understand what is happening underneath and adjust the project first. I avoid assuming the problem is only in the shader.
So, I connect the GPU debugger and see what the GPU state is and how the graphics API was used.
Then, I interpret what I saw based on my knowledge of the engine internals. I think what went wrong and where. When I have a hypothesis, I try to test it.
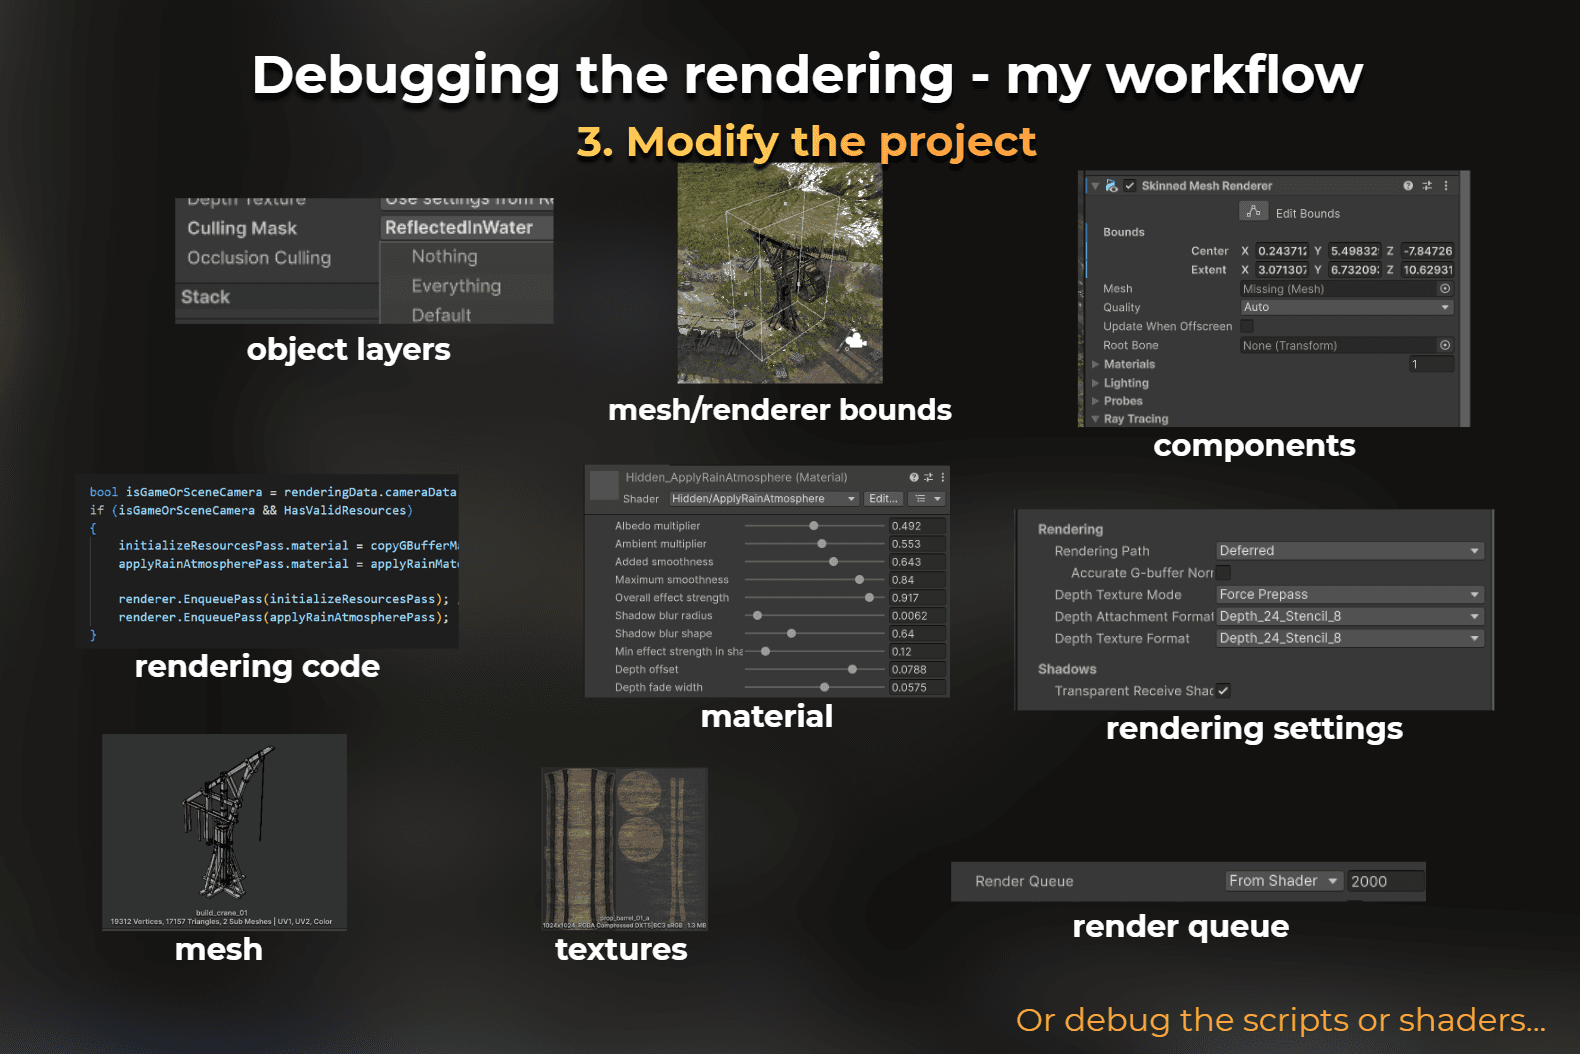
So, suspecting where the problem lies, I start experimenting with the project. Issues with the mesh properties can lead me to the model import settings or the model itself. When something disappears at the edge of the screen, I may inspect the renderer bounds. etc.
The idea is to quickly modify the project, use the debugger, modify the project, use debugger... over and over again, as long as I didn’t ensure my hypothesis is good.
What tools do I use?
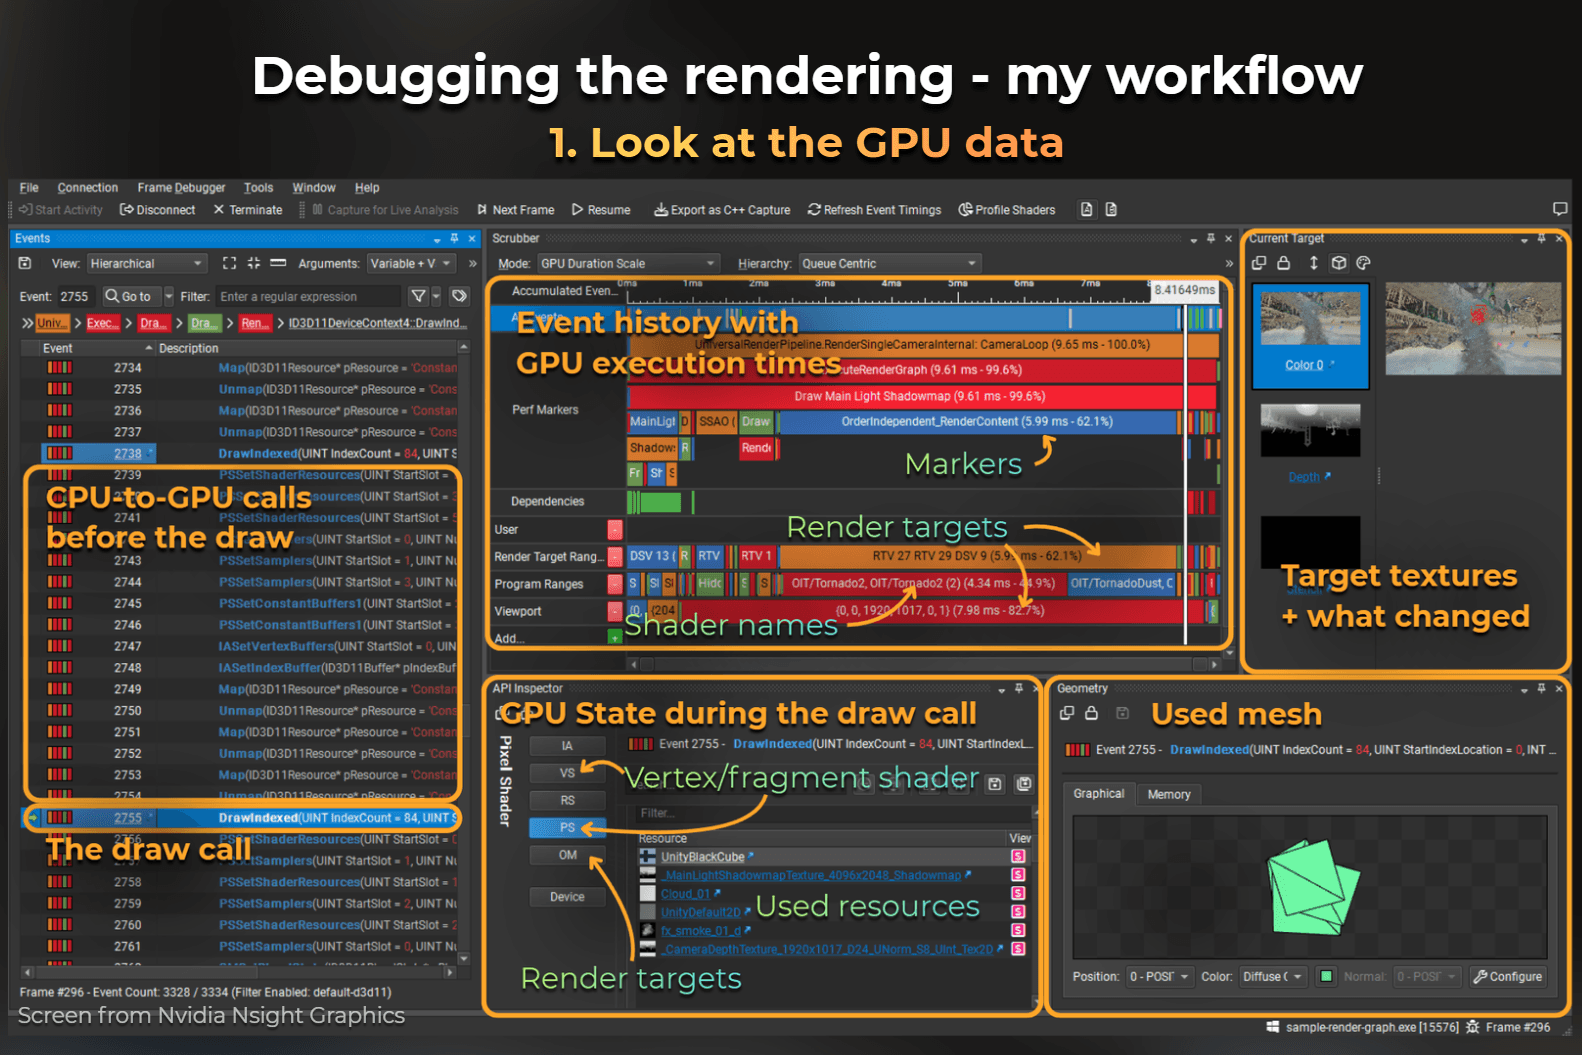
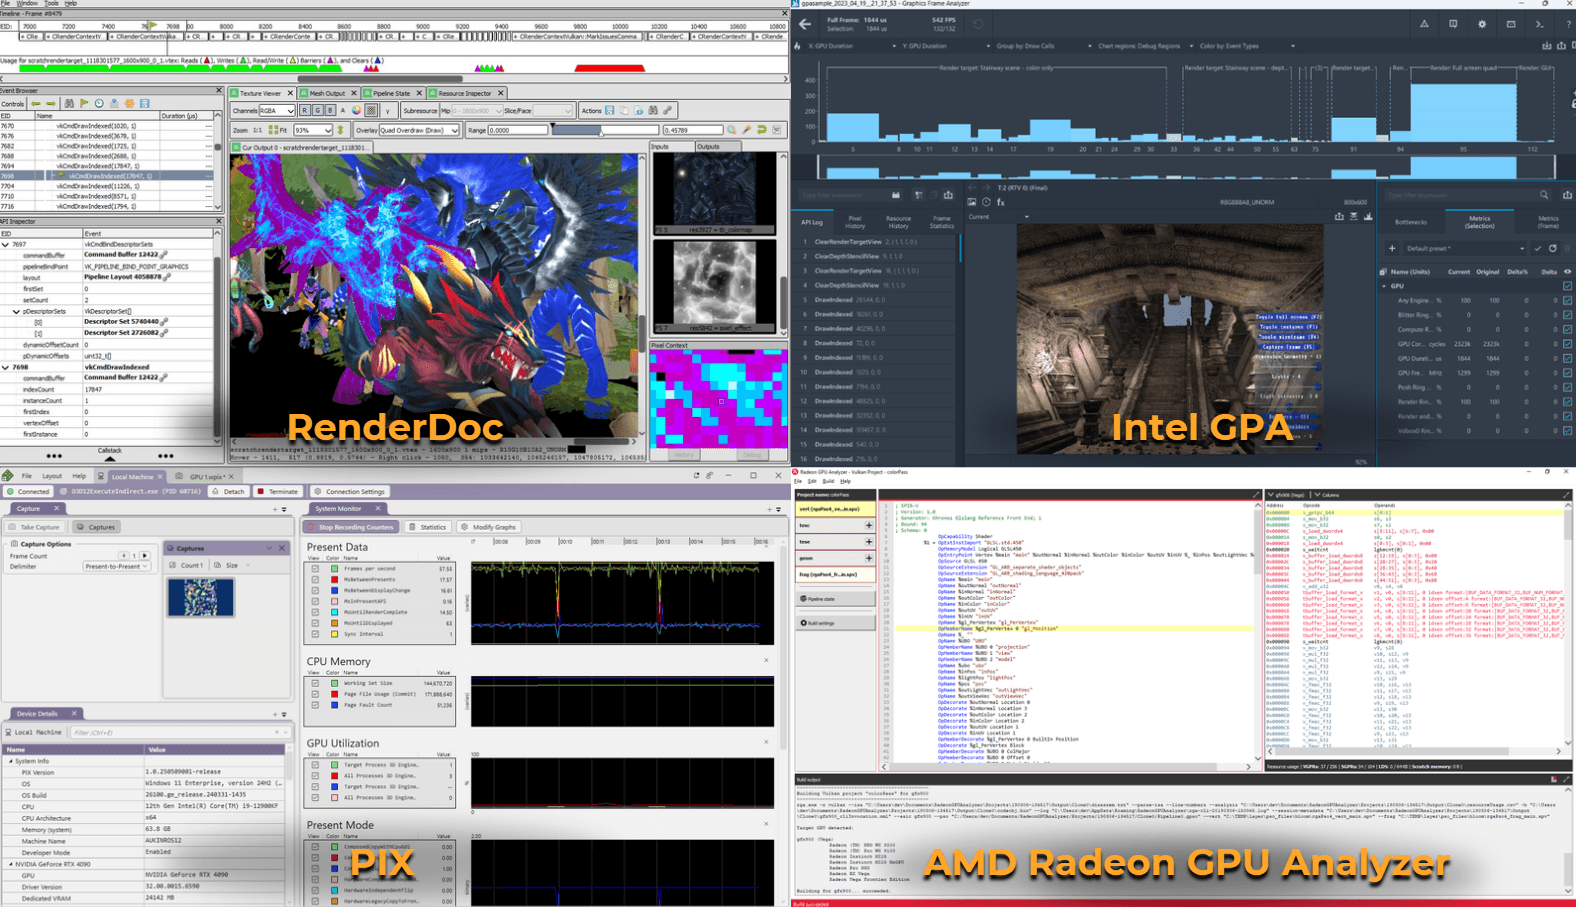
I usually use the GPU debugger provided by the GPU vendor. Usually, it is Nvidia Nsight Graphics.
I build the game or connect the Nsight Graphics directly to the Unity editor with the Frame Debugger feature. The Nsight Graphics allows me to analyze a single rendered frame.
This is Nvidia’s frame debugger. It takes some time to get familiar with its features.
However, there are also different tools:
When I optimize for low-end, like mobile, I like to use integrated Intel GPUs - I use Intel GPA.
RenderDoc when working with Android.
XCode GPU Frame capture for iOS and macOS.
I could also recommend PIX, which works for most of the GPUs on Windows and Xbox.
There is also AMD Radeon Developer Tool Suite - for AMD GPUs. However, I have Nvidia GPU installed, so I don’t have experience with this one.
Unity Frame Debugger is fine for looking at shader properties and in-engine batching. It sometimes struggles to show all the data.
When working with consoles, look at the tools in the SDK.
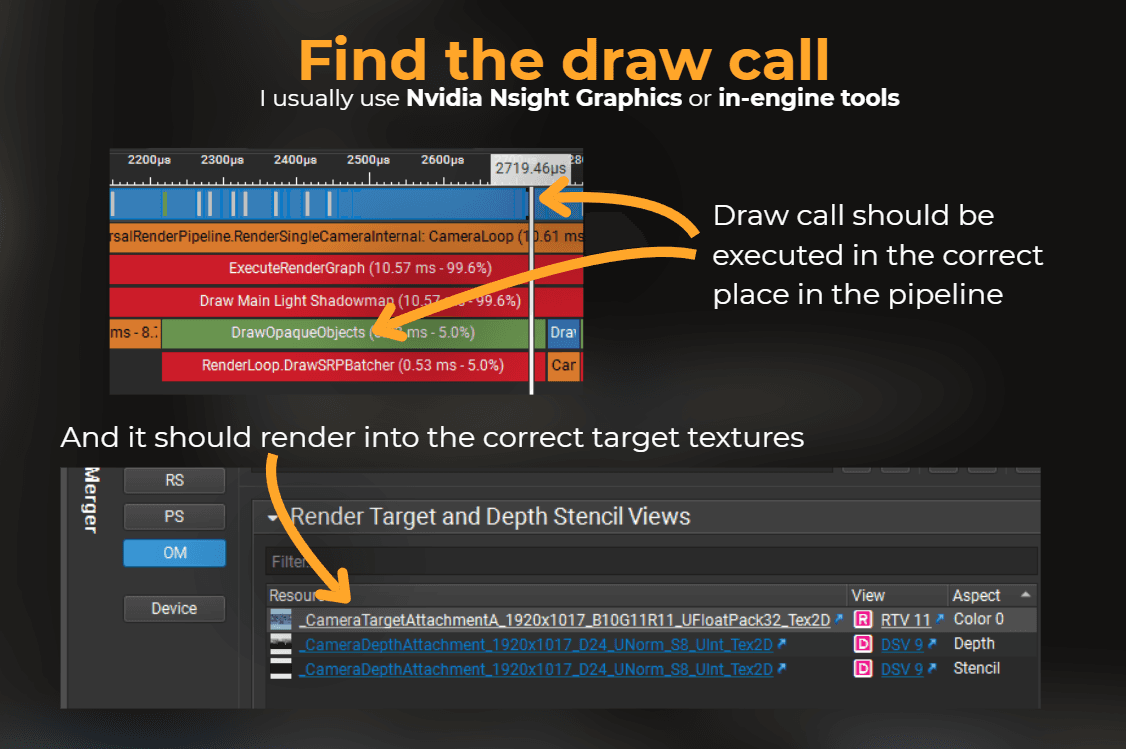
Find the draw call
I usually start by identifying the draw call that is causing the issue. I usually browse through the GPU events and search for a GPU state specific to the draw call.
So I want to see a correct mesh, shader program, used textures, and target textures. Some of that needs to match.
Of course. If the rendering work is incorrect, some of it may not be correct, but identifying the correct place in the pipeline where the draw call should be is crucial.
At this point, you may notice that parts of the draw call setup are incorrect.
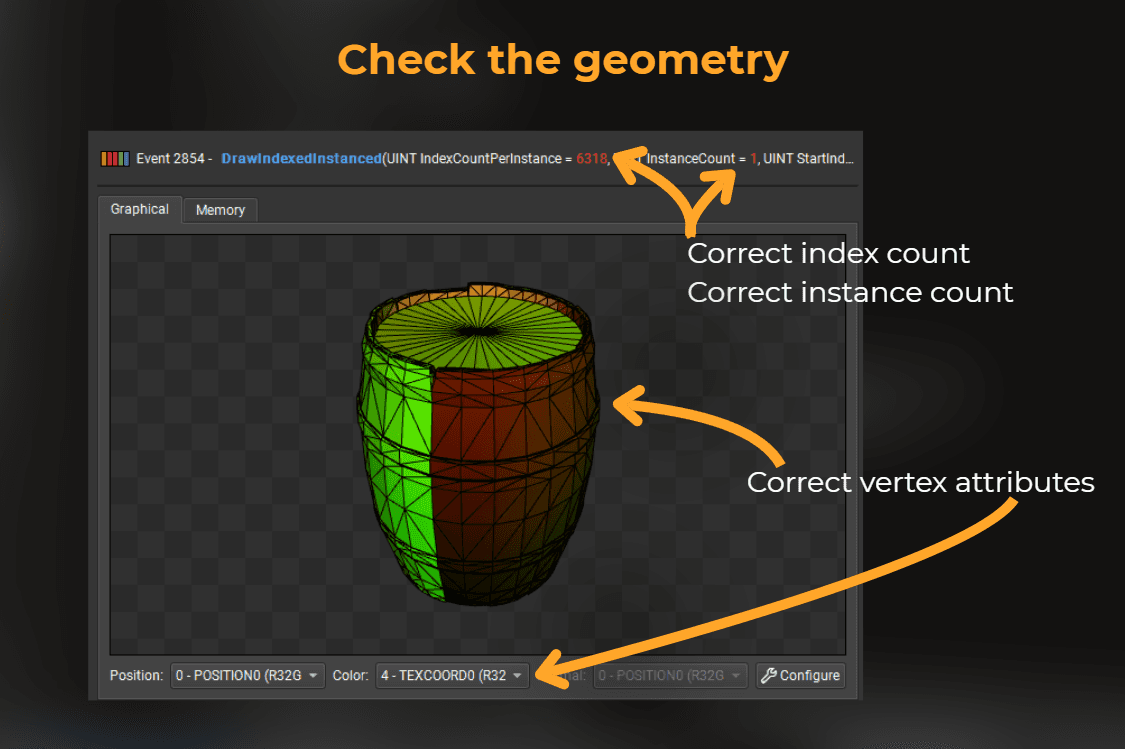
Check the geometry
Now, after I know that I look at the correct draw call, I check the full setup. Usually, I check if the geometry is correct.
So, I check if the vertices contain all the attributes required and if the draw call was executed for the correct index count of the model and also for the correct instance count.
Usually, if something is wrong here, it’s a matter of selecting a correct mesh in the renderer or modifying the mesh import settings. Sometimes the model itself has some defects - in this case, I would use a modelling software to fix that.
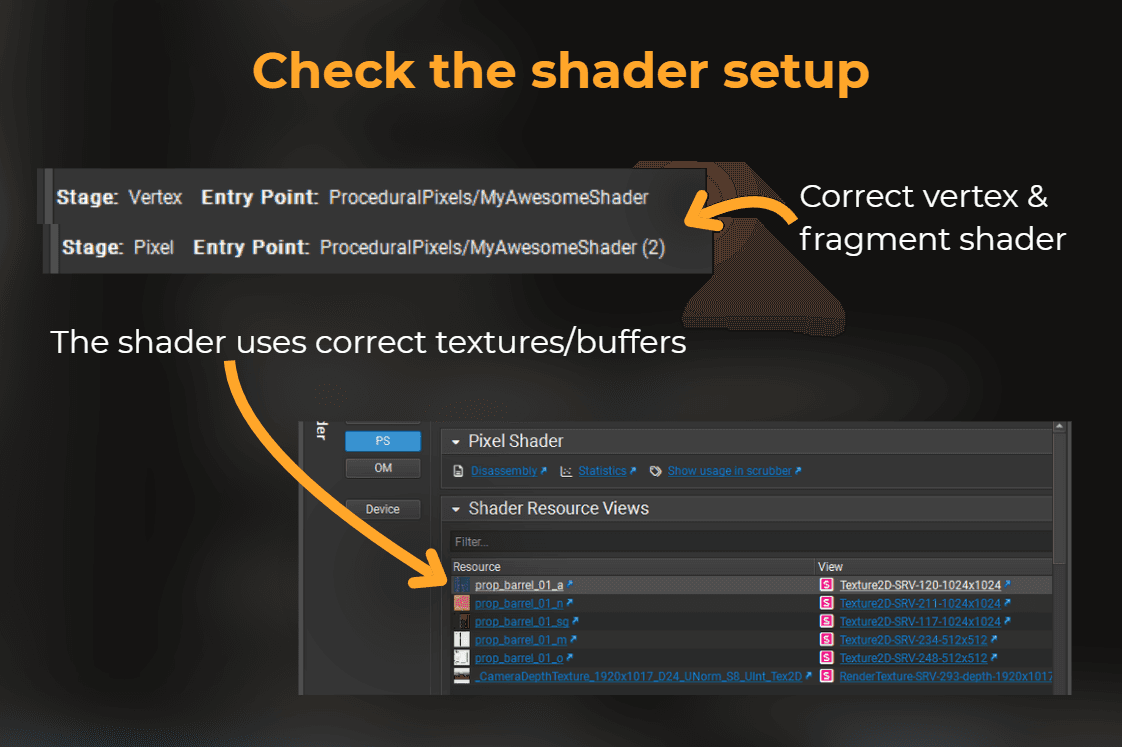
Check the used shader
I use the API inspector and the shader disassembly to check if the draw call was executed with a correct shader.
Usually, the use of incorrect shaders or textures signals an incorrect material setup.
Check the depth testing and blending
I want to ensure that the depth testing and color blending are correct for the render pass. Therefore, transparent objects should use alpha blending, or additive or multiply blending, while opaque objects should have blending disabled.
Depth tests should also be correctly set, usually for LEqual to ensure that objects closer to the camera are prioritized. Also, transparent objects should usually have depth write disabled.
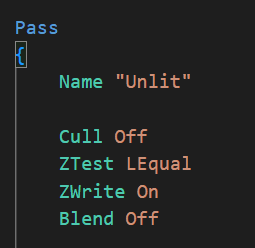
In Unity, errors in depth and error setup usually are a sign of an incorrect pass setup in the shader file.
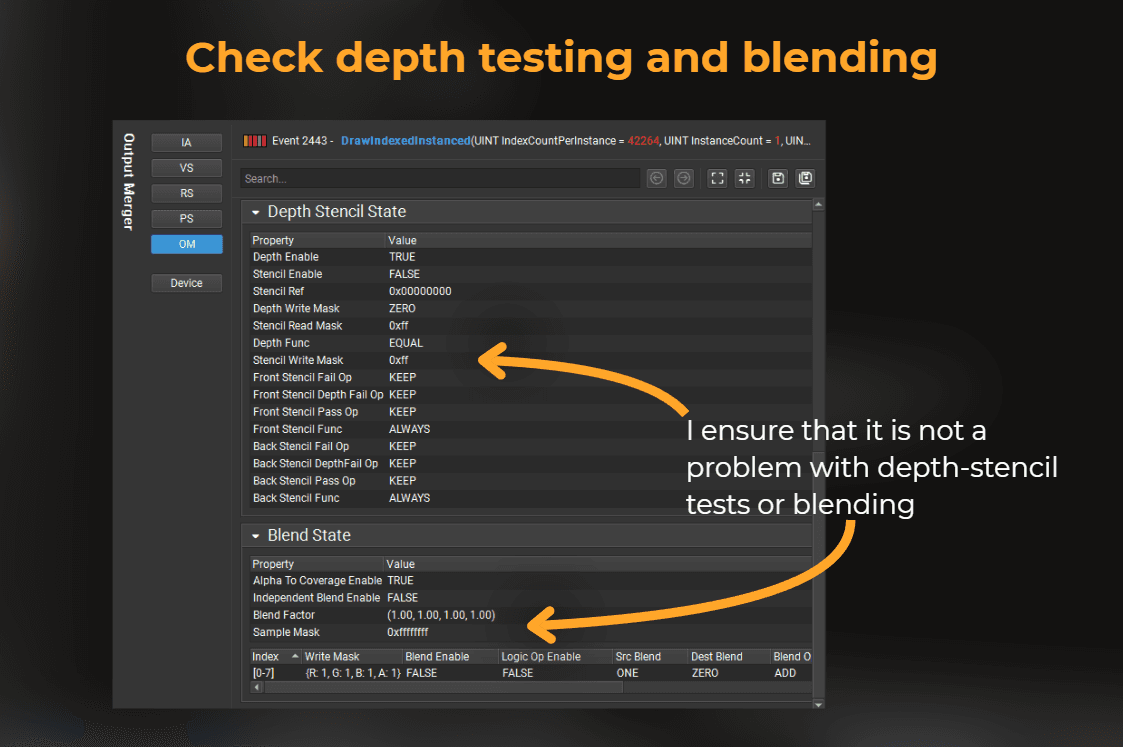
So check this part of a shader file if something looks off.
:center-px:
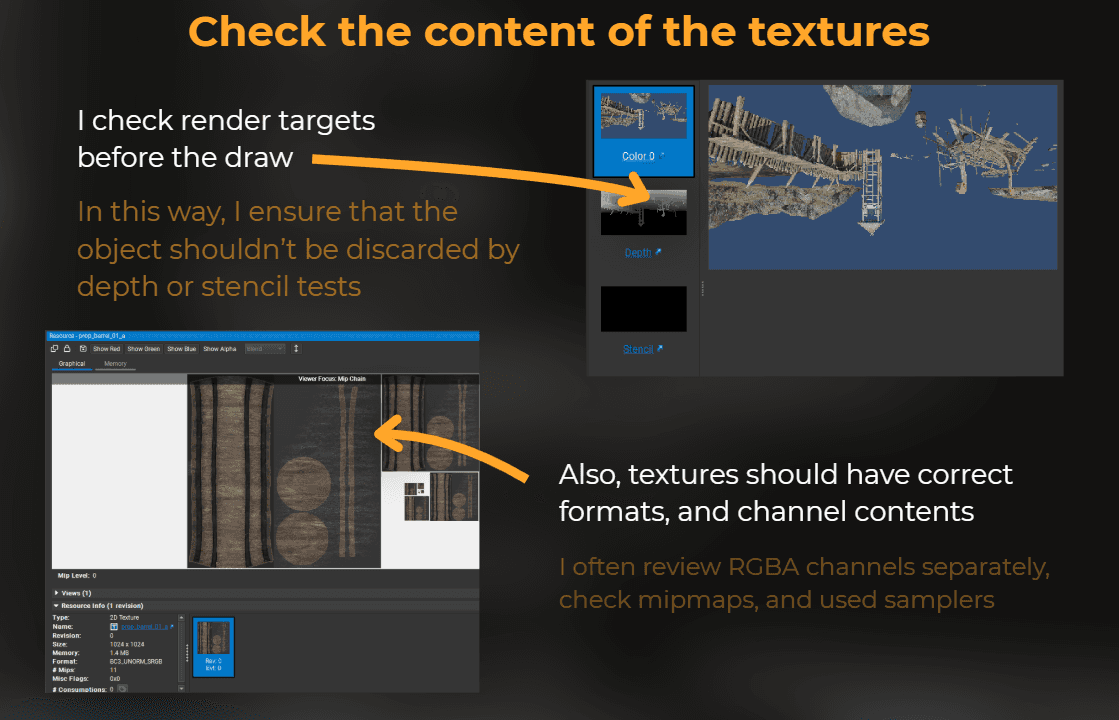
Check the content of the textures
I also check the content of the render targets before the draw to ensure that the object is not discarded due to the depth testing or color blending, because of invalid target texture contents.
If target textures look wrong, the issue isn’t in the current draw call, but in what happens in the frame before.
Then I look at the contents of the textures used by the current draw.
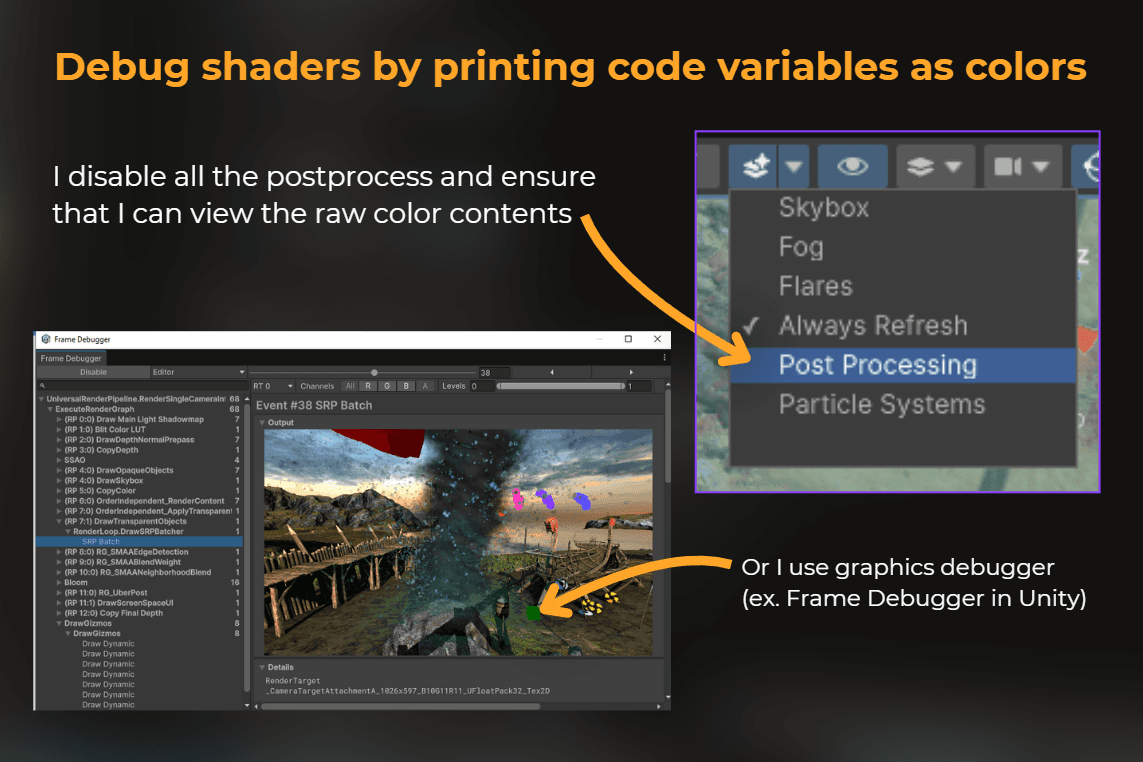
Debug the shaders
If I’m sure that all the setup in the project is fine, I start to debug the shaders.
And this is where the fun starts. I usually debug the shaders by printing the color values to the screen.
The rule is that the screen can print values in the 0-1 range. Everything below 0 and above 1 is clipped. So to ensure that I see the correct range, I disable all the postprocesses or use a graphics debugger.
This is an example of printing a world position on the screen. XYZ components as RGB colors. Notice that most of the positions in world space are outside of 0-1 range, so usually it saturates the color quickly.
To properly interpret this position, I usually use a frac function that returns a fractional part of the number. But there are many other tricks I do to interpret the values. Those are some of them.
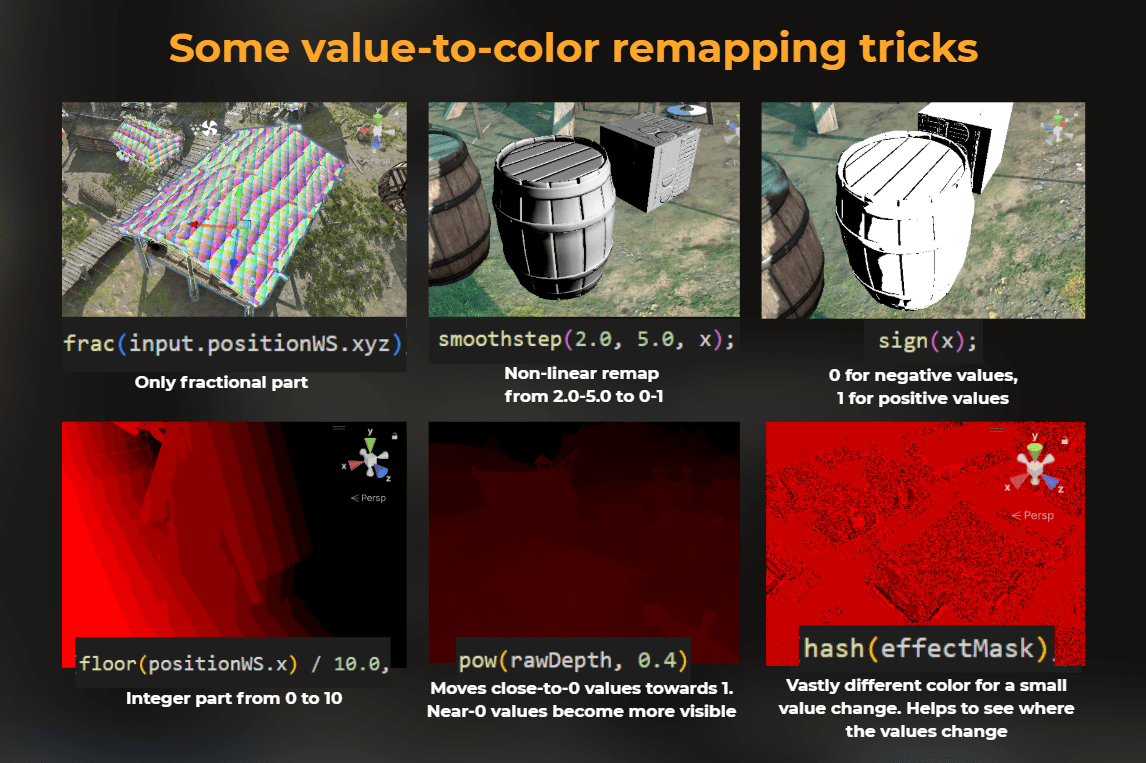
It takes some time to get familiar with this debugging method. The key is to experiment a lot with the remapping techniques to understand what is happening with high confidence.
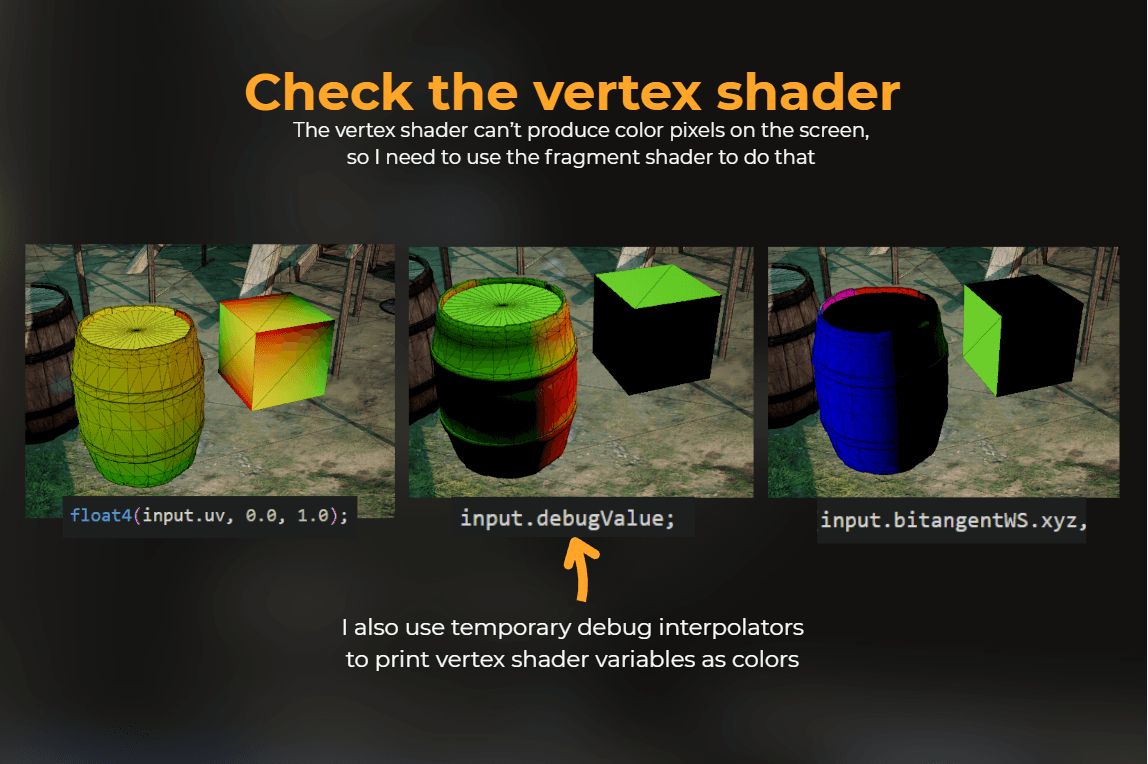
Start by debugging the vertex shader
I usually start by ensuring that the vertex shader works fine. It means that all the positions produced by the vertex shader are correct and all the interpolators that are passed to the fragment shader are correct.
However, the vertex shader can’t output colors to the screen, so I use the fragment shader to debug it.
I start by printing a fixed color to the screen and ensure that it is in the correct place and that depth testing works correctly.

Then I print interpolators or use a debug interpolator, created just for debugging purposes.
Debug the fragment shader
After I know that the vertex shader is ok, I debug the fragment shader the same way - by printing the variables from the shader code.

___
Summary
Debugging rendering is complex because the GPU, unlike the CPU, requires careful setup and coordination to work correctly. I use the analogy of 3D printing: just as a printer needs to be properly assembled, leveled, and loaded before printing, the GPU needs each step of the graphics pipeline set up and validated. If any part of the process is wrong - be it model data, textures, or shaders - the output will be incorrect.
To debug rendering, I systematically check every stage: initialization, buffer preparation, model import, shader and material setup, draw call execution, and the state of render targets. I rely on GPU debuggers like Nvidia Nsight Graphics, Intel GPA, RenderDoc, and Unity’s Frame Debugger to inspect frames and identify issues. I start by finding the problematic draw call, then verify geometry, shader assignments, blending, depth tests, and texture contents. Only after confirming the pipeline setup do I debug actual shader code, typically by outputting values to the screen for analysis.
The key is to understand both your engine’s render pipeline and the GPU’s workflow, check everything from asset import to frame presentation, and use the right tools to isolate problems. Don’t assume the issue is always in the shader - often, it’s a misconfiguration elsewhere in the pipeline.
___
Additional resources
If you want to get familiar with the graphics pipeline and what happens on the GPU to render a single frame, I can recommend this series of articles by Fabian Geisen:https://fgiesen.wordpress.com/2011/07/09/a-trip-through-the-graphics-pipeline-2011-index/
And here are the links for the tools:
Nvidia Nsight Graphics - currently my favourite tool for GPU debugging.
https://developer.nvidia.com/nsight-graphics
RenderDoc
AMD Radeon™ Developer Tool Suite
XCode GPU Frame Capture
https://developer.apple.com/documentation/xcode/capturing-a-metal-workload-in-xcode
PIX on Windows